OpenLM Applications Manager configuration
OpenLM Applications Manager is a Java application that monitors and controls the use of any software in the organization regardless of the licensing scheme in effect. This document details the steps on how to configure the OpenLM Applications Manager.
The main features of the Applications Manager are as follows:
- Obtains information from the OpenLM WorkstationAgent regarding active processes and software launches on the end-user workstation
- Enables OpenLM Workstation Agents to launch software according to specific rules and configurations
The Applications Manager interacts with the OpenLM Workstation Agent which is a lightweight component that is installed on the end-users' workstations. It has the following features:
- Monitors processes that are running on the workstation
- Intercepts and reports software launch events
- Intervenes in the execution of specific processes on the workstation by running actions as defined by an administrator
The Applications Manager also adds management capabilities to applications that are not managed by a license manager or in cases where the license manager lacks advanced management capabilities.
In situations where workstation licenses cannot be managed directly by a license manager (e.g., single licenses or named licenses), the OpenLM Applications Manager provides the ability to monitor software usage. This permits OpenLM to simultaneously monitor software controlled by a license manager along with software that supports stand-alone licenses.
Installing required OpenLM components
The following components are mandatory for the functioning of OpenLM Applications Manager:
- OpenLM SLM which provides an administrative interface (EasyAdmin) to configure OpenLM Applications Manager and its related components, maintains license usage information in the database and provides a platform for reporting license usage. Please see the OpenLM SLM Installation Guide for more installation information.
- OpenLM Workstation Agent must be installed on all end-user workstations that will be monitored. The Agent is an end-user proxy that monitors software activity on a user's workstation. Please see the OpenLM Workstation Agent Installation guide for more installation information.
- OpenLM Broker and **OpenLM Applications Manager -**must both be installed on the same Windows OS or Linux machine. OpenLM Broker performs tasks as prompted by the OpenLM SLM and returns advanced licensing information from the license managers.
Configuring OpenLM Workstation Agent
- Make sure the OpenLM Applications Manager is installed before configuring the Workstation Agent. Consult the OpenLM Applications Manager installation document for detailed instructions on installation.
- Download and install the latest Workstation Agent version from theOpenLM website.
Configuring OpenLM Applications Manager
Before proceeding with configuration, make sure that the Applications Manager has been detected and configured in OpenLM Broker's settings. The Broker in turn should be connected and reporting to an installation of OpenLM SLM.
The following section describes the configuration options and features of the OpenLM Applications Manager.
Adding an application to OpenLM Applications Manager
Applications can be added to the Applications Manager either manually through EasyAdmin's user interface window The following steps describe how to add an application to the OpenLM Applications Manager using EasyAdmin User Interface:
-
Open the OpenLM EasyAdmin User Interface (Windows Start → OpenLM → OpenLM EasyAdmin User Interface):
-
Select the Administrationoption from the EasyAdmin Start Menu:
-
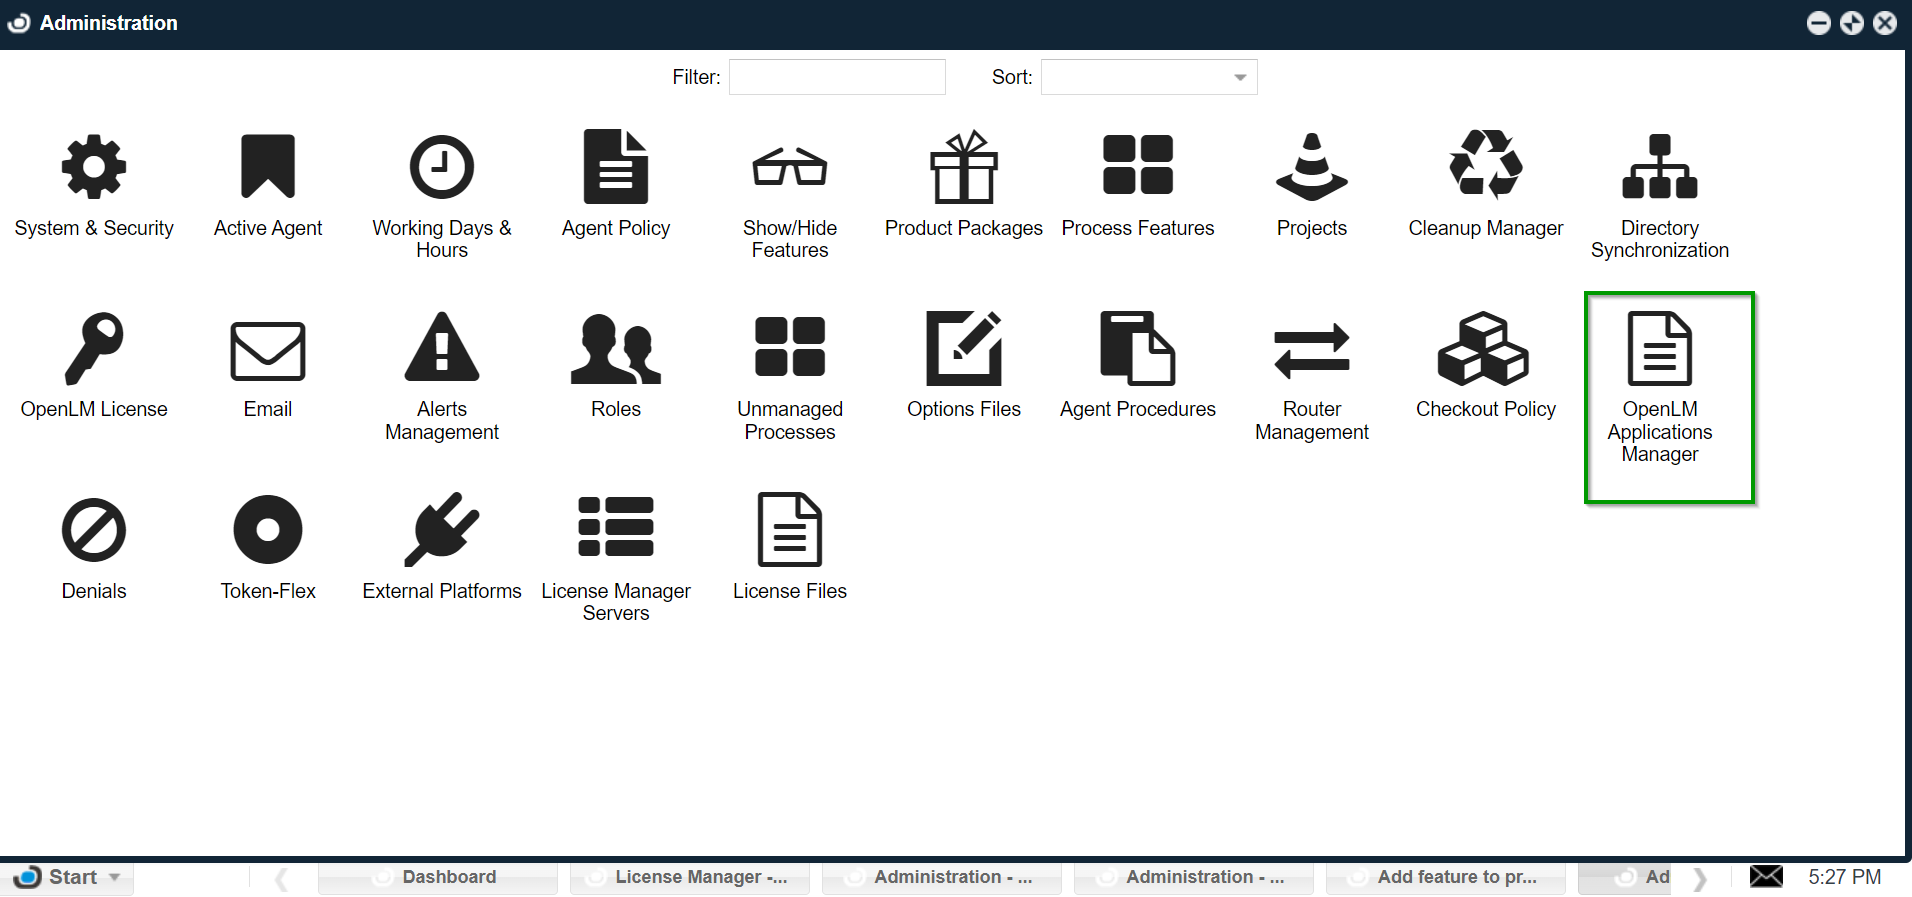
Click on OpenLM Applications Manager:
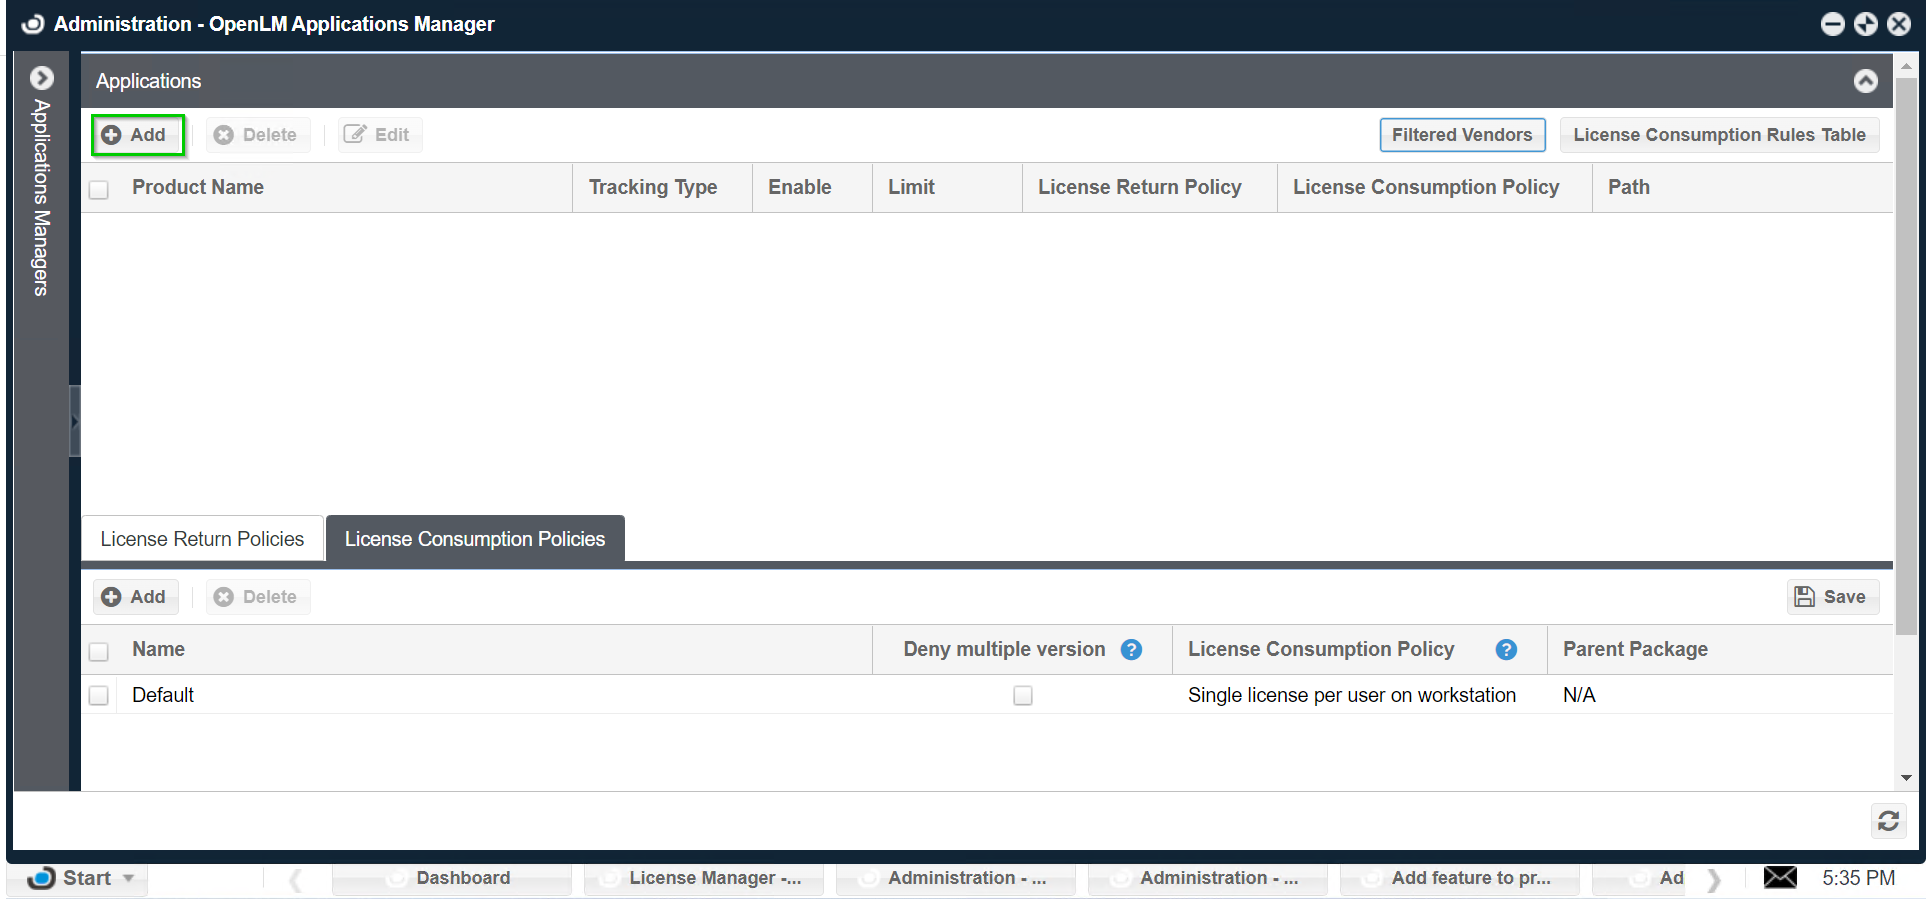
- In the opened Applications window, click the Addbutton:
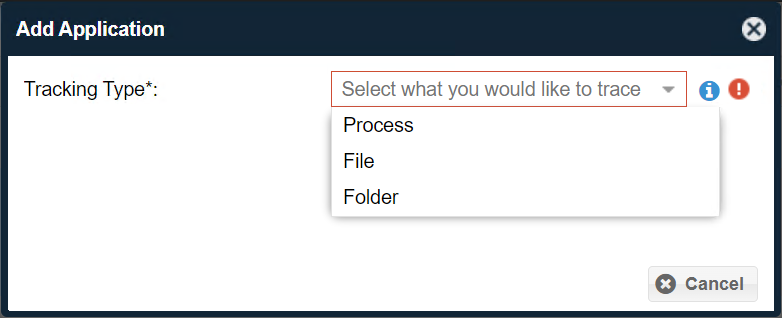
- Select the Tracking Type from the drop-down menu depending on what you want to track: Process, File, orFolder.
- Process - this tracks the application using its process name. Most often, this is the same name as the executable without the *.exe extension. To determine the process name of the application you want to track, start the application, open Windows Start → Task Manager, then locate the name of the process associated with your application.
- File - this tracks the application by monitoring the launch of a specific executable file. Similar to the Process tracking type.
- Folder - this tracks the application by monitoring all executable file launches in a folder.
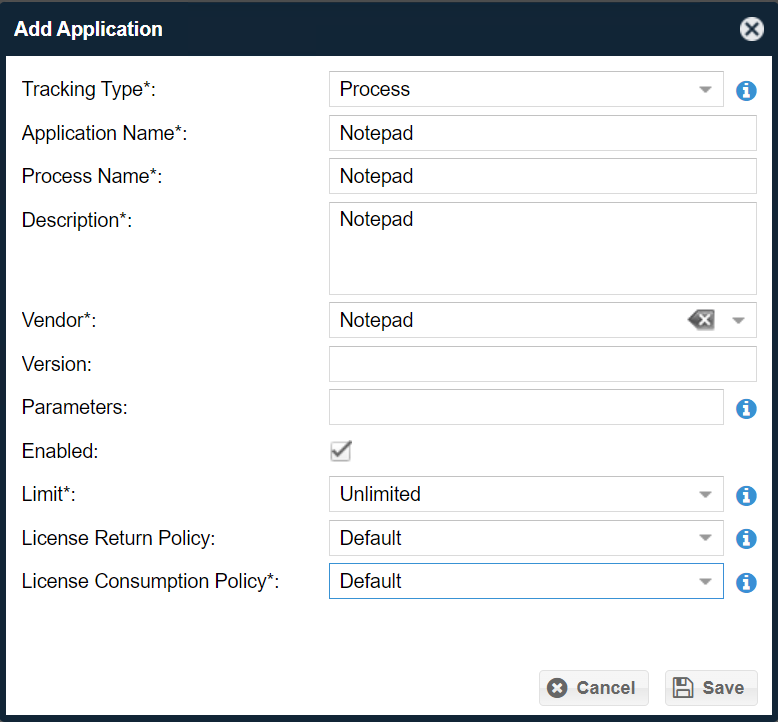
- Fill in the text fields as follows. Fields marked with an asterisk are mandatory:
Application Name* - a unique name for the application you will be tracking
Process Name* - this should match the name of the application process.
File Path* / Folder Path* - if you've selected the "File" or "Folder" tracking type, enter the full path of the file or folder you want to track
Description* - Enter a description to help you recall what a certain process, file or folder does
Vendor* - Select the vendor related to the application from the drop-down list or enter your own
Version - Enter a version number to help you identify an application and manage to track of multiple versions
Parameters - Enter the parameters that were used to launch the tracked application. Used for applications that have the same process name but offer different features depending on what arguments/parameters are used to launch the executable
Enabled - Check whether to enable/disable tracking for this application
Limit* - Specify the number of concurrent instances allowed per application. "Unlimited" by default. Set to 0 to block all instances from launching.
License Return Policy - The license return policy is a collection of definitions that specify when OpenLM releases a license back to the pool.
License Consumption Policy* - The license consumption policy specifies certain rules for how an application is to be used, including whether to deny multiple version launches and how to count multiple licensing use
- Click "Save" to add a new application.
Editing an existing application configuration
To edit an already configured application configuration, you must select the row of the application and then either click on "Edit" in the Applications Manager window or double-click the corresponding row. The configuration settings are the same as in section 3.1 when adding an application.
Using the "Filtered Vendors" functionality
TheFiltered Vendors button allows administrators to prevent double usage reporting when monitoring software that has both floating and non-floating licensing options.
There may be cases when the software on a user's machine connects to a license manager (e.g. FlexLM) but also has the capability of running using a stand-alone license (e.g. a single-use registration key). Under regular circumstances, if the application is monitored by both the license manager (through OpenLM Broker/SLM) and the OpenLM Applications Manager, launching the application would mean that usage is reported in both places. The "Filtered Vendors" function ensures this doesn't happen so that the Applications Manager only reports stand-alone license usage.
The term "stand-alone license" refers to any of the following:
- Any single-use software installation (that uses a registration key or local license)
- Any node-locked licenses that are not reported by a license manager
- Any named licenses allocated by cloud managers but aren't monitored anywhere
- Any pirated software installed without the system administrator's consent
- Any network licenses that are not supported by the OpenLM SLM
Known limitations
- Our solution is based on the assumption that the monitored software is using either a network license or a stand-alone license for the same user on the same workstation.
- Software that has both types of licenses will be considered by the Applications Manager as a network license. As a result, sessions from stand-alone licenses will not be reported.
- When a user switches the licensing method on a workstation (either from network to stand-alone or vice versa), there may be a margin of error for which usage will be erroneously reported.
- Vendor filtering does not distinguish between different applications which use the same vendor name. If you want to filter sessions for applications with the same vendor, we recommend assigning a different vendor name for each application.
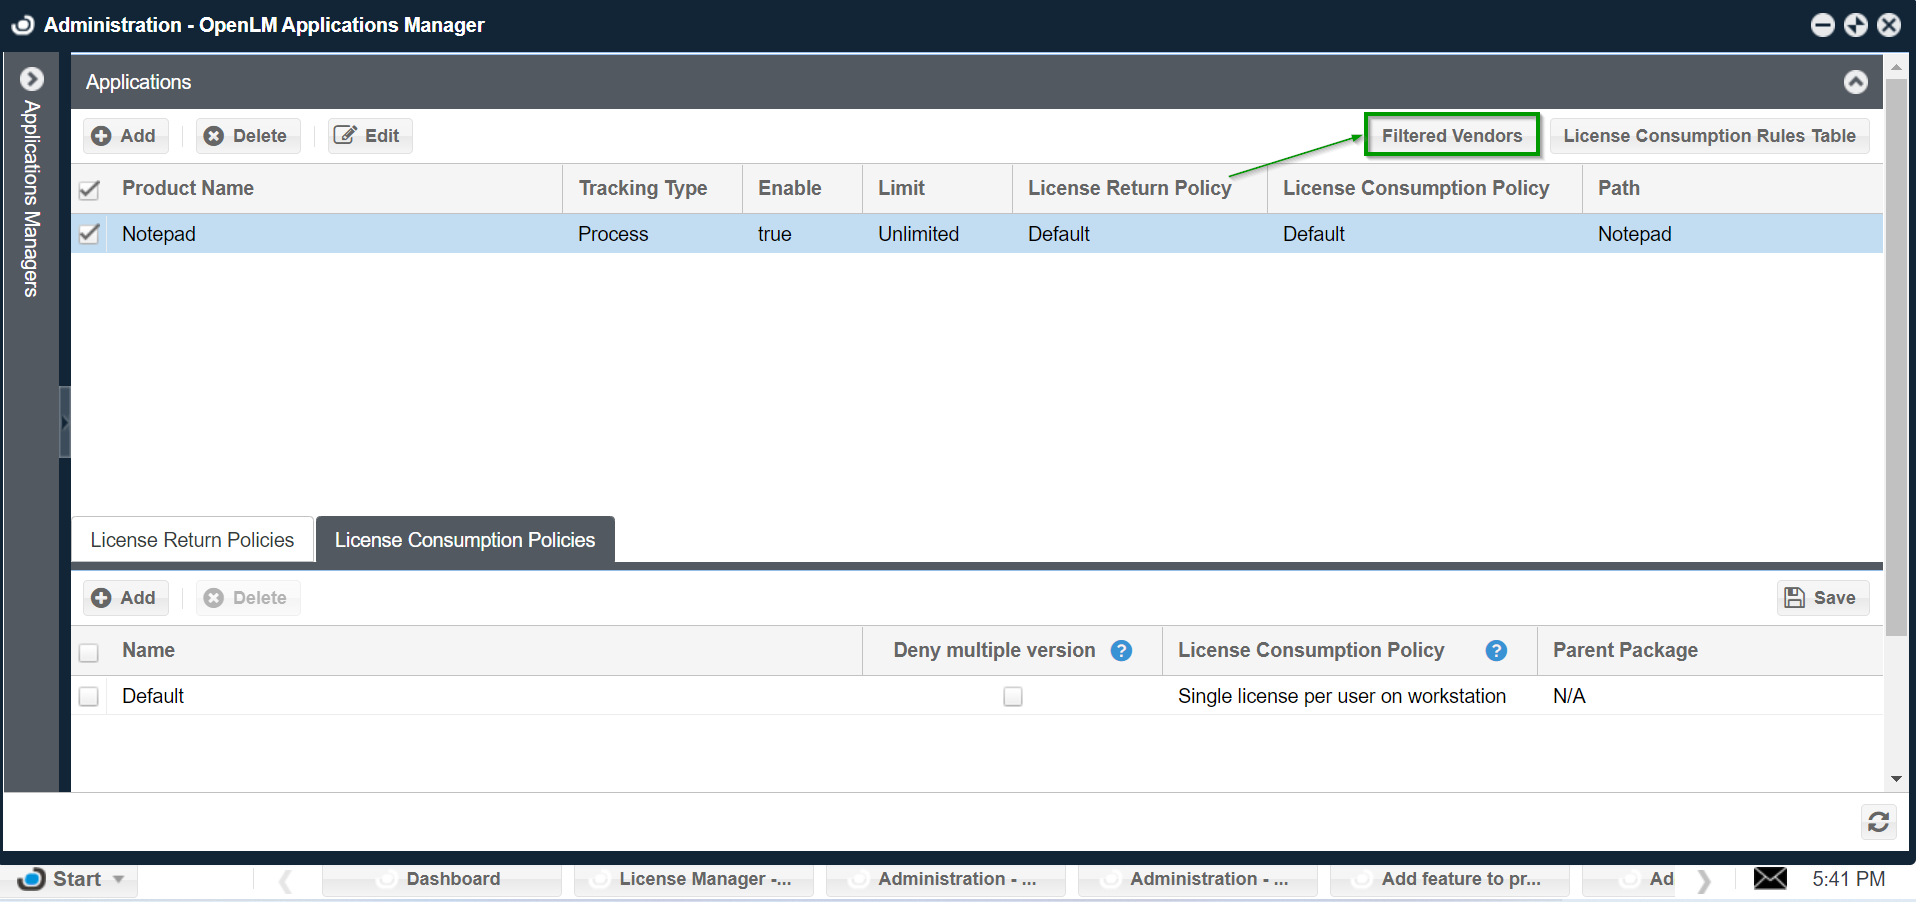
- Click the Filtered Vendors button to open the Filtered Vendors screen:
- A new window will appear with a drop-down list. Click Add, then select the desired vendor from the drop-down list (this is populated automatically from the available products list):
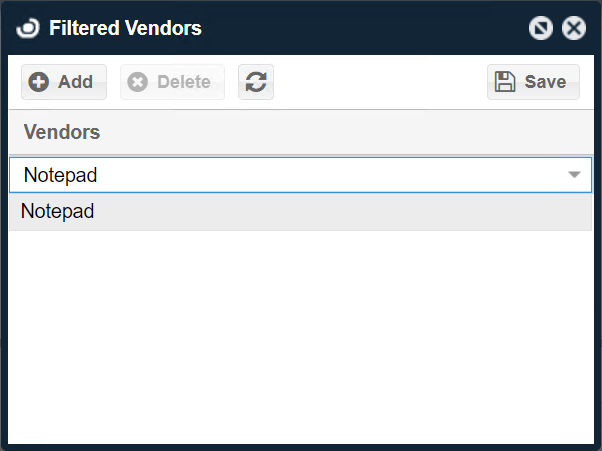
- Click Saveto commit the changes.
This completes the filtering setup. One of two things will happen:
- If the filtered vendor software is controlled by a license manager and a license is consumed (e.g., a floating license), the license usage will be reported by OpenLM SLM only.
- If the filtered vendor software is not controlled by a license manager and a license is consumed e.g., a cloud license, a single user (stand-alone license or pirated software), the license will be reported instead by the OpenLM Applications Manager.
NOTE: If a user consumes a floating license and does not have the usage report from the license manager for the past 72 hours, the license will be logged as a single-user and not as a floating one. During the short window of this transition between floating and stand-alone licenses, there may be a period of overlap (less than 10 minutes) where a license is counted as both types and appears in reports for both OpenLM SLM and the OpenLM Applications Manager.
Defining rules with the License Consumption Rules Table
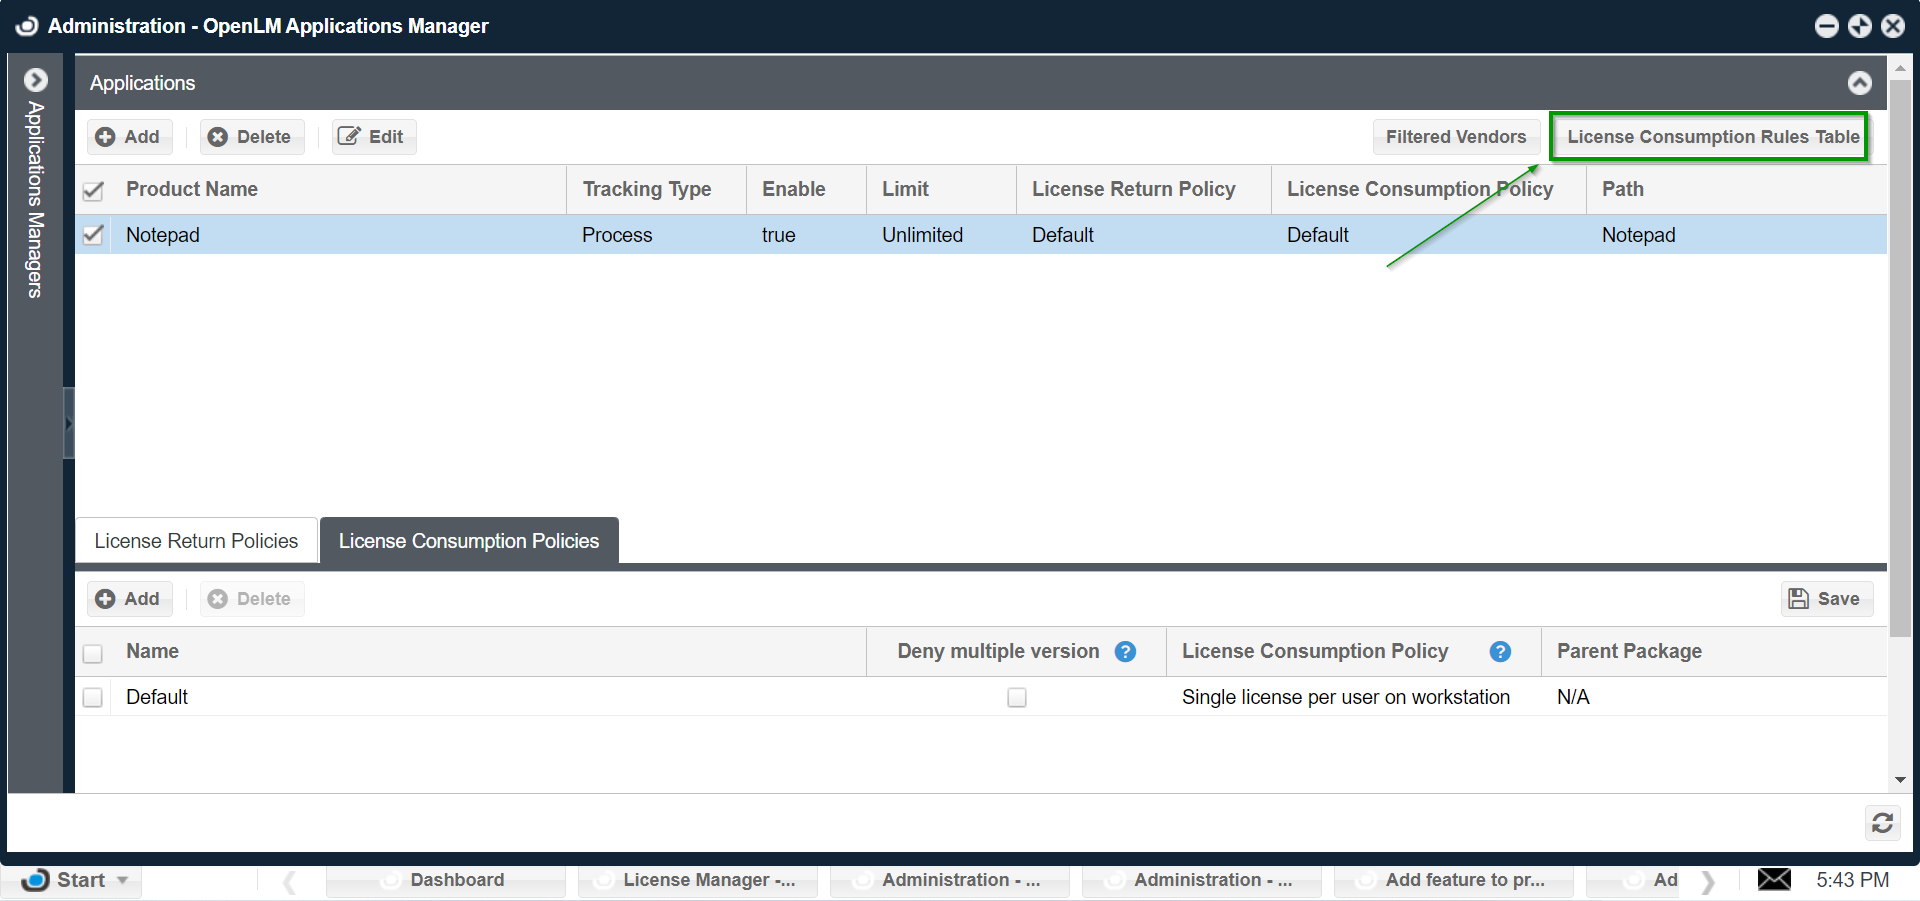
The License Consumption Rules Table allows you to define different types of access rules for licenses. The rules are implemented as a "Decision Table". Click the License Consumption Rules Table button to open it:
Adding a new rule
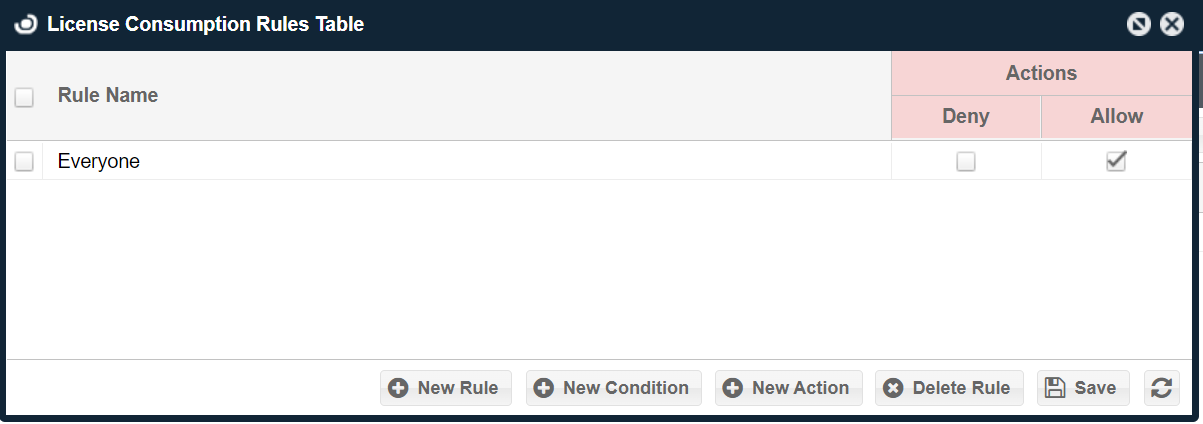
- The default Rule Nameis "Everyone" with the Actionsset to Deny.
-
This is a security default and must be set to Allow in order to permit application launches and to create new rules and conditions. Alternatively, this rule can be deleted by marking the left side checkbox and clicking Delete Rule.
-
Click New Rule. Type in a name (e.g. Windows Media Player is not allowed) and set the desired outcome by either checking Denyor Allow(e.g. Deny):
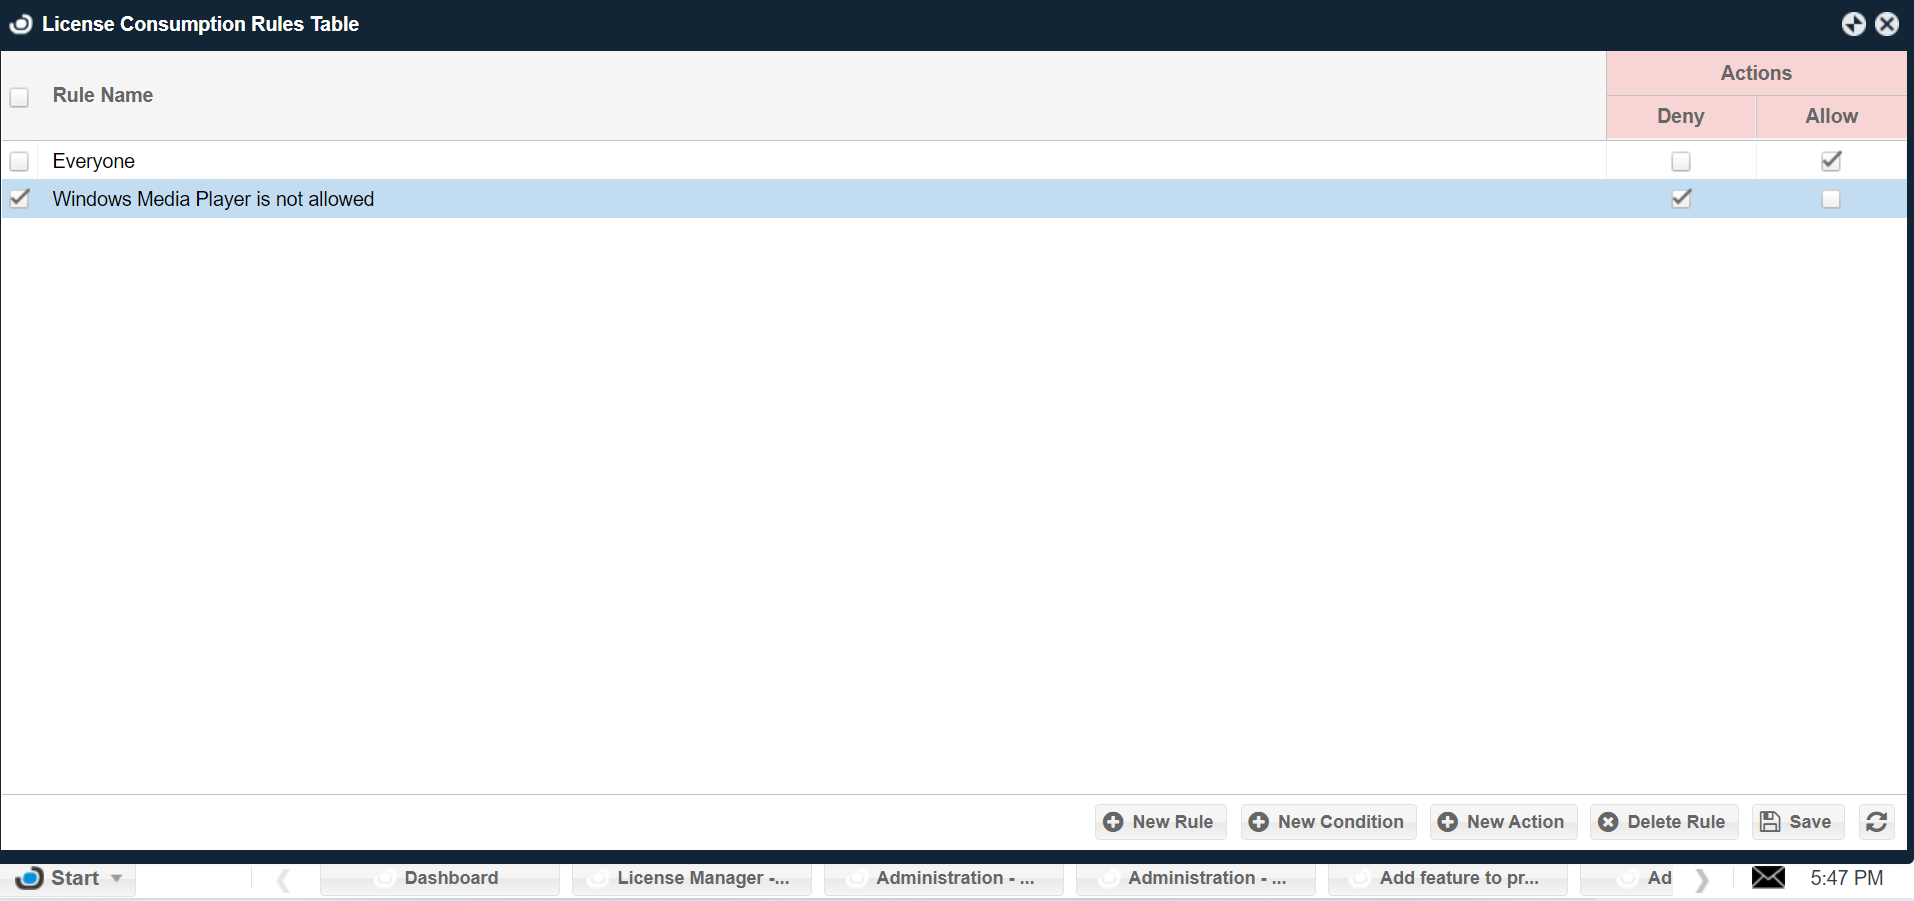
Note: The red triangle indicator shows field changes that haven't been saved. Press the Savebutton to commit the changes.
Adding a new condition to a rule
- To create a condition for a new or existing rule click on New Condition:
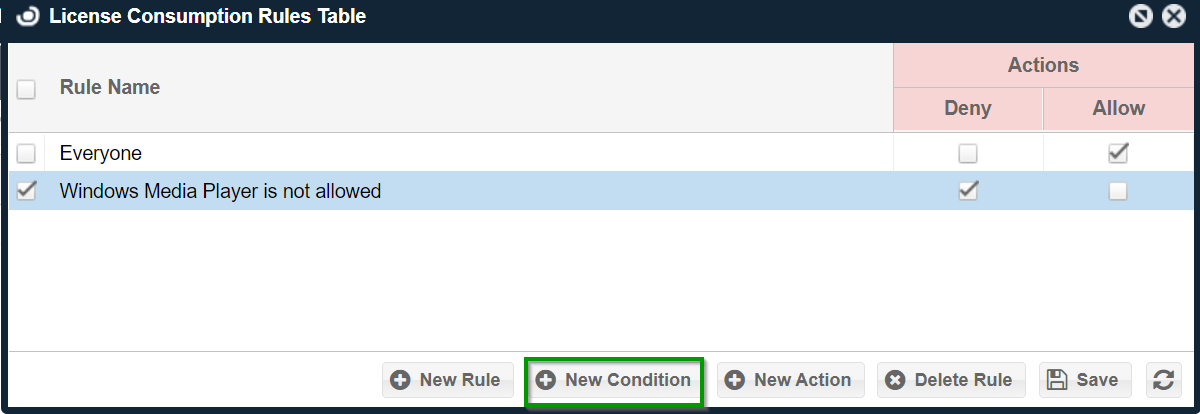
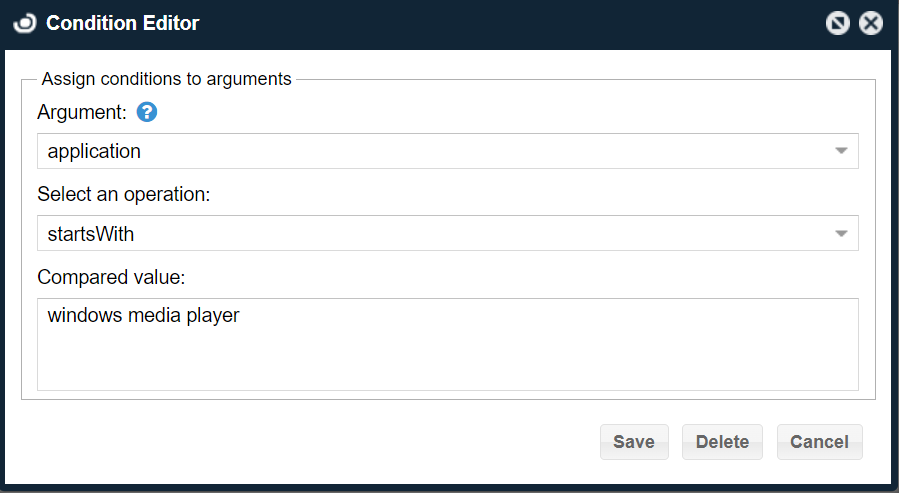
The Condition Editor window will appear. To create a condition, first select the argument followed by the type of operation, and finally input a compared value.
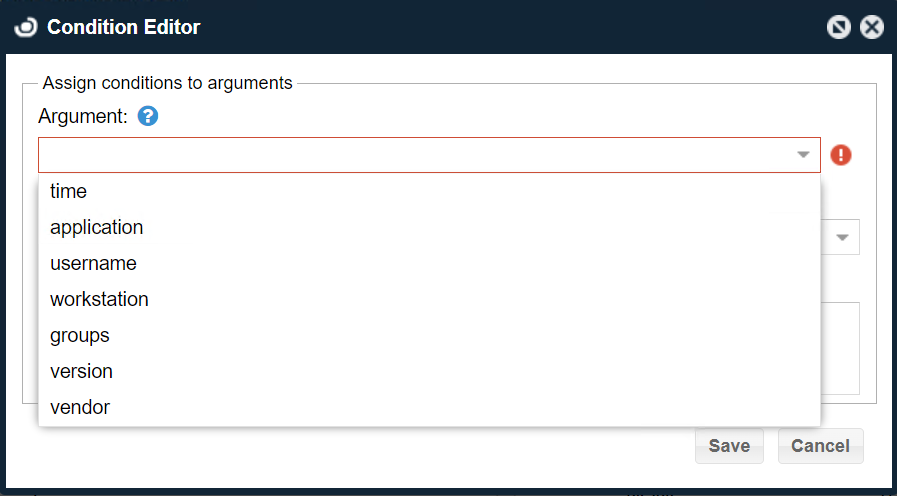
- Here is a description of each of the Argumentoptions:
Time- makes your rule time-sensitive. The after and before operations are based on the time of day while matchesCron allows you to define a rule with CRON expressions. Note that the syntax for CRON rules is slightly different from Linux CRON (more info)
Example:
time after 9:00
time before 18:00
time matchesCron * * 15 9 6 ?
Application- binds the rule to a specific application. The equal, startsWith and endsWith operations are checked against the application name/product name as it has been set in the OpenLM Applications Manager configuration window.
Example:
application equals AutoCAD 2016
application equals MicroStation
application startsWith AutoCAD
application endsWith 2016
Username- used to associate a rule to one or more user accounts. The equals operator looks for an exact match while startsWith and endsWith work as wildcard operators.
Example: the _NY suffix is assigned to all usernames from your NY office. You can apply the following condition to all user accounts that match this pattern
username endsWith _NY
Workstation- used to associate a rule to a specific workstation. The comparison is made using the workstation's name.
Example: your organization differentiates desktop workstations with the "DESKTOP-" prefix. If you wanted to create a condition that applies to all desktop computers you could use the following condition
workstation startsWith DESKTOP-
Groups- used to associate a rule to users belonging to a specific group as defined in OpenLM's Groups component.
Example: a condition that applies to users of the "engineering" group
groups include engineering
or you can have a condition for users not associated with any group
groups empty
Version- used to associate a rule to a specific version of your software. This is compared to the version value which is set when adding an application to the Applications Manager.
Example:
version equals 5.0
version startsWith 5
version endsWith 2019
Vendor- used to associate a rule to a specific Vendor. Vendor-specific rules can be configured by comparing against the vendor value which is set when adding an application to the Applications Manager.
Example:
vendor equals Autodesk
vendor equals Bentley
- Select an operation for the argument. The operation choices are dependent on the type of Argumentyou have selected:
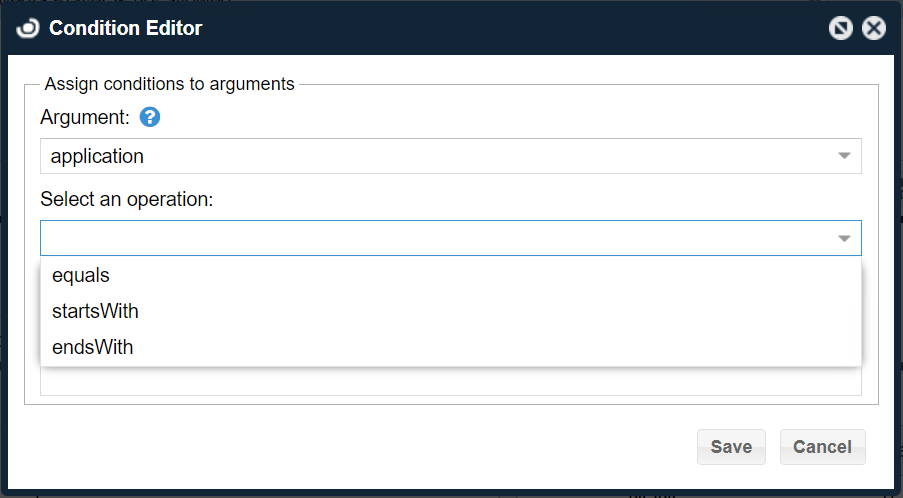
- Enter a value in the Compared valuefield. With the exception of the time argument, this field must fully or partially match (if using the startsWith or endsWith operations) the value as it was defined when an application was added to the Applications Manager list. Please note that the value comparison is not case sensitive.
In our example, to match the "Windows Media Player is not allowed" rule, we are setting the condition type to application, the operation to equals and the compared value to windows media playeras it has been defined the Applications Manager list
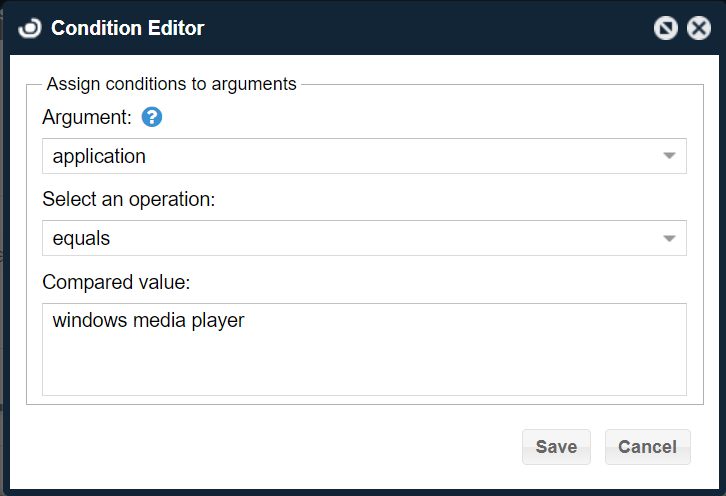
Note: Application name, Version and Vendor are the values as you have defined them in the OpenLM Applications Manager. Groups are automatically displayed as they're present in the OpenLM system. Username and Workstation are matched to the ones reported from OpenLM Workstation Agent.
-
Click the Savebutton to commit the new settings. A new Conditionscolumn will appear on the License Consumption Rules Table screen.
-
Check the box under Conditions in the newly added column for the rule you wish to associate it with.
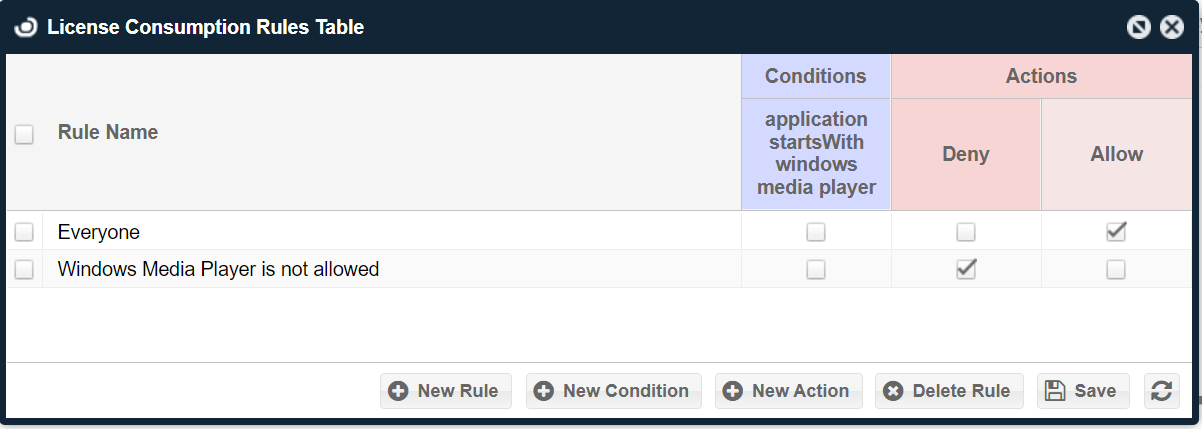
In our example, the Applications Manager will now check for the launch of the windows media player application whenever a monitored Agent/workstation launches the process, file or folder that has been associated with it. If the condition is met, the Applications Manager will then check against the value of the Actions column to determine whether to Deny or Allow the application launch.
Testing a condition
In order to test if a new condition is being applied, open an application that has the Deny flag set. In our example, this is the Windows Media Player application which has already been added to the Applications Manager configuration. A generic denial message appears when a user attempts to open the application:
Customizing the default message or script that is run is possible by double-clicking on either of the Allow or Deny action columns. This will bring up the Action Editor screen which follows the same configuration as the "Adding a New Action" section below.
Adding a new action
- ClickNew Action to open the Action Editor screen:
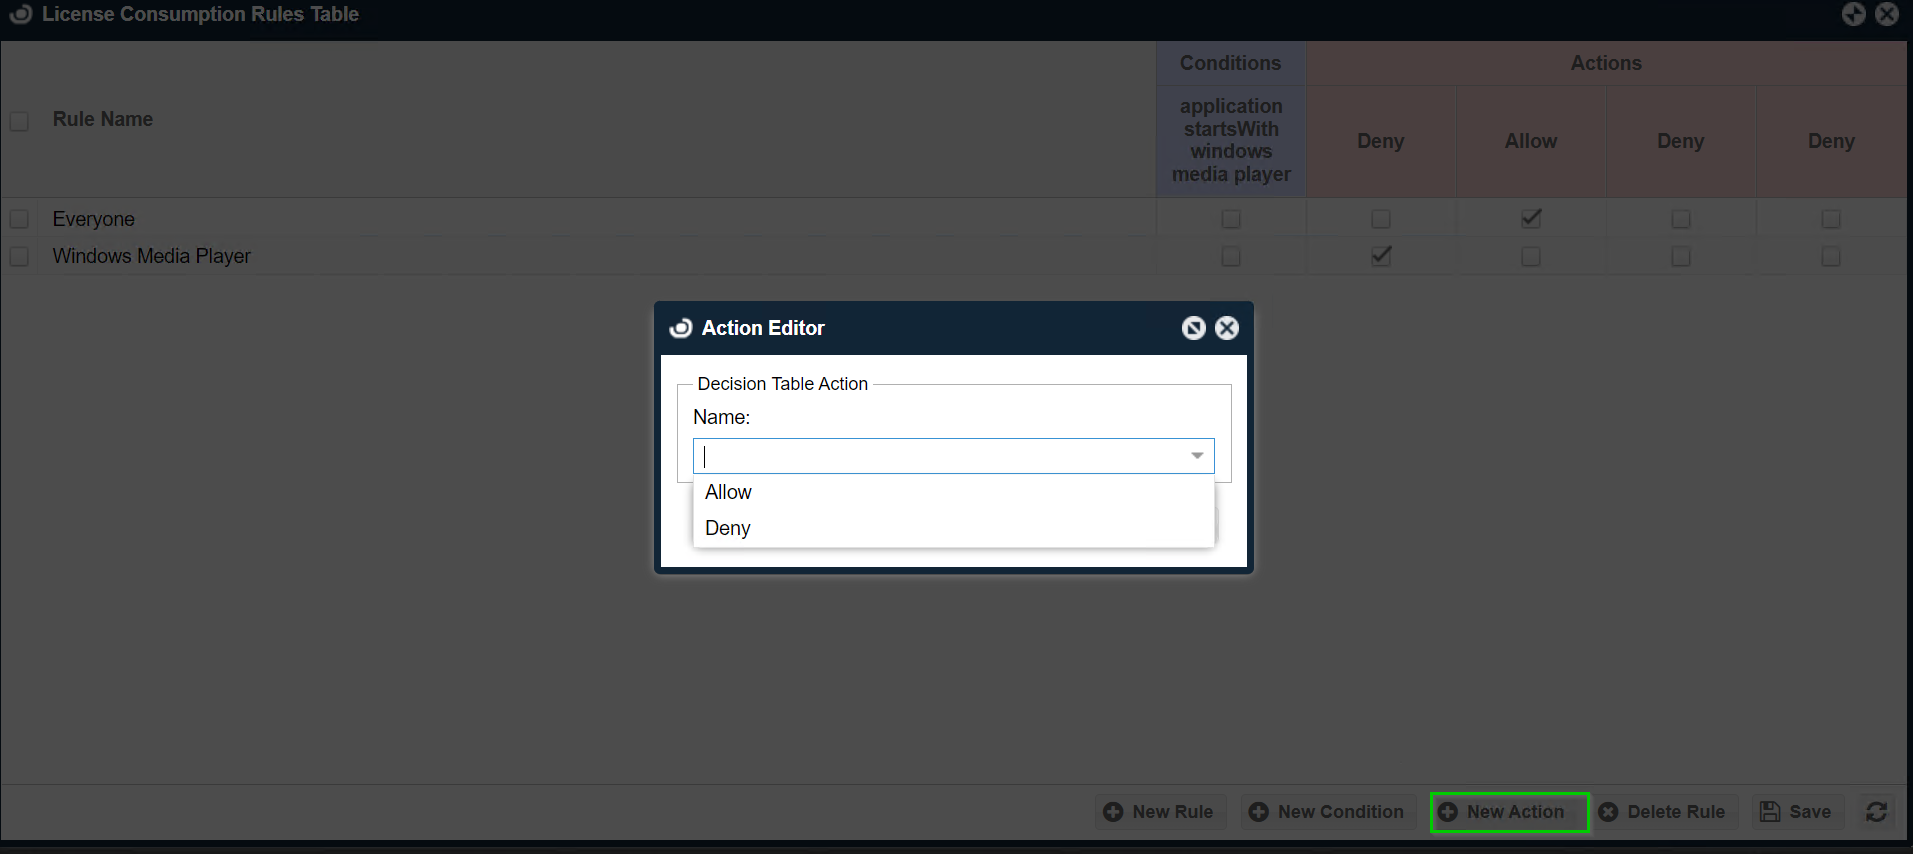
- Configure the available fields as follows:
Name:
Allow- Action will be run when a license is successfully granted.
Deny- Action will be run when a license is denied.
Script:
This field is available only if your OpenLM SLM license includes the Custom Commands feature (contact sales for more information). This field should contain commands that use the Windows Shell scripting format. Some of the functionality that can be achieved with scripts includes, but is not limited to:
- Displaying custom messages such as warnings
- Changing registry entries to allow creative management of available licenses
- Launching any program or process automatically
For more detailed information on custom commands see theUsing Custom Commands document.
Run At:
Application:
-
- Intended for scripts that run in the Agent Application domain - those that facilitate on-screen viewing and user interaction (e.g. show messages or display applications).
- The script is executed with the current user's account privileges.
- These scripts cannot influence System-owned tasks.
Service:
-
- Intended for scripts that run in the Agent Service domain - background tasks and silent procedures (e.g. manage the registry or configure security policies).
- The script is executed with the System user's account privileges.
- Scripts cannot access any user preference.
- These scripts cannot influence User-owned tasks
- Click Saveto commit the changes. A new Actionssubcolumn will appear on the right side of the License Consumption Rules Table window. In our example, this is an additional Deny column:
Note: It is possible to have multiple actions for a single rule name. For example, you may want to run both an application and a service. To delete unwanted columns, click the column header (e.g., Allow or Deny) and click the Delete button in the Action Editor window:
-
Check the Denybox in the newly added column.
-
Click Save to commit the changes. The script will now be run for all denied events that match the condition.
Note: If there are multiple rules matching a request, OpenLM Applications Manager gives priority to the one that has the most conditions checked. E.g. if you have a rule for everyone running AutoCAD but you want to make an exception for the user JohnDoe, you simply create another rule that checks the same conditions but you also create an additional condition for the username JohnDoe. Because this rule has more conditions, it will be prioritized over all the other rules that have similar conditions.
3.4.5 Editing an existing action or condition
- To edit an existing action or condition click on its label (e.g., "application starts with Windows media player" under Conditions or "Allow/Deny" under Actions):
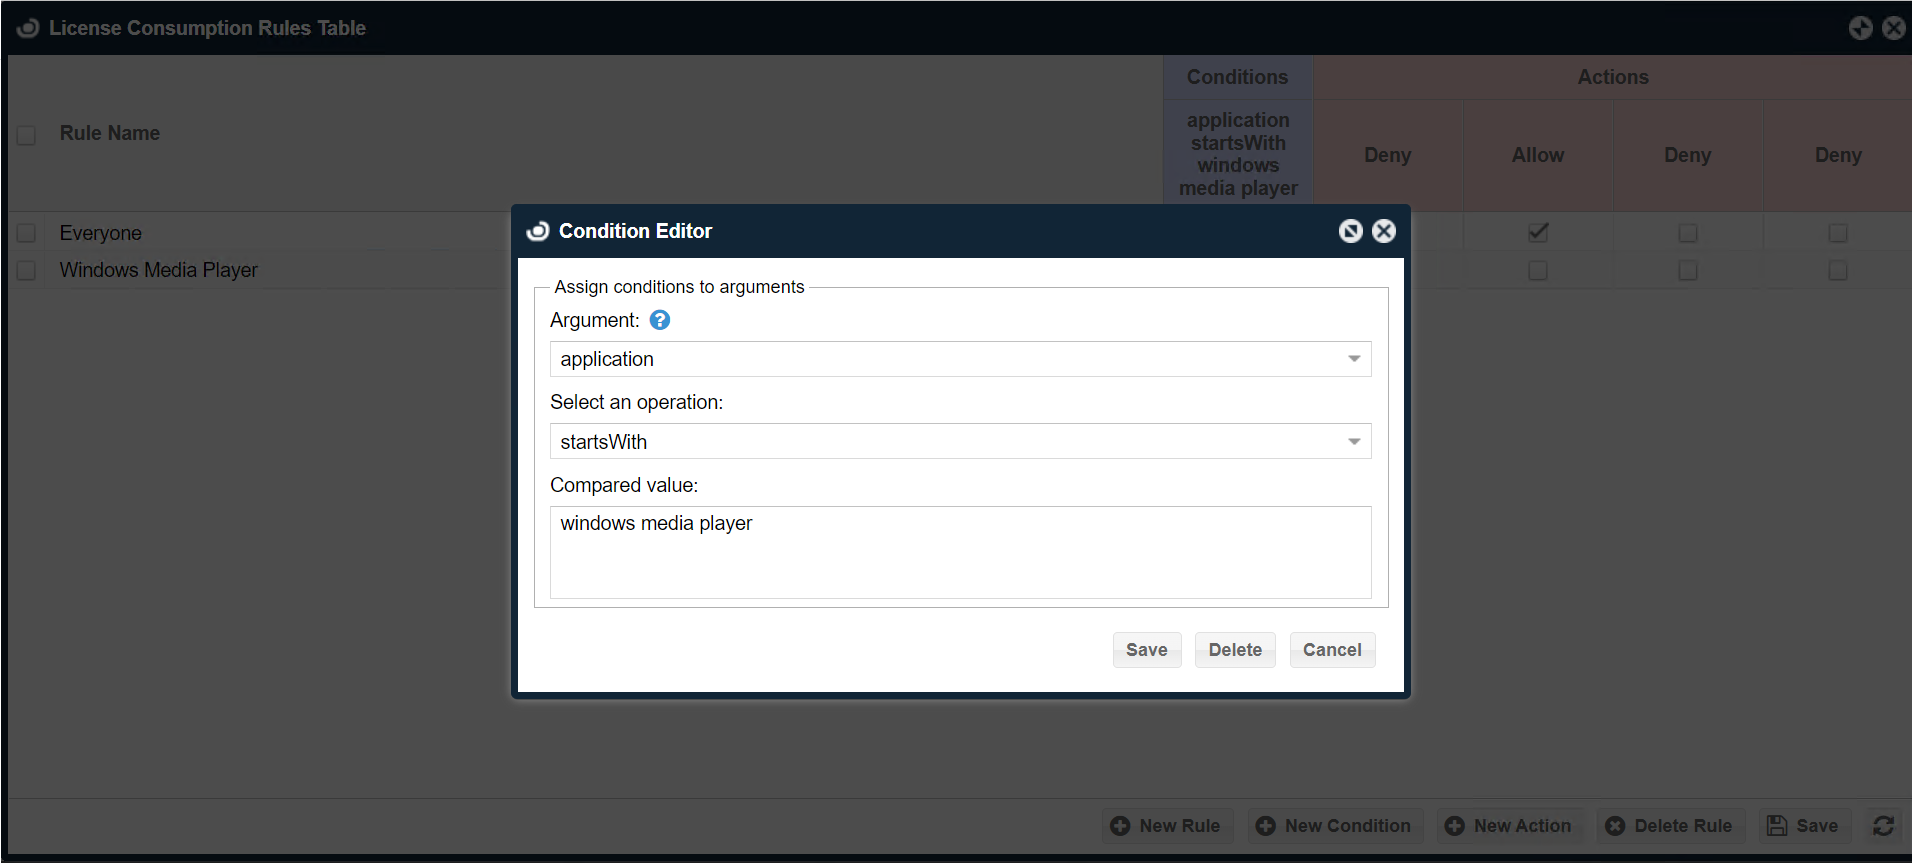
- Either the Condition Editoror the Action Editor window will appear where you can change the configured settings:
Configuring License Return Policies
- The set of rules that defines Applications Manager behavior for when a user closes an application is configured under the License Return Policies tab in the lower half of the OpenLM Applications Manager window:
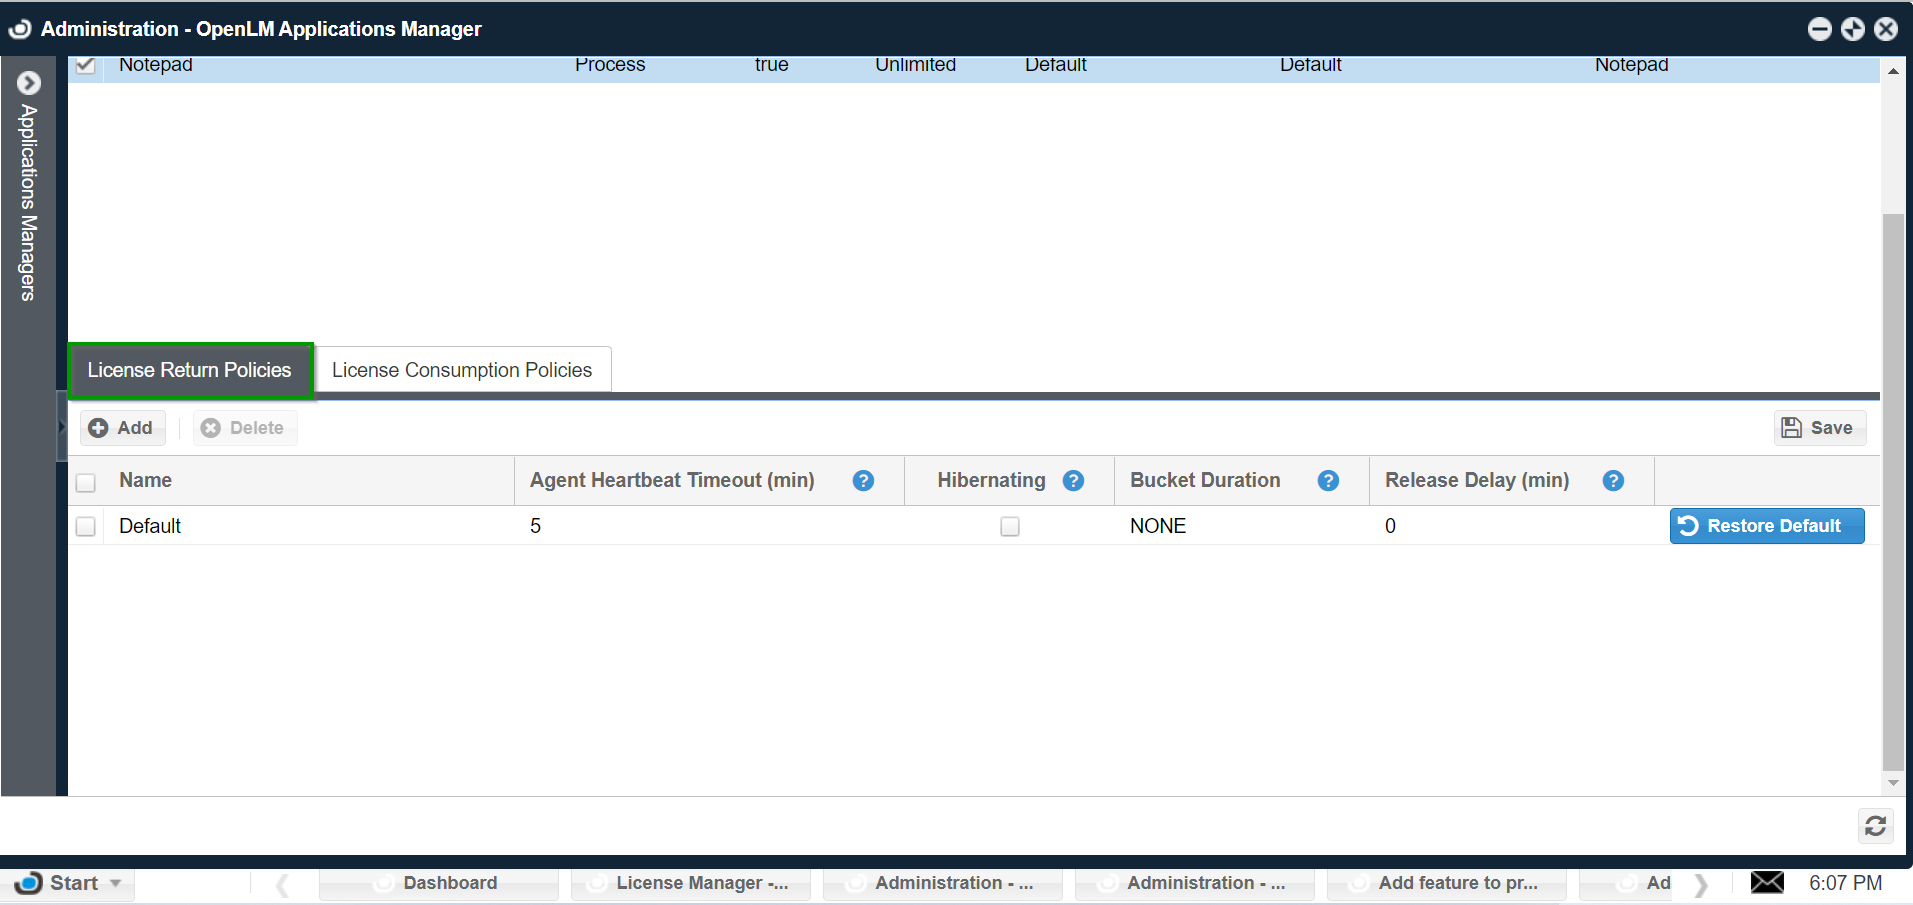
The explanation for each field is as follows:
Name- a unique name to help you associate a specific application to a policy.
Agent Heartbeat Timeout (min)- represents the amount of time the Applications Manager holds the license for once the OpenLM Agent instance has stopped sending heartbeats. A heartbeat is a message that is sent every minute which includes a list of all the monitored and running applications on a workstation. This is how the OpenLM Applications Manager synchronizes its state in case of missed events. Once the timeout period has been reached, all licenses related to the OpenLM Agent instance are released.
Hibernating - by default, when a workstation is shut down, OpenLM Agent sends a message to terminate all sessions and release all licenses associated with the workstation. Enabling this checkbox will ensure that this behavior also applies when the workstation enters Sleep, Stand By, or Hibernate mode. When this option is enabled, all licenses related to a workstation are released immediately. If disabled, the Applications Manager waits for the heartbeat timeout before releasing any licenses.
Bucket Duration - used mainly for applications that use the Bentley trusted licensing model. It can be set to either DAY, HOUR, or NONE. When the license is consumed within a calendar hour or day, the license stays consumed until the end of the hour or day.
If Bucket Duration is set to DAY, the Applications Manager releases licenses only at midnight.
If Bucket Duration is set to HOUR, licenses are released at minute 0 of every hour (0:00, 1:00, 2:00, etc).
Release Delay (min)- the amount of time between the application close event and the return of the license to the Applications Manager license pool. During this time, the license is still reserved to the user. If the user re-opens an application within the delay period, the Applications Manager just continues the previous session and the usage would be displayed as 1 session in the OpenLM SLM.
In the case of applications that use hourly buckets with the Bentley trusted licensing model, the Release Delay should be set to 11 minutes and Bucket Duration to NONE, as Bentley considers the minimal session length to be 10 minutes. Note that this also means that Bentley considers every session that is longer than 50 minutes as consuming at least two 'buckets'.
- Click Savein the upper right corner of the License Return Policies tab to commit the changes:
Setting up License Consumption Policies
- The License Consumption Policies tab allows configuring the behavior of the Application Manager when application launch events are detected and a license is consumed:
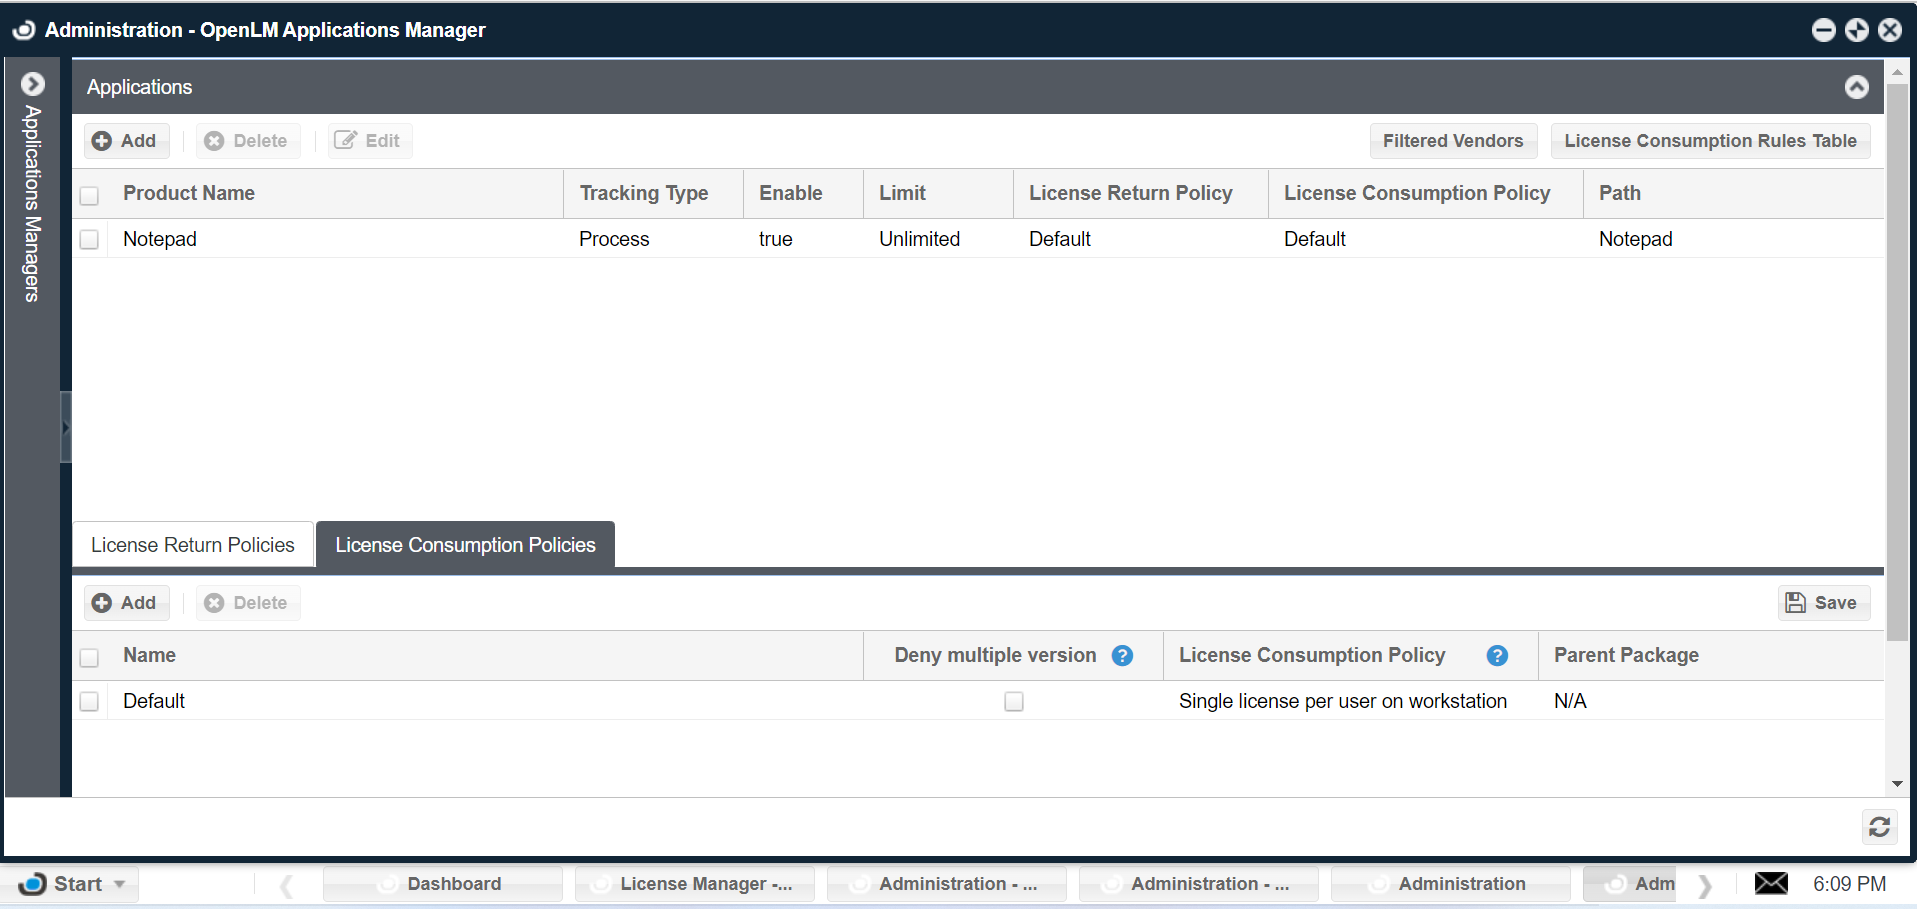
Name- a unique value to associate an application with a policy.
Deny multiple versions - designed to prevent double license consumption of Autodesk products. Autodesk customers can purchase licenses in suites, which means users can run multiple Autodesk products while still consuming just 1 license. However if a user runs 2 versions of the same product (e.g Autodesk 2017 and Autodesk 2016), the Autodesk license manager consumes 2 licenses instead of one.
When this box is checked, OpenLM Applications Manager blocks the execution of another application that has the same vendor name but is a different version.
The version can be set either as the Version field value or as the year suffix in the Name or Description of the application. Most Autodesk products include this in their naming (e.g. AutoCAD 2017).
Example:
The customer purchased AutoCAD and 3DS MAX as a suite. The following rules apply if a License Consumption Policy has the "Deny multiple version" box checked:
If AutoCAD 2016 is running, launching AutoCAD 2015 would result in a denial.
If 3DS MAX 2016 is running, launching 3DS MAX 2015 would result in a denial.
The current version of OpenLM Applications Manager does not support suite configuration. However, this feature relies on the Vendor name. As a workaround, different Vendor names could be set to handle multiple software suites or products that comprise them.
License Consumption Policy - applies to the licensed consumer. Double-click on the drop-down menu to select one of the following settings:
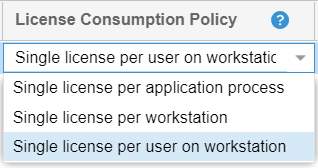
Single license per application process - when the consumer is set as "Application Process", every instance of an application would consume 1 license each even if they run it on the same workstation.
Single license per workstation - when the consumer is set as "Workstation", the license is dedicated to the workstation. Different users using the same computer would consume the same license. This policy is used by applications that use the Bentley licensing model.
Single license per user on the workstation - this is the most common policy. Licenses are assigned to users. Even if users share a workstation, they would each have their license usage session reported in the OpenLM Applications Manager.
Parent Package - this feature allows the use of a shared license pool for different applications. This way, applications can be monitored and reported separately by the OpenLM SLM. The usage limit would be the same as the number of licensed applications. The value of the "Parent Package" is the name of another application that has already been configured in the OpenLM Applications Manager.
The result is that when a user runs an application associated with a policy that includes the "Parent Package", the consumed license will be counted for both that application as well as the application that is set as the "Parent Package".
Example:
"AutoCAD 2017" is configured as a stand-alone application in the Applications Manager.
A new License Consumption Policy named "AutoCAD" is created that has "AutoCAD 2017" set as the Parent Package.
"AutoCAD Map 3D 2017" is added as another application in the Applications Manager, using the "AutoCAD" policy that was just configured.
When a user launches "AutoCAD Map 3D 2017", the Applications Manager will report that 2 licenses are used: one for "AutoCAD 2017" and one for "AutoCAD Map 3D 2017".
- Click Savein the upper right corner of the License Consumption Policies tab to commit the changes.