OpenLM Broker configuration
Introduction
The OpenLM Broker requires configuration according to the desired use and preferences of an organization and to influence the best communications between the Broker and Server. All parts of the configuration are completed through the OpenLM Broker Configuration Tool (besides Java and some specialized configurations). This document covers only Broker configuration. For information on configurations for Server, installation of Broker and Broker use, see the dedicated OpenLM Broker Installation.
The OpenLM Broker tool is an optional Java software module that interacts directly with the license manager server in order to get the current license server status. Being a Java component, the OpenLM Broker can run on any Java-supported platform.
The benefits of OpenLM Broker include the following (see the feature list for additional information):
- Sending queries to obtain license usage information from the license manager.
- Buffering transmissions to overcome potential communication failures.
- Monitoring log file information (e.g., license denials, accurate license usage logging, offline licenses, etc.).
- Maintenance of FlexLM Options files from the OpenLM EasyAdmin interface.
- Monitoring license file information (e.g., license packaging, license pools, Named licenses, DUP_GROUP).
- Remote file fetching.
- Uploading license files to the license server.
- Starting / Stopping / Rereading of the license server.
After OpenLM Broker is installed on the license manager server, the next step is to configure the package to address the OpenLM SLM, license servers and to define access to server files.
To open the configuration, choose [Start] > [OpenLM] > [OpenLM Broker] (default path: C:ProgramDataMicrosoftWindowsStart MenuProgramsOpenLMOpenLM Broker). This will open the OpenLM Broker Configuration Tool (see Figure 1) which allows the setup of OpenLM Broker, OpenLM SLMs, and license servers.
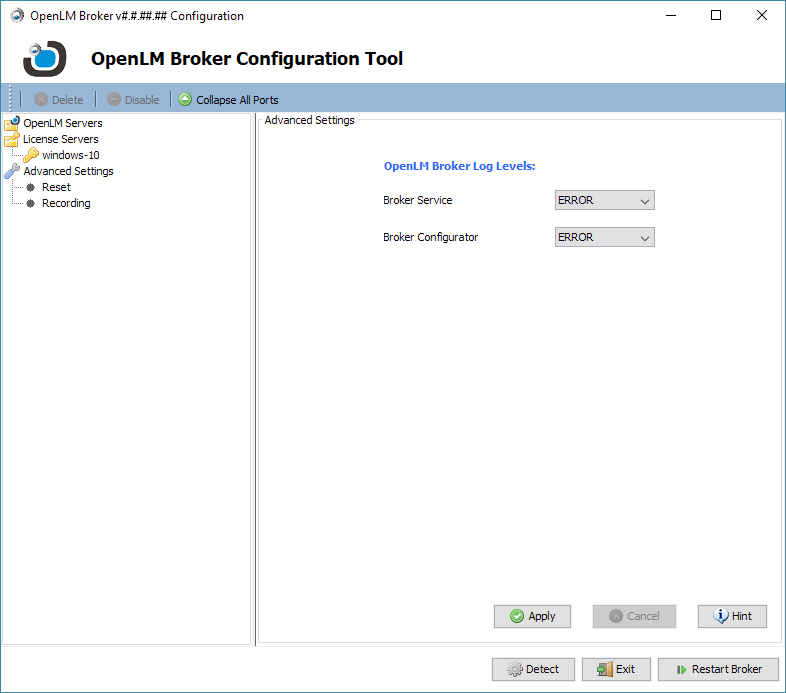
Figure 1: The OpenLM Broker Configuration Tool as it appears immediately after installation.
[NOTE: OpenLM Broker automatically detects the settings of some license managers (e.g., FlexLM, DSLS, RMS) if they are already installed on the machine so initial configurations may vary. The existence and location of options files are not automatically configured, so setting names and paths need to be entered manually.]
Configuring OpenLM Broker
The options for configuration include adding an OpenLM SLM and adding a license server. These options are covered in separate sections below.
Add an OpenLM SLM
The OpenLM SLM is the hub of the OpenLM system. It integrates the info from peripheral OpenLM components (e.g., OpenLM Brokers and OpenLM Workstation Agents). At least one server must be added to complete the setup and exit the configuration tool.
-
Open the OpenLM Broker Configuration Tool (Start > OpenLM > OpenLM Broker Configuration Tool).
-
Click the "OpenLM SLMs" item in the menu at the left of the OpenLM Broker Configuration Tool screen.
-
Click on the [+Add OpenLM SLM] button. The OpenLM SLM connectivity panel will appear at the right of the screen prefilled with default information (see Figure 2).
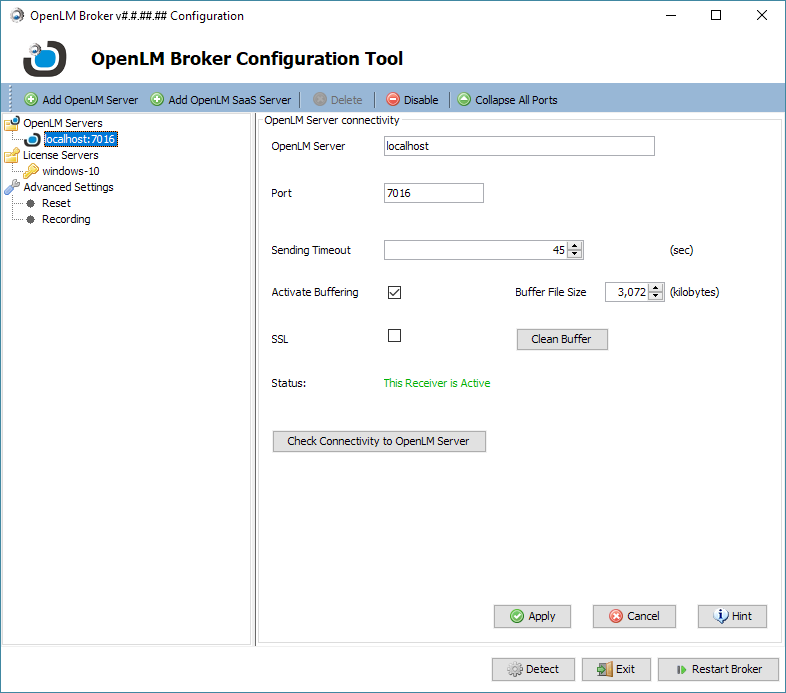
Figure 2: The Configuration Tool with Connectivity panel displayed.
- Change the OpenLM SLM parameters to match your configuration. Items 'a' and 'b' must match the server name and port in order for the connectivity check to succeed.
a. [Optional] Change the OpenLM SLM name. This will be "localhost" by default. If the location of the installation is not local, this should be modified to match the exact server name or IP address.
b. [Optional] Change the OpenLM Port for the Broker. This will be "7016" by default. [NOTE: This is the same port number as appears in the "OpenLM SLM Configuration" tool, under the "Port Settings" tab, in the "License Managers Reporting Port" text box.]
c. [Optional] Change the Sending Timeout time. This is the Broker's sending timeout limit. The default is "45" sec.
d. [Optional] Change Activate Buffering. This is enabled/checked by default. It enables the Broker's offline mode which stores unsent data when not connected to the OpenLM SLM. All messages buffered will be sent to the OpenLM SLM when the connection resumes.
e. [Optional] Change the Buffer File Size. This step is only possible if Active Buffering is enabled. The file size limits the number of messages saved in one buffer file. The default value is 3,072 kb. [NOTE: it is the user's responsibility to clear the file system.]
[Optional] Check SSL checkbox to send data to OpenLM SLM using SSL secure communication protocol.
f. [Optional] Click the [Clean Buffer] button. A confirmation screen will appear (see Figure 3). Click [Yes] to confirm to delete the data; click [No] to close without affecting the data in the buffer file. [NOTE: It is recommended that this feature be used with some caution so that desired data is not lost.]
Figure 3: The Clean Buffer confirmation screen.
g. Click the [Check Connectivity to OpenLM SLM] button. This will initiate a connectivity check and result in one of several behaviors (i, ii or iii):
i. If OpenLM SLM name or Port change, the check applies the changes. A reminder to clean the buffer appears (see Figure 4), and then a Save confirmation (see Figure 5). Either Step #4.g.ii or Step #4.g.iii follows.
Figure 4: The Clean Buffer reminder.
Figure 5: Confirmation screen for data changes
ii. An error screen opens if Broker appears to be stopped. (see Figure 6).
Figure 6: The Broker Connection error screen.
If the error screen appears, click [OK] to close the screen and then click [Restart Broker]. A success screen should appear confirming that Broker services have restarted (see Figure 7). Click [OK] and repeat Step #4.g. [NOTE: If Broker services do not restart successfully examine the OpenLM Broker log files for recent errors (located in <path>\OpenLM Broker\logs). If the issue is not apparent or cannot be resolved contact OpenLM support* support@openlm.com.]
Figure 7: The Broker restart success screen.
iii. A countdown screen will appear (see Figure 8), and then a result of success (see Figure 9) or server connection failure (see Figure 10). If the connection is successful continue with Step #5. If the connection fails, check that the OpenLM SLM is running and repeat Step #4.g.
Figure 8: Countdown screen.
Figure 9: Connection success.
Figure 10: Connection Failure.
h. [Optional] Click the [Detect] button to automatically detect license managers. This action will look for new configurations. [NOTE: See Detecting Broker Configuration later in this document for additional details.]
-
Click [Apply] to save the information entered.
-
Click the [Restart Broker] button. This restarts the OpenLM Broker services with the updated configuration.
The OpenLM Broker connection to OpenLM SLM is complete. Please refer to documentation for specific modules for additional integration.
Add a license server
Adding a license server involves adding the server and then configuring it.
- Click on a server name in the navigation pane at the left of the OpenLM Broker Configuration Tool screen (see Figure 11). This displays the License Manager panel at right. The license server Host Name IP should default in based on the local machine. [NOTE: To check the Host Name, type ipconfig/all at a command prompt.]
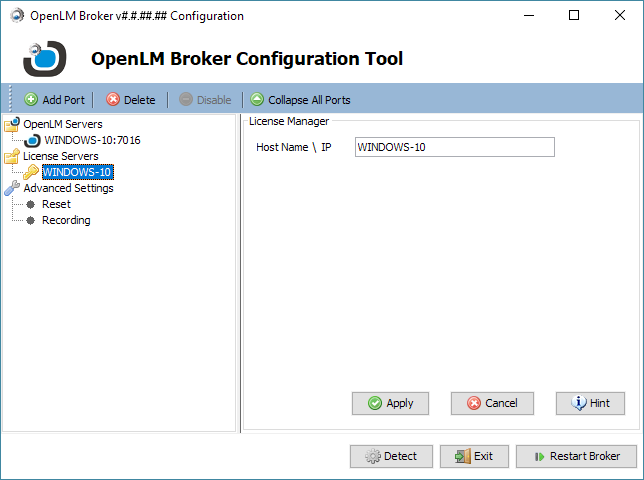
Figure 11: Selected License Server License Manager panel.
- Click [+Add Port] above the navigation panel. A new port node is added and the Add New Port dialog opens warning to update Port Number and Vendor detail (see Figure 12).
Figure 12: Add New Port dialogue.
- Click [OK] to close the Add New Port dialogue. The Port Number field, License Manager Type drop list and "Advanced" link will be displayed in the License Manager Port panel (see Figure 13).
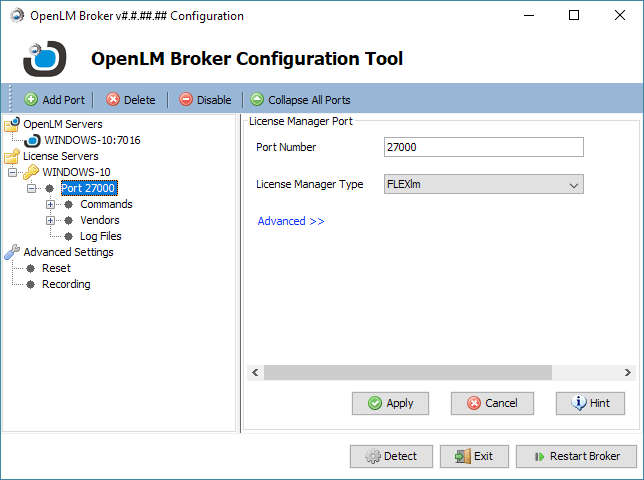
Figure 13: The Configuration Tool displaying the License Manager Port panel.
-
Change the Port Number if appropriate. The default will be 27000.
-
Select the license type that needs to be managed (e.g., FlexLM) from the License Manager Type drop list.
-
Click [Apply] to accept the changes. If changes have been made, a confirmation screen appears requesting confirmation of the changes (see Figure 14).
****Figure 14: The Update Commands Confirmation screen.
- Click [Yes] on the confirmation screen commits the data. A save success screen appears when the process is complete (see Figure 15).
Figure 15: Save success screen for License Manager changes.
-
Click [OK] on the Save success screen to return to the License Port Manager panel.
-
Review the paths at each node to be sure they are valid. To do this, follow Step #9.a to Step #9.c. For more information on setting paths or to address failures, see License Server Command Paths later in this document.
a. Click the plus [+] icon to the left of the Commands node to expand the node See Figure 16).
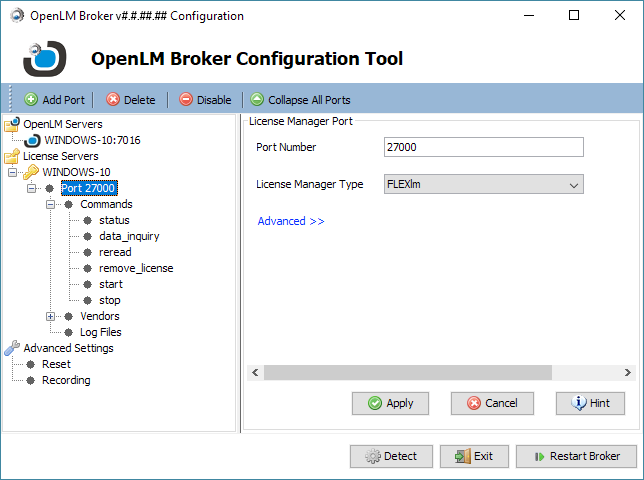
Figure 16: The Commands node expanded.
b. Click the node to reveal the associated configuration panel on the right of the OpenLM Broker Configuration Tool screen.
c. Click the [Execute] button below the Command Line field. The "Test execution of the status command line" screen will appear with a message of success or failure.
10. [Optional] Create additional license server ports by repeating Step #2 to Step #9. [NOTE: Port numbers cannot be duplicated.]
- Click the [Restart Broker] button. This restarts OpenLM Broker with the applied configurations.
At this point the basic configuration of the license server is complete.
Detecting Broker configuration
The Detect feature can be used to automatically detect license manager information and simplify OpenLM Broker configuration. The function will add information for new ports (e.g., commands and paths) depending on what is detected. This is useful for clean setups or detecting new license server information. Existing information is reserved and edited ports are not updated with default information.
-
Click [Detect] on the bottom of the OpenLM Broker Configuration Tool screen. This will populate the Command options with detected configurations or it will use defaults for the License Manager Type. Nodes will be added to the navigation tree in the navigation panel corresponding to the populated commands.
-
Review all the added configurations to be sure the information has been added correctly.
Read license files
OpenLM can obtain license information via license usage records or via license files with supported license managers (e.g., FlexLM). In order to read the license files and incorporate the detailed license information, the OpenLM SLM and OpenLM Broker must be configured to relate to the license file.
-
Navigate to the License Manager Port panel of the OpenLM Broker Configuration Tool by clicking on the port to configure in the navigation panel to the left of the screen.
-
Click the Advanced>> link. This will reveal the License Information section of the panel (see Figure 17). [NOTE: The available configurations for the Advanced portion of the panel is context sensitive to the selected License Manager Type. For example, LUM license manager type has a "Cluster" checkbox which reveals further configuration options to allow Broker to make cluster-specific commands. All features are not supported at all for the selected License Manager Types. If there are no advanced configurations, the message "License Information not supported" will display on the panel.]
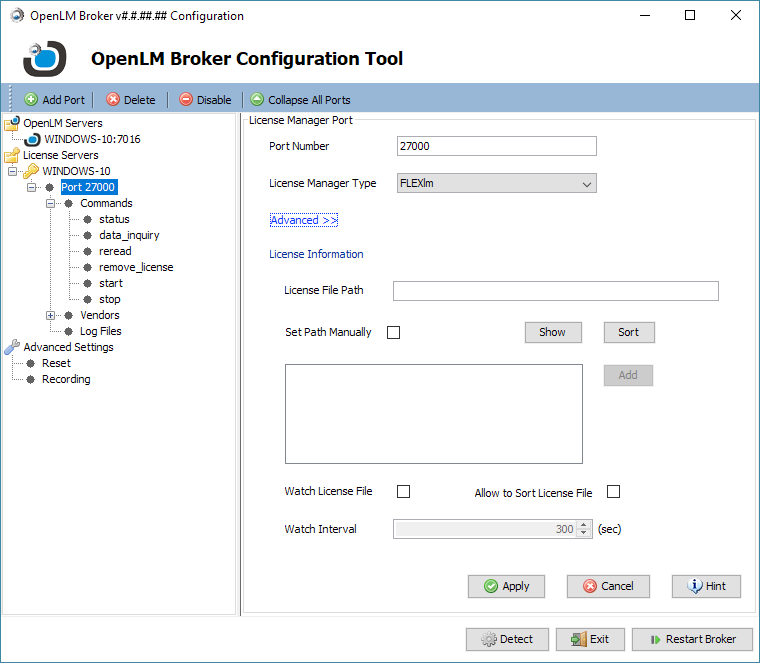
Figure 17: The License Manager Port screen with Advanced options revealed.
- Locate the license file that will be monitored. This can be accomplished automatically (a) or manually (b). The file content can be viewed (c) and the order of the license files sorted (d). Finally, the monitoring needs to be enabled (e) to use the feature.
a. Automatic License File Path detection. License file paths are acquired automatically during startup for some license managers (e.g, FlexLM).
b. Manual License File Path selection.
i. Check the Set Path Manually checkbox by clicking on it. This will activate the [Add] button to the right of the entry field.
ii. Click on [Add]. This will call a file browser.
iii. Navigate to the location of the desired license file in the file browser and click on the file name to highlight it.
iv. Click [Open]. This will place the path to the license file in the Path field (see Figure 18).
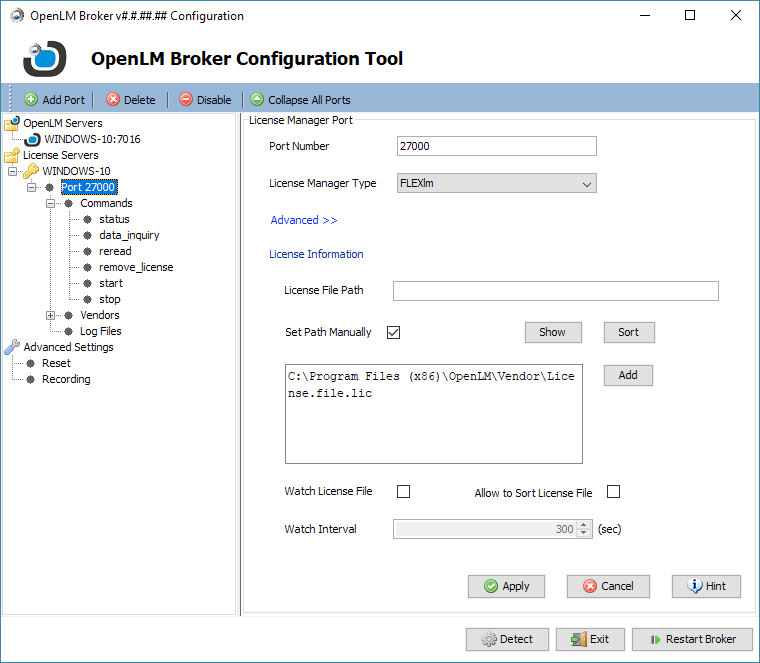
Figure 18: The path field populated by the [Add] button.
v. [Optional] Repeat Step #2.b.ii to Step #2.b.iv to add additional files. Additional files with be added to the Path field separator. [NOTE: The separators vary depending on vendor and OS. Most often they are semicolons (;) on Windows or colons (:) on Linux / Unix.]
vi. Click [Apply] to commit the changes. This will display a query screen for updating all command nodes (see Figure 19).
Figure 19: The Update Commands Confirmation screen.
vii. Click [Yes] to proliferate the changes to other nodes in the command tree. Click [No] to leave the command nodes as previously configured. A Save confirmation screen will appear to confirm changes have been committed to the broker.xml file (see Figure 20).
Figure 20: Save confirmation screen.
c. [Optional] Click [Show] to display the content of the license file (see Figure 21). This opens a 'read only' display of the license text to confirm the file content. If there is more than one license file, multiple windows will open displaying the content individually.
Figure 21: Display of file content.
d. [Optional] Sort the license order. License files are sorted according to pools as part of OpenLM SLM multiple-pool monitoring. Sort order can be overridden using the Sort option in the License Information configuration.
i. Click the Allow to Sort License File checkbox to enable sorting.
ii. Click the [Sort] button to open the Asset Info Order screen.
iii. Reorder the items in the screen by clicking an item to select it and then use the [Move Up] and [Move Down] buttons to position the item in the order (see Figure 22).
**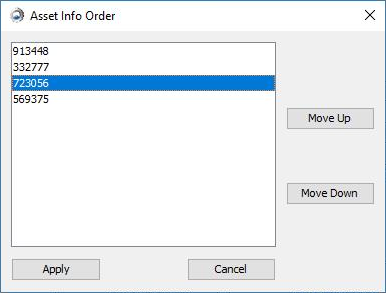 **Figure 22: The Asset Info Order screen.
iv. Click [Apply] to commit the changes and close the Asset Info Order screen.
e. Initiate monitoring of the license file(s).
i. Check the Watch License File box. This will enable the Watch Interval value.
ii. Adjust the Watch Interval value as desired (the default is 300 seconds). Either enter a number directly in the field or scrolling with the toggle arrows. The license file will be checked for changes as defined in the Watch Interval. If a change is found, the Broker will propagate the new license file information to the OpenLM SLM.
f. Click the [Apply] button. This commits the changes.
g. Click the [Restart Broker] button. This restarts OpenLM Broker in order with the applied configurations.
License server command paths
Commands allow control over a variety of tasks including starting and stopping processes, querying data and querying server status. Commands are license manager specific, and the paths for these commands may be set for each license server or port individually, or globally. The configuration is mostly automated by detecting settings. Manual configuration may be necessary. The steps below cover manual setup.
[NOTE: Upon installation, some paths will be automatically detected. Other license manager command paths are set by default to C:Program FilesOpenLMOpenLM Brokertools. All Commands will not all be available for every license manager type.]
- Expand the port node in the OpenLM Broker Configuration Tool screen that will be configured by clicking the [+] to the left of the port. This will display additional nodes for configuration (see Figure 23).
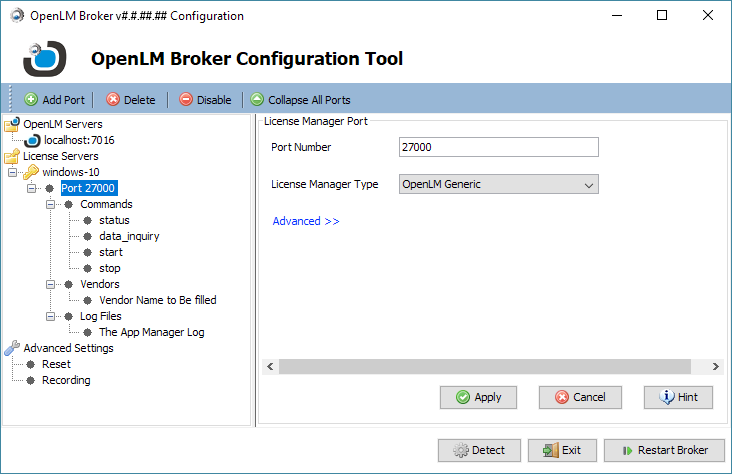
Figure 23: The OpenLM Broker Configuration Tool with a port node expanded.
- Click on the Commands node under the expanded port that you want to configure. The current configuration for the command will be displayed in the Command Definition panel on the right which will be context sensitive.
3. [Optional] Address the Windows Service Configuration on the Commands panel. Use Service is checked by default. The Service Name field will populate with default values when appropriate. [NOTE: If the automated detection fails to populate the field, it is possible to determine the name using Windows Services]. When checked NET START / NET STOP commands are used for Start / Stop processes. When unchecked LMGRD / LMUTIL DOWN are used which are FlexLM-specific.
- Review the paths by clicking each node in the navigation tree. To check the Command Line paths, click the [Execute] button. If the Command Line paths are valid, a confirmation screen appears confirming the success (see Figure 24). If there is an error, the screen will contain error information (see Figure 25). See Table 1 for a list of configurable commands. If the commands are configured as desired, skip to Step #5.
Figure 24: Execute confirmation screen with generic content.
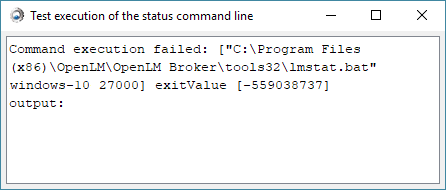
Figure 25: Execute confirmation screen with error content.
| Command Node | Description |
| status | Queries the License Server for its status; Up or idle. |
| data_inquiry | Queries the License Manager for license usage information that is forwarded by OpenLM Broker to the OpenLM SLM. |
| start | Starts license manager server activity. |
| stop | Stops license manager server activity. |
| reread | Prompts the license manager to re-read Option or License files that have been edited and incorporate new information. |
| denial | Returns data about license denials. |
| remove_license | Used to terminate license sessions. |
Table 1: Configurable Commands.
5. [Optional] If any of the paths are incorrect, these can be updated manually (a) or by using the Update feature (b).
a. Manually update a command.
i. Click on the command in the navigation tree. The information for the command will appear on the Command Definition screen.
ii. Edit the path directly in the Command Line field.
iii. Click the [Execute] button to confirm the command is functioning properly. A confirmation screen appears with success or error messages. If an error appears, edit the Command Line as necessary and repeat the test.
iv. Click [Apply] to store and confirmation the changes (see Figure 26).
Figure 26: The Command update confirmation screen after [Apply].
v. Click [OK] to close the confirmation screen.
vi. [Optional] Repeat Step #4.a.i to Step #4.a.iv to configure other commands.
vii. Click [Restart Broker] to engage the new configuration. A success screen will confirm the restart (see Figure 27).
Figure 27: Confirmation screen for the Broker restart.
b. To update all command paths under a Command node:
i. Click on the Command node where the commands reside. The Commands panel will display to the right.
ii. Browse for the path to the desired executable file using the [...] button to the right of the Path field, or type changes to the path directly in the field.
iii. Click the [Update] button. This will update all paths under the Command node that have not previously been manually altered. A success screen will appear (see Figure 28).
Figure 28: The Command update confirmation screen.
iv. Click [Apply] to store the changes. A confirmation screen will appear (see Figure 29).
Figure 29: The Command update confirmation screen after [Apply].
v. Click [OK] to close the confirmation screen.
vi. Click [Restart Broker] to engage the new configuration. A success screen will confirm the restart (see Figure 30).
Figure 30: Confirmation screen for the Broker restart.
License server vendors
The Vendors node on the navigation tree is used to define handling of vendor-specific license and option files. For more information on options files, see the Options File Management document.
-
Expand the port node where vendors need to be added in the OpenLM Broker Configuration Tool navigation panel by clicking the [+] to the left of the port. This will display additional nodes.
-
Click on the [+] to the left of the Vendors node under the port. The Vendor Definition panel will display on the right of the OpenLM Broker Configuration Tool screen.
-
A node titled ¨Vendor Name to Be Filled¨ will display under the Vendor node. [NOTE: If no node appears, one can be added by clicking the [+Add Vendor] button above the navigation pane when the Vendor node is active.]
-
Click on "Vendor Name to Be Filled" and the Vendor Definition panel will display additional fields to be used in the definition (see Figure 31).
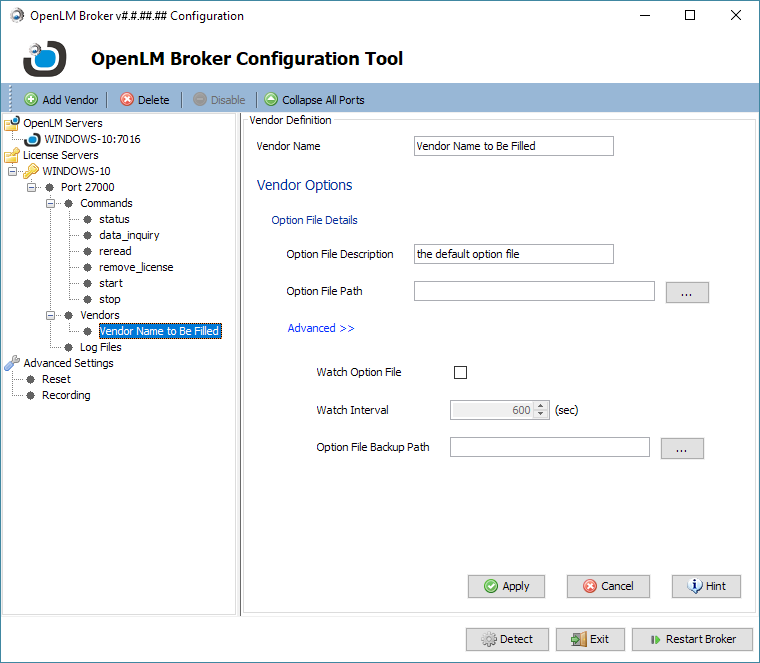
Figure 31: The Vendor Name to Be Filled node highlighted and additional fields visible.
- Enter the vendor name in the Vendor Name field. The vendor's name should be exactly as provided by the vendor (e.g.: ARCGIS, adskflex, ptc_d, MLM, ugslmd). For FlexLM, this field is secondary as the real name is read directly from the action line. For other license managers, the exact name is necessary for proper log analysis. The provided name will be displayed in the tree node when the changes are applied and can be used to create log file definitions (see License Server Log Files). [NOTE: You can find the vendor name in the Broker's 'data_inquiry' command execution output or in EasyAdmin's Management → Licenses window.]
- For RLM and LMX, the name must be an exact match to the one found in the Licenses window.
- For DSLS, the vendor name should be entered as "Dassault Systemes".
6. [Optional] Enter a description in the Option File Description field. This is a free text field for reference.
-
Click the [...] button to the right of the Option File Path field to search for the vendor option file. This should be a full path, including the option file name.
-
Click on the "Advanced>>" link to display the advanced options on the bottom of the panel if they are not displayed already.
-
Check the Watch Option File box to enable detection of changes in the option file.
-
[Optional] Adjust the Watch Interval which determines how often the option file is checked. [NOTE: It is recommended to keep the 600 sec default value for best performance.]
-
Click [Apply] to commit the changes made to the Vendor Definition panel. A confirmation screen will appear (see Figure 32).
Figure 32: The Command update confirmation screen after [Apply].
- Click [Restart Broker] to engage the new configuration. A success screen will confirm the restart (see Figure 33).
Figure 33: Confirmation screen for the Broker restart.
License server log files
Log files produced by license managers must be configured to be read by OpenLM Broker. OpenLM Broker forwards data to the OpenLM server for analysis of license usage.
-
Expand the port node which needs to be configured so OpenLM Broker will read the log file by clicking the [+] to the left of the port in the OpenLM Broker Configuration Tool navigation panel. This will display additional nodes.
-
Click on the Log Files node. This displays the Log File Definition panel and reveals the [+Add Log File] button above the navigation panel (see Figure 34).
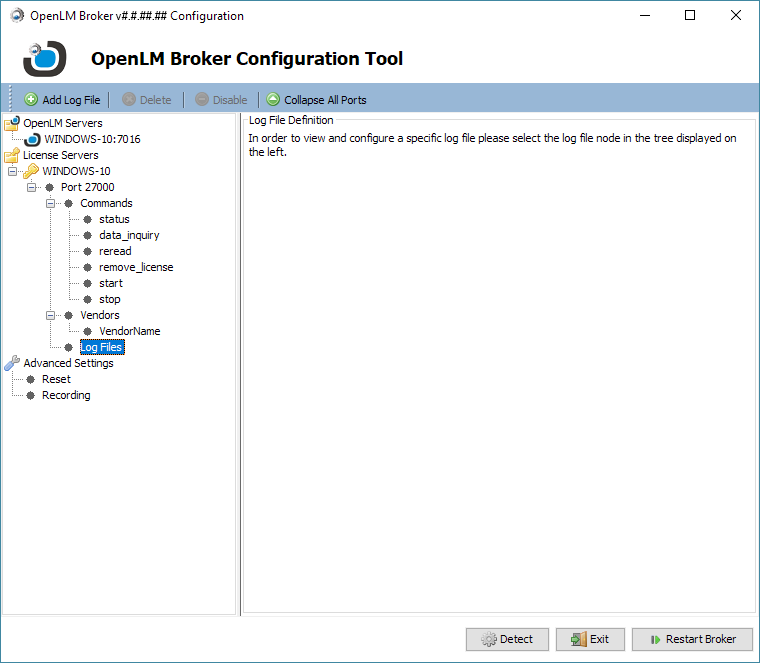
Figure 34: The Log File node highlighted.
-
Click the [+ Add Log File] button. This will add a node below the Log Files node and reveal fields in the Log File Definition panel which are used to configure the definition.
-
Select the log file type from the Type drop-down list. Different options become available and should be selected according to the type of the license manager. E.g. For FlexLM it's "FlexLM Debug Log File", for LMX it's "LMX Debug Log". If no appropriate option is available, select "Other".
-
Enter a name for the log file in the Name (Descriptive) field. This is a free text field and is used in the navigation tree as the log file node name.
-
Click the [...] button to the right of the Path field to search for the log file. This field should contain the full path, including the file name.
7. Select a Vendor from the Vendor drop-down list. The vendors are populated from entries that have been entered under the Vendor node. Make sure that for RLM, LMX and DSLS the names are an exact match (see step 5 in the License Server Vendors section).
8. [Optional] Click on the "Advanced>>" link to display the advanced options on the bottom of the panel if they are not displayed already. [NOTE: It is recommended that the default values for these parameters remain as predefined to avoid performance issues.]
9. [Optional] Adjust the Set Data Size Limit parameter. This parameter defines the amount of data that is read from the log file on each pass in kilobytes.
-
Set the Watch Files by Pattern check box. When checked, logs can be tracked even when the logs are configured to change names (e.g., timestamps are added to the filenames). [NOTE: Required for DSLS clients]
-
Click [Apply] to commit any changes. A confirmation screen will appear (see Figure 35).
Figure 35: The Command update confirmation screen after [Apply].
- Click [Restart Broker] to engage the new configuration. A success screen will confirm the restart (see Figure 36).
Figure 36: Confirmation screen for the Broker restart.
Advanced settings
Advanced settings accommodate some general parameters and functions. This includes setting logging levels (A) separately for Broker Service and Broker Configuration, as well as Reset (B) and Recording (C) components.
A. OpenLM Broker log levels*
The log file level for Broker Service and Broker Configuration are set on the Advanced Settings panel.
- Click on the Advanced Settings node in the navigation panel of the OpenLM Broker Configuration Tool to display the Advanced Settings panel (see Figure 37).
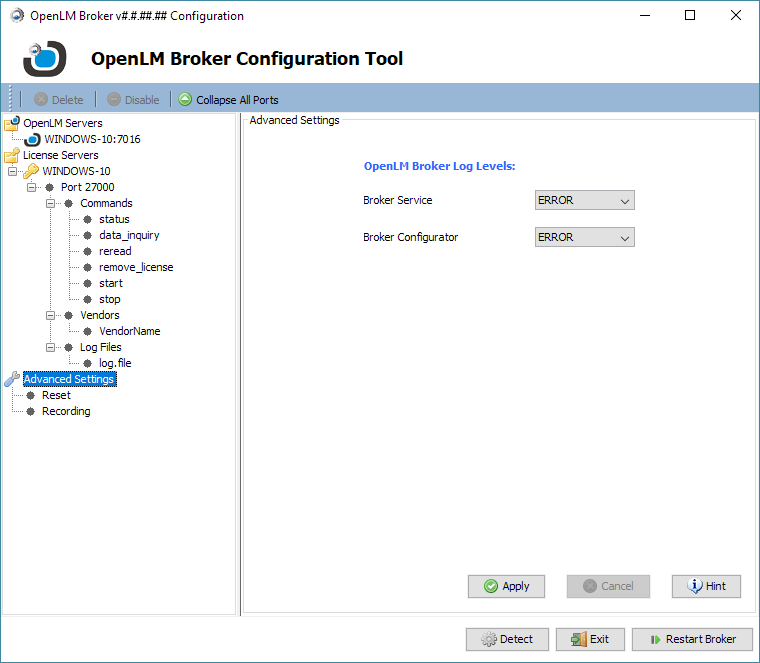
Figure 37: The Broker Configuration Tool with Advanced Settings displayed.
2. [Optional] Choose the desired logging level from the drop lists. Table 3 defines these parameters. [NOTE: More complex levels of logging may affect system performance.]
| Log Level | Description |
| ALL | Most detailed level of event reporting including all data transaction information. |
| DEBUG | Detailed information about processed data transactions that give context to events so they can be analyzed. |
| WARN | Includes unexpected events that may warrant attention but do not qualify as errors or failures. Intended to help diagnose running issues. |
| ERROR | Logs all error and failure messages signaling irrecoverable behaviors or data loss . |
| Table 3: Log level listing with descriptions. |
- Click [Apply] to commit any changes. A confirmation screen will appear (see Figure 38).
Figure 38: The Command update confirmation screen after [Apply].
- Click [Restart Broker] to engage the new configuration. A success screen will confirm the restart (see Figure 39).
Figure 39: Confirmation screen for the Broker restart.
B. Reset
Reset is intended to provide a method for clearing configurations OpenLM Broker. Because this may have broad-reaching effects, it is recommended that users become familiar with all the ramifications of resetting before attempting to reset (listed below as well as on the Reset panel).
- Reset clears all License Server and Port definitions. Any manual configuration of ports will be lost.
- Reset is not intended for deleting single ports. [NOTE: To delete a specific port or license server, click the appropriate node and then click the [Delete] button above the navigation tree.]
- Reset should not be used to detect additional ports because it wipes out customizations. [NOTE: Use [Detect] to automatically configure additional ports. See the section of this document on Detecting Broker Configuration.]
- Reset backs up the the OpenLM Broker configuration file prior to resetting. The backup file is labeled broker_YYYY-MM-DD_HH-MM-SS.xml. Users can rollback to that configuration by changing the file name to broker.xml (the current XML file name will need to be changed first).
- Default settings are applied after reset using automatic detection.
- OpenLM SLMs nodes are not affected.
- Advanced Settings are not affected.
After considering these warnings, the configuration can be reset using the following steps.
-
Click the Reset node so the Reset panel appears on the right of the OpenLM Broker Configuration Tool screen.
-
Click the [Reset] button. A Reset confirmation screen will appear (see Figure 40).
****Figure 40: The Reset confirmation screen.
- Click the [Yes] button to confirm deletion of the current configurations. Once the current configuration is deleted, a screen will appear (see Figure 41) while the system detects existing license servers..
Figure 41: Detecting existing license servers.
- Click [Restart Broker] to engage the new configuration. A success screen will confirm the restart (see Figure 42).
Figure 42: Confirmation screen for the Broker restart.
C. Record
Recording is a debugging feature meant to record OpenLM Broker activity. It is generally used by OpenLM support to locate issues. To record, follow the steps below.
- Search for a location to store the recording using the [...] browse button located to the right of the Recording to Path field. Making a selection will populate the field with the full path but no file name. The file will be created and stored there when the [Record] button is clicked (Step #4) and will be named as in the example below:
<serverName>_<port #>_<startDateTime>_<endDateTime>.rec
-
Set the duration of the recording in Recording Duration field. This defaults to one minute.
-
Select the ports to be recorded. These are populated in a tree structure according to the ports and license servers in the navigation panel (see Figure 43). [NOTE: The illustration shows a checkbox tree in the Recording Configuration panel used for selecting what to record. In this case, the FlexLM license server will be recorded but the OpenLM App manager will not.]
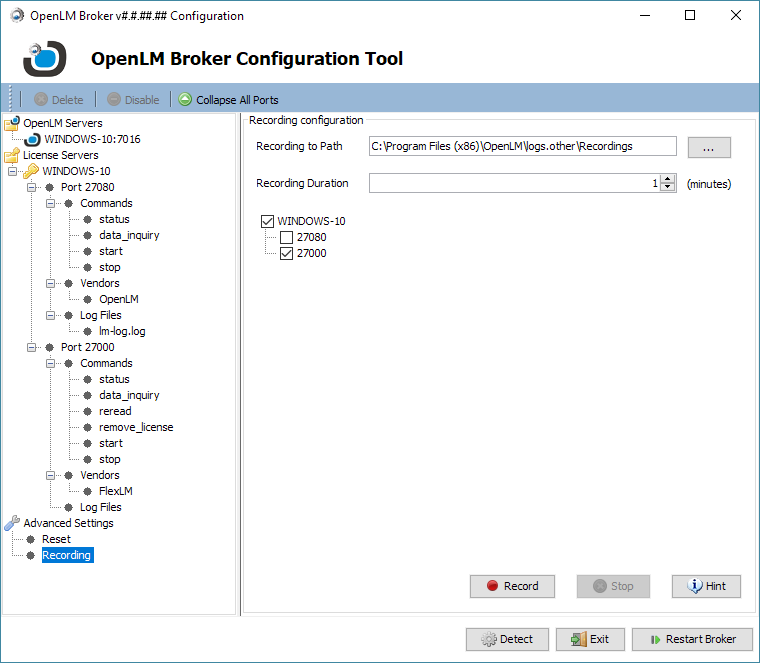
Figure 43: The Recording Configuration panel with port 27080 selected.
- Click the [Record] button. A file will be created and the activity recorded for the duration selected.
Exit OpenLM Broker
When the configuration is complete, it is recommended that the user exit the configuration tool. Three components usually apply to nearly any configuration change (see the buttons on the screen in Figure 44):
- [Apply]
- [Restart Broker]
- [Exit]
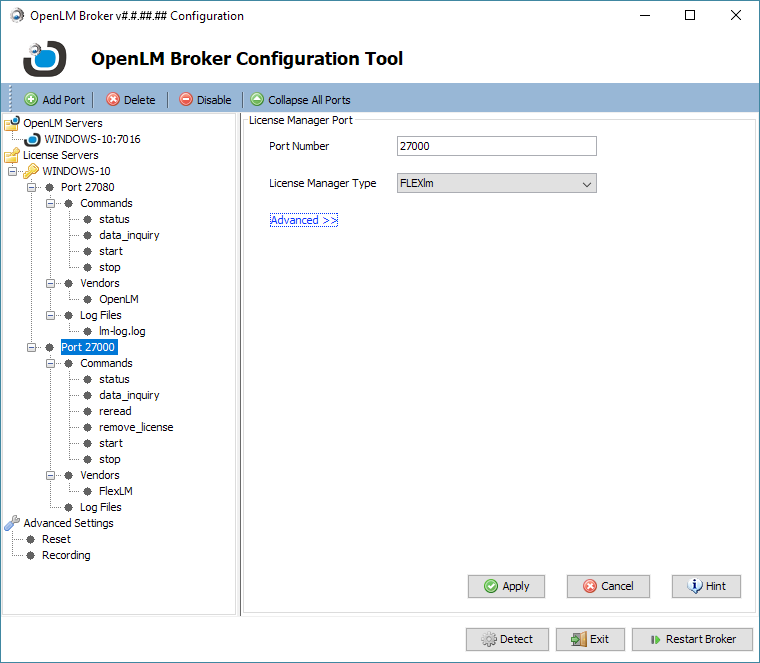
Figure 44: A typical OpenLM Broker screen.
When exiting the configuration screen it is best to always click [Apply] (to store changes), then [Restart Broker] (to make changes live) before clicking [Exit] (to close the screen). This will conclude OpenLM Broker configuration.