This is a quick guide to setting up the SSL connection for the OpenLM SLM and Identity Service v2x.
Important:
- The certificates used for the SLM must also be installed and present in the Trusted Certificate Store of the machine with the component connecting to the OpenLM SLM.
- Once the server’s SSL is enabled, all components that connect to it must update their hostname/IP to use the HTTPS protocol. As with the SLM configuration, ensure the exact FQDN is used when specifying the host.
- A self-signed certificate has been used for demonstration purposes. We strongly advise using a use Certificate with a digital signature from a Certificate Authority (CA).
Setting up SSL for Identity Service
- Go to C:\Program Files\OpenLM\OpenLM IdentityService\SecurityService\cert and place here the certificate with a digital signature from a certificate authority (CA).
Attention! Do not delete any existing certificates! - Open the appsettings.json file at C:\Program Files\OpenLM\OpenLM Identity Service\SecurityService with a convenient text editor and administrator privileges.
- Locate the Settings node and change the “IssuerUri” parameter from HTTP to HTTPS:
},
  "Settings": {
    "UseDb": true,
    "IssuerUri": "https://FQDN:5000",
    "DbType": "MariaDB"
  },
5. Edit the Kestrel node. Provide the data for the certificate: path to the Certificate and password then change the URL parameter from HTTP to HTTPS:
  },
  "Kestrel": {
    "Endpoints": {
      "Http": {
        "Url": "https://FQDN Name:5000"
          "Certificate": {
          "Path": "./cert/cert.pfx",
          "Password": "Cert Password"
        }
      },
      "Https": {
        "Url": "http://*:5001"
   }
    }
  },
- Path – The path to the certificate file. Make sure the Windows paths use double backslashes instead of forward slashes.
- Password – the password for the private key of the certificate.
- Certificate Name – The certificate name should be ‘cert.pfx’
Note: make sure the curly braces { } are properly closed at all times.
6. Save the changes.
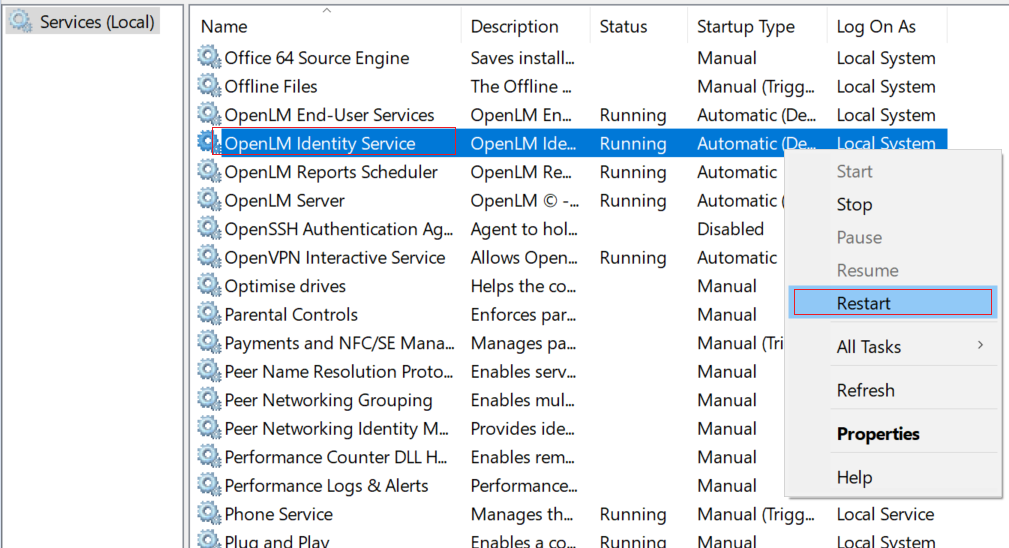
7. Restart the Identity Service:

8. To verify whether the SSL connection is successful, open up the Identity Service UI, type in the address bar the new address (HTTPS), and refresh the page. Click on the “Lock” icon as portrayed below:

Setting up SSL for OpenLM SLM
1. Go to C:\Program Files\OpenLM\OpenLM Server\bin and create a folder called “Cert”, then paste the certificate with a digital signature from a certificate authority (CA) to this folder.
2. Open up the appsettings.json located at C:\Program Files\OpenLM\OpenLM SLM\bin in a text editor with administrator privileges.
3. Locate and edit the Kestrel node configurations and update the URL for the Kestrel endpoint, i.e the full path to EasyAdmin: https://FQDN:port
},
  "Kestrel": {
    "Endpoints": {
      "Http": {
        "Url": "https://FQDN:5015"
      },
4. Locate and edit the Certificates node. Provide the following details:
- Path – The path to the certificate file. Make sure the Windows paths use double backslashes instead of forward slashes.
- Password – the password for the private key of the certificate.
Note: make sure the curly braces { } are properly closed at all times.
},
    "Certificates": {
      "Default": {
        "Path": "./cert/cert.pfx",
        "Password": "12345"
      }
    },
5. Locate the “Auth” node and edit the “Authority” line with the updated Identity Service URL (HTTPS)
},
  "Auth": {
    "EnableSecurity": true,
    "Authority": "https://hostnname:5000",
    "Audience": "openlm.server.api",
    "AuthProvider": "",
    "ClientId": "openlm.server.client",
    "ClientSecret": "c0936471-0f6a-44af-9078-99d150683cad",
    "ClientScope": "openlm.cloud.scope openlm.ugs.read.scope IdentityServerApi openlm.dss.scope openlm.etlmanager.scope",
    "TokenEndpoint": "/connect/token"
  }
}
6. Save the changes (Ctrl+S).
7. Now it is time to change the OpenLM SLM URL we have declared in the Identity Service Settings. Login to the Identity Service→Settings→Security Configuration tab and declare the updated Sever’s (SLM) address (HTTPS) and click Save:

8. Restart the Server Service.

9. To verify the connection, type in the address bar the updated EasyAdmin address: https://FQDN:port

