This document is a comprehensive technical guide to the OpenLM Virtual License Manager (VLM). It begins with a detailed explanation of what the Virtual License Manager is, followed by a systematic walkthrough of its functionalities using step-by-step instructions and accompanying screen illustrations.
What is the Virtual License Manager?
VLM is a cloud software tool that manages and processes licenses for the FlexNet Embedded license manager. Looking ahead, VLM aims to support additional license managers. However, this expansion will be subject to the condition that the license managers provide an external interface, such as APIs or other methods, to retrieve information and allocate licenses to users or devices.
The Virtual License Manager (VLM) currently supports compatibility exclusively with OpenLM Cloud, with plans to introduce an On-Prem version in the future. Given its cloud-based nature, a registered account on the OpenLM Cloud Portal is mandatory.
VLM User Roles
VLM has 2 types of roles for users: Admin Role and Manager Role.
Admin Role
- A user with an Admin Role manages Physical License Managers, Virtual License Managers, Virtual Pools, and users with a Manager Role. It can manage and do the following operations:
- Visualize Physical License Managers with their features.
- Visualize and manage Virtual License Managers with their features. A user can create Virtual License Managers from features of Physical License Managers, for example, it can create one Virtual License Manager from one or many features of different Physical License Managers or the same Physical License Manager. A user can delete the Virtual License Managers, but only in cases when there are no Virtual Pools created from these Virtual License Managers.
- Visualize and manage Virtual Pools with their features: a user can create Virtual Pools from the features of Virtual License Managers. Specifically, a user can create a Virtual Pool by selecting licenses of only one feature from one Virtual License Manager. This Virtual Pool can then be assigned to a certain user with a Manager Role who will be responsible for allocating those licenses to specific users or devices within the company. Hence, a Virtual Pool is a pool of licenses associated with a specific feature of a License Manager. When creating a Virtual Pool, the user determines the number of licenses they want to include in that pool. They also designate a user with a Manager Role to manage the Virtual Pool, responsible for allocating or removing license allocations to users or devices.
- The allocation of licenses is done on a one-to-one basis, meaning that each license of a certain feature can only be allocated to one user or device.
- As the user with the Admin Role sets a number of licenses for a Virtual Pool, that quantity is subtracted from the corresponding feature, effectively decreasing the available license quantity.
- This decrement continues for each Virtual Pool until the quantity reaches zero. If the quantity of licenses for a feature reaches zero, that feature can no longer be used for creating new Virtual Pools.
- Additionally, users have the ability to delete Virtual Pools, and when a Virtual Pool is deleted, the quantity of licenses associated with that pool is returned to the feature of the license manager it was created from, increasing its value back to the number of licenses in the deleted Virtual Pool.
- Visualize and manage users with a Manager Role: A user with an Admin Role can visualize users with a Manager Role in 2 places: The Users tab of VLM and the Users tab of OpenLM Cloud Portal. Also in the Users tab of OpenLM Cloud Portal, a new user with a Manager Role can be invited and or/and deleted.
Manager Role
- A user with a Manager Role can visualize the Virtual Pools and manage license allocations, allocate licenses, remove allocations of licenses, and manage devices of users.
- Visualize Virtual Pools with their features with their quantity of licenses.
- It can allocate licenses to devices, i.e. their users in attachment, by the ID of the device. Allocation of a license is going one-to-one, i.e. only one license of a certain feature can be allocated only to one user or device.
- It can remove allocations of licenses, i.e. their users in attachment, by the ID of the device. The removal of allocation of a license is going one-to-one, i.e. only one license of a certain feature can be removed from one user or device.
- Add a description to the Device or User. As the user is shown only in the encrypted way by Device ID, a user with Manager Role cannot know or remember for the future who is that user, thus user with Manager Role can add a note or description of that Device ID (user) on time of allocation of a license, after being able to manage them by special page, reaching that page by clicking to a number of Devices Ids of a certain feature of Virtual Pool.
How to access Virtual License Manager
- To get started, register for an account on the OpenLM Cloud Portal if you don’t already have one. Simply visit the following link to create your account: OpenLM Cloud Portal Registration.
- To access the OpenLM Cloud Portal, log in using the appropriate URL based on your registration zone:
OpenLM Cloud Portal – Other Countries
OpenLM Cloud Portal – EU Countries - Activate Virtual License Manager Product in the OpenLM Cloud Portal.
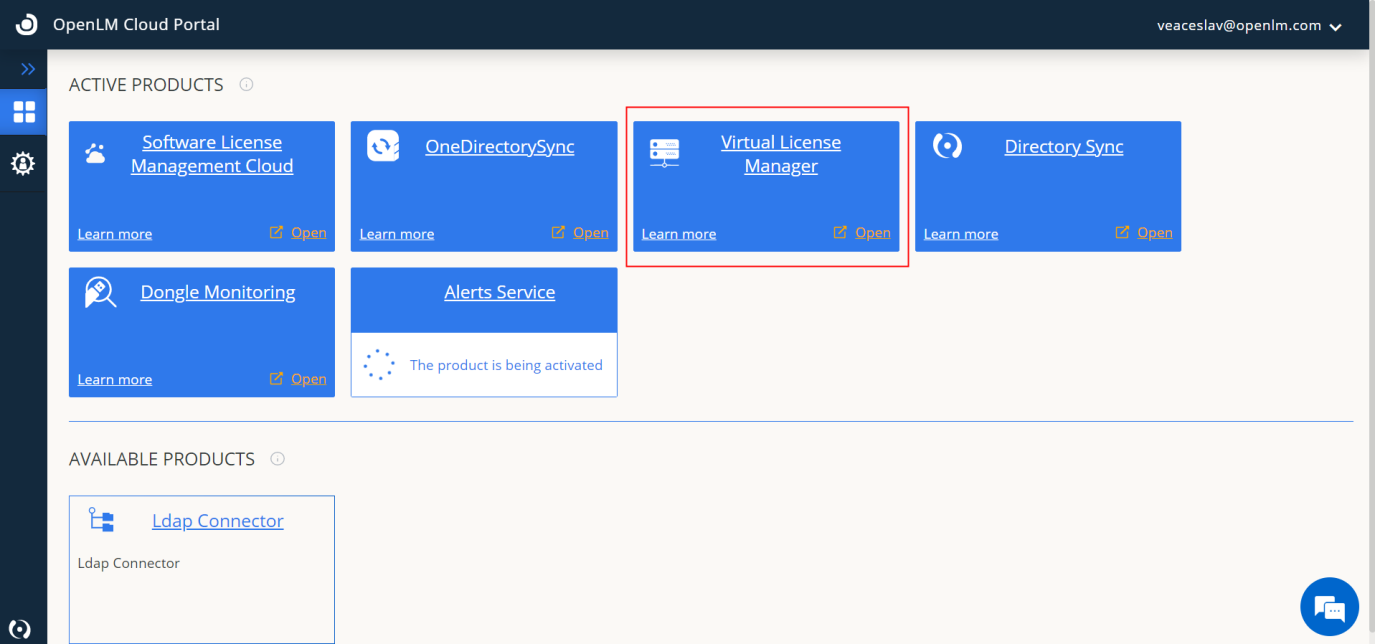
- To open the Virtual License Manager (VLM) product, simply click on the “Open” button. The specific user interface (UI) interface of VLM that you will see upon opening will depend on the role assigned to you.
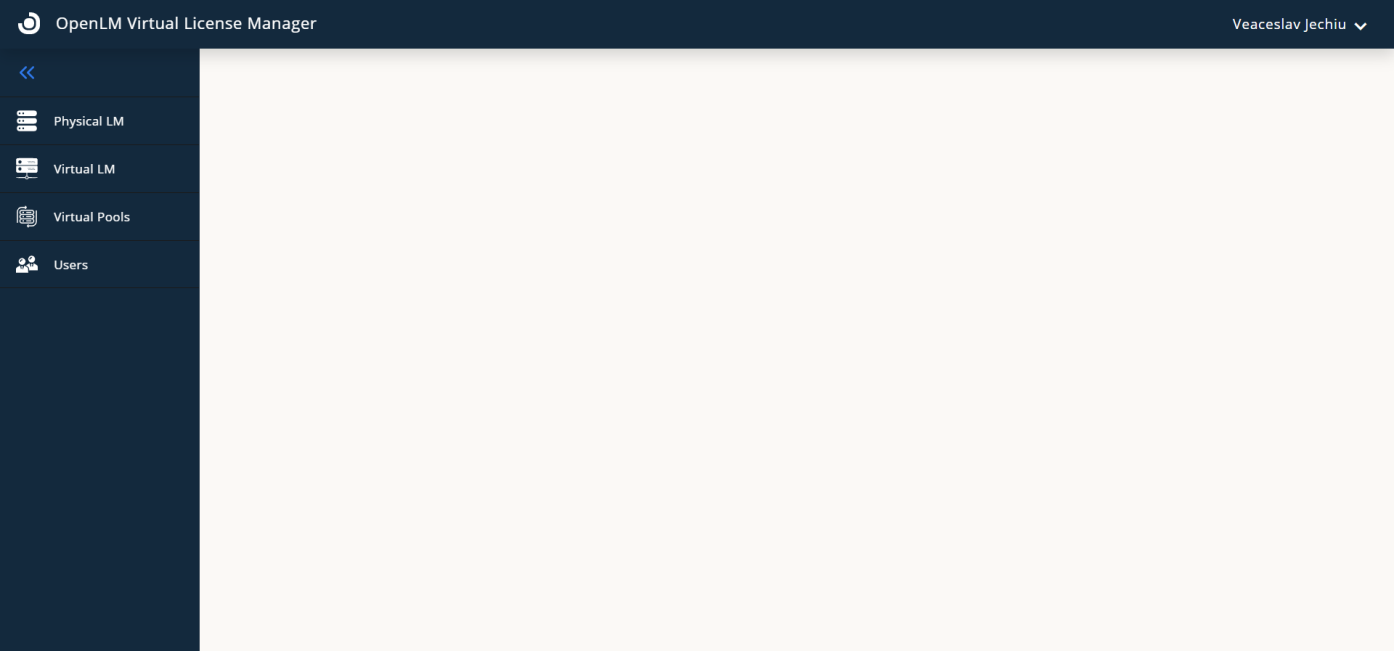
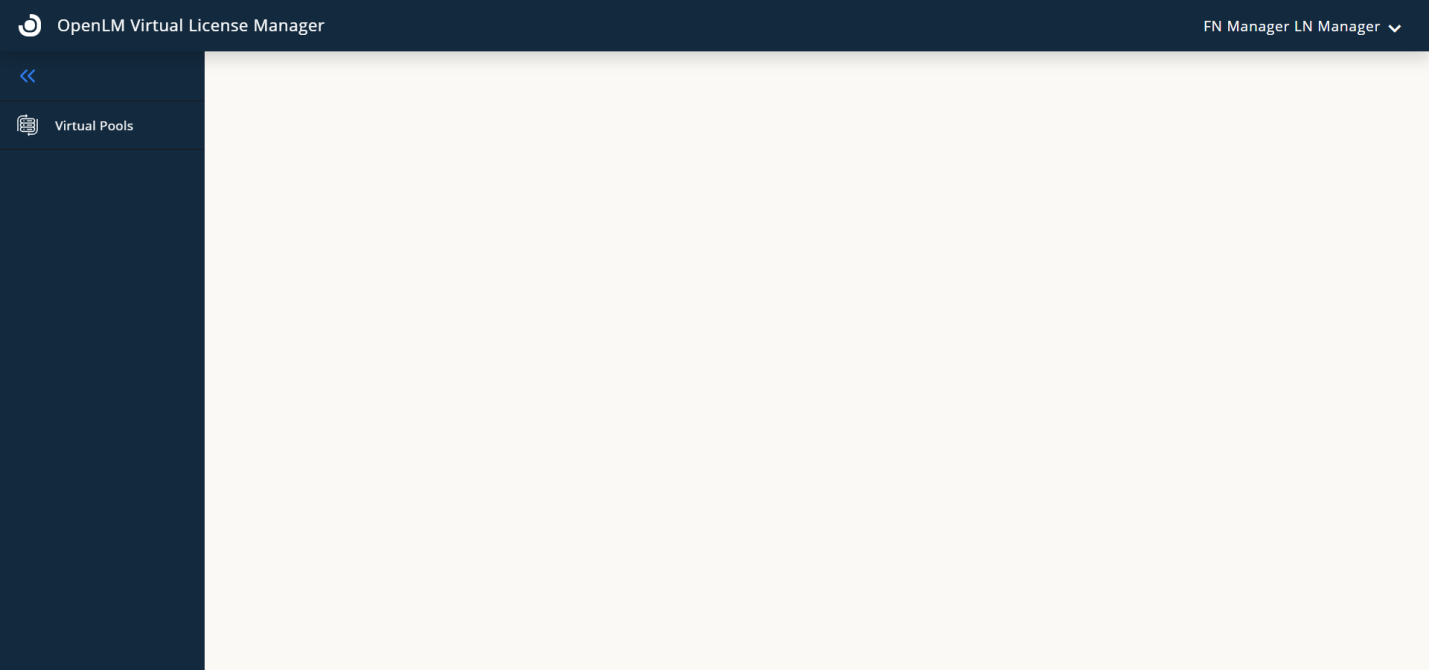
- Users with the Admin Role will be presented with the following user interface (UI) upon opening the Virtual License Manager (VLM):
- Users with the Manager Role will be presented with the following user interface (UI) upon opening the Virtual License Manager (VLM):
Virtual License Manager User Guide
Admin Role User Guide
To synchronize the Virtual License Manager (VLM) with the FlexNet Embedded server’s License Managers, follow these steps:
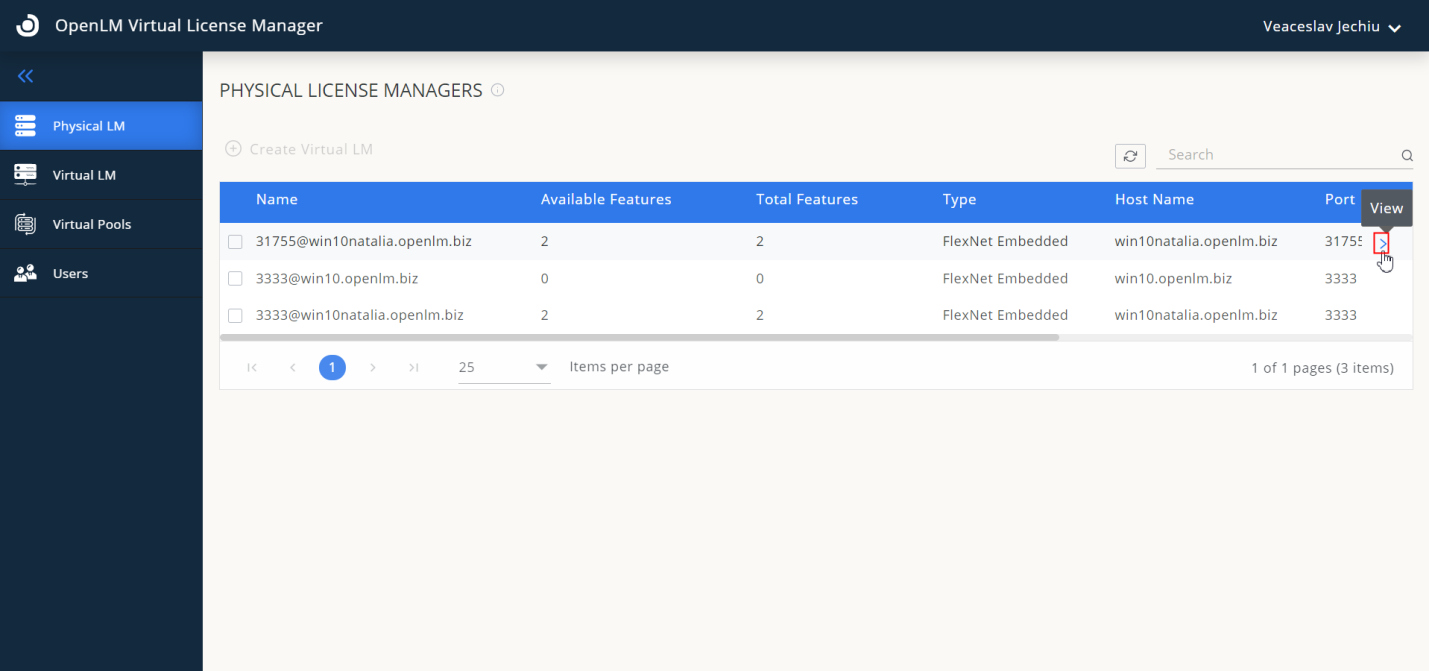
- Access the Physical License Managers page by clicking on the “Physical LM” option from the left tab menu.
- On the Physical License Managers page, you will find various columns, including “Available Features” and “Total Features.”
- The “Available Features” quantity indicates the number of features that can be assigned to the Virtual License Manager. Each feature can only be assigned once to a Virtual License Manager. As features are assigned, the quantity in the “Available Features” column decreases for the corresponding Physical License Manager.
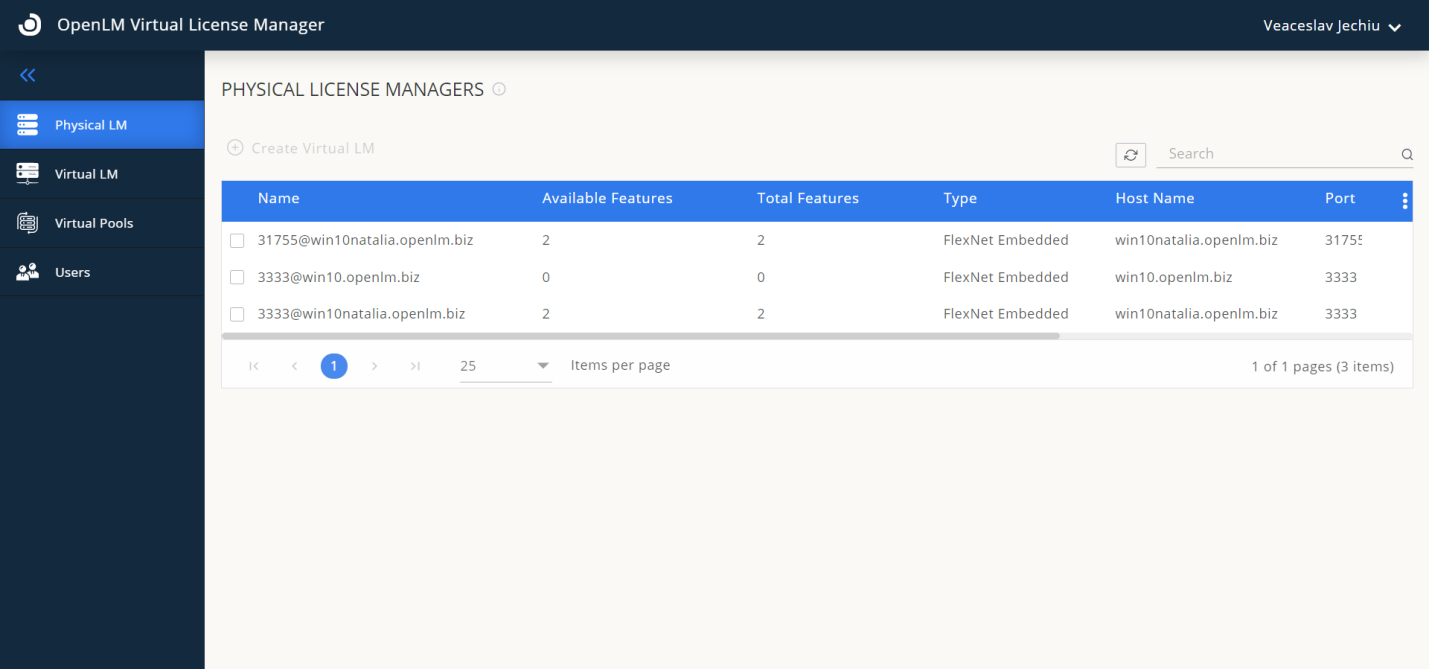
- When the “Available Features” quantity reaches zero for a Physical License Manager, it can no longer be used to create new Virtual License Managers. The feature becomes unavailable for further assignments and is not visible in the list of assignments.
- The “Total Features” quantity represents the total number of features associated with a Physical License Manager, regardless of their availability.
- If the “Total Features” quantity is zero, it means that there are no features delivered or accessible for management or use through that specific Physical License Manager. In this case, the “Available Features” quantity is also zero, indicating that the Physical License Manager cannot be used for the creation of Virtual License Managers.
Search Functionality
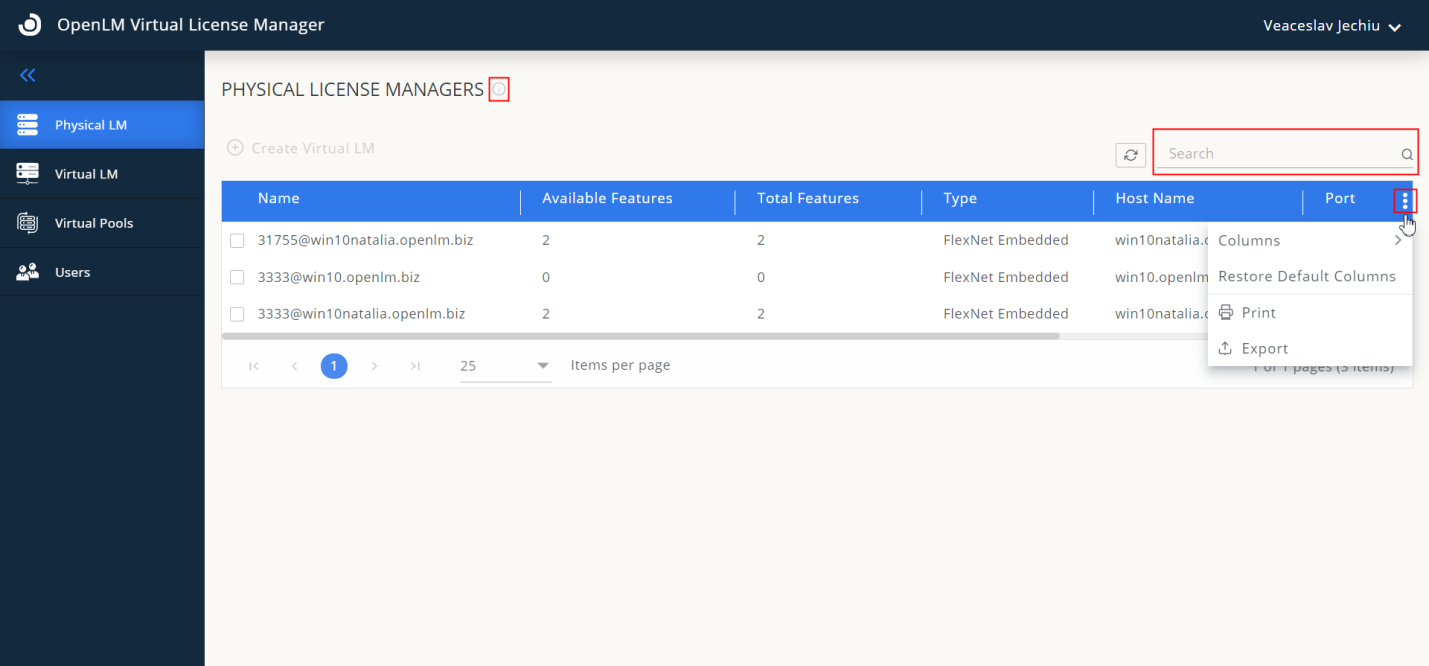
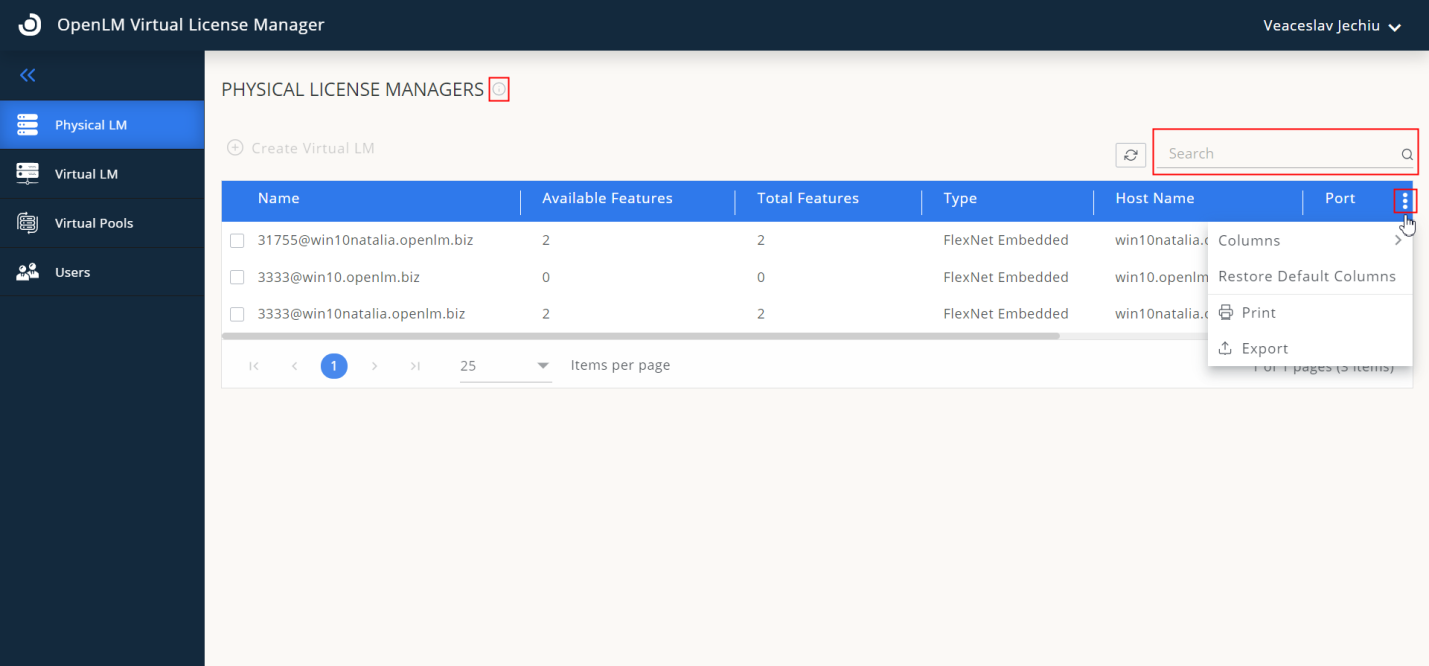
- Easily find a specific Physical License Manager by using the search field. Enter the name you are looking for, and the table will automatically filter the results.
Column Management
- Customize the view of the table by managing the columns. You have the option to rearrange their order, adjust their size, or even remove certain columns altogether. Simply click on the three-dot icon located on the top-right of the table header to access these options.
Print and Export
- Utilize the three-dot icon mentioned above to access the print and export functionalities. This allows you to generate a printable version or export the table data to a CSV file for further processing.
Information Icon
- If you require information about the current page or tab you are on, look for the information “i” icon located on the right side of the header. Clicking on this icon will provide you with relevant details and insights pertaining to the specific page or tab you are viewing.
View Physical License Manager Features
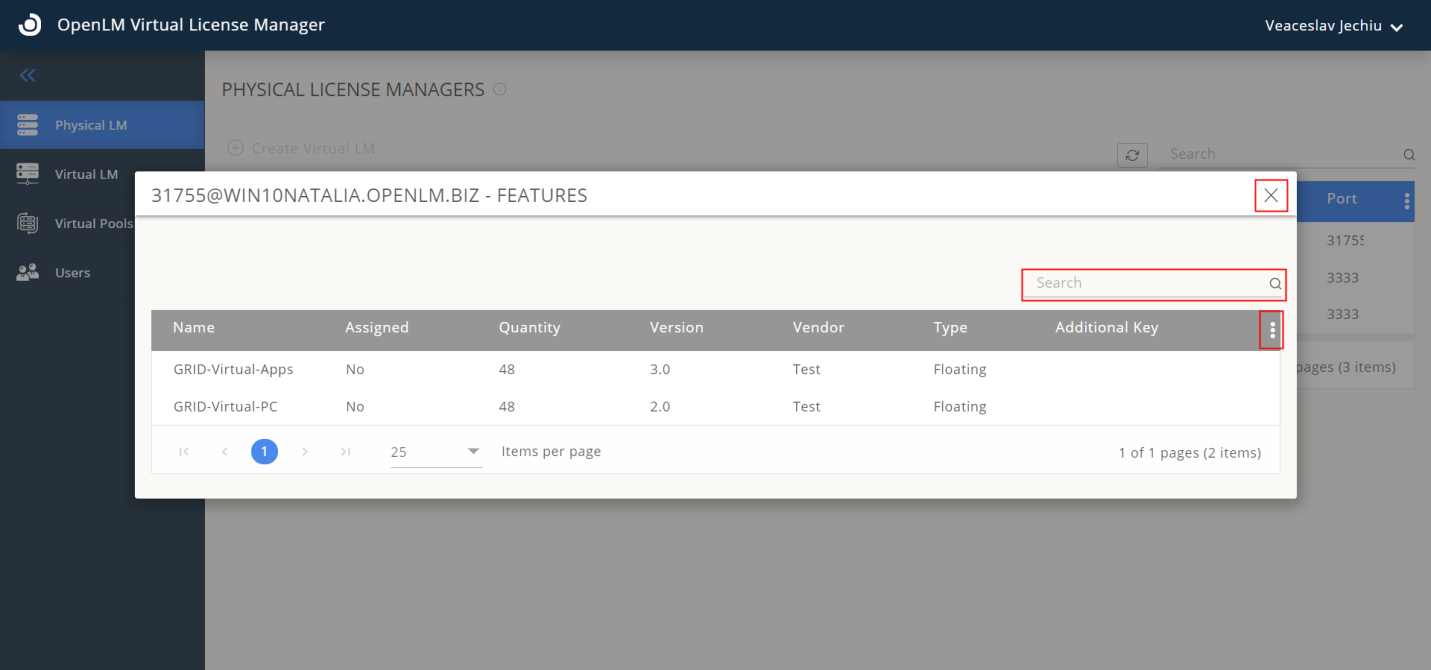
- To view Features associated with a Physical License Manager, simply click the “View” icon located at the end of the respective record.
- Utilize the search field to search for specific Features by name.
- To close the Features view, click the cross-close icon.
- You can manage columns, print, and export the Features table in the same way as you would with the Physical License Managers table.
Creating a Virtual License Manager
- To create a Virtual License Manager, select the Physical License Managers tab and click the “Create Virtual LM” button:
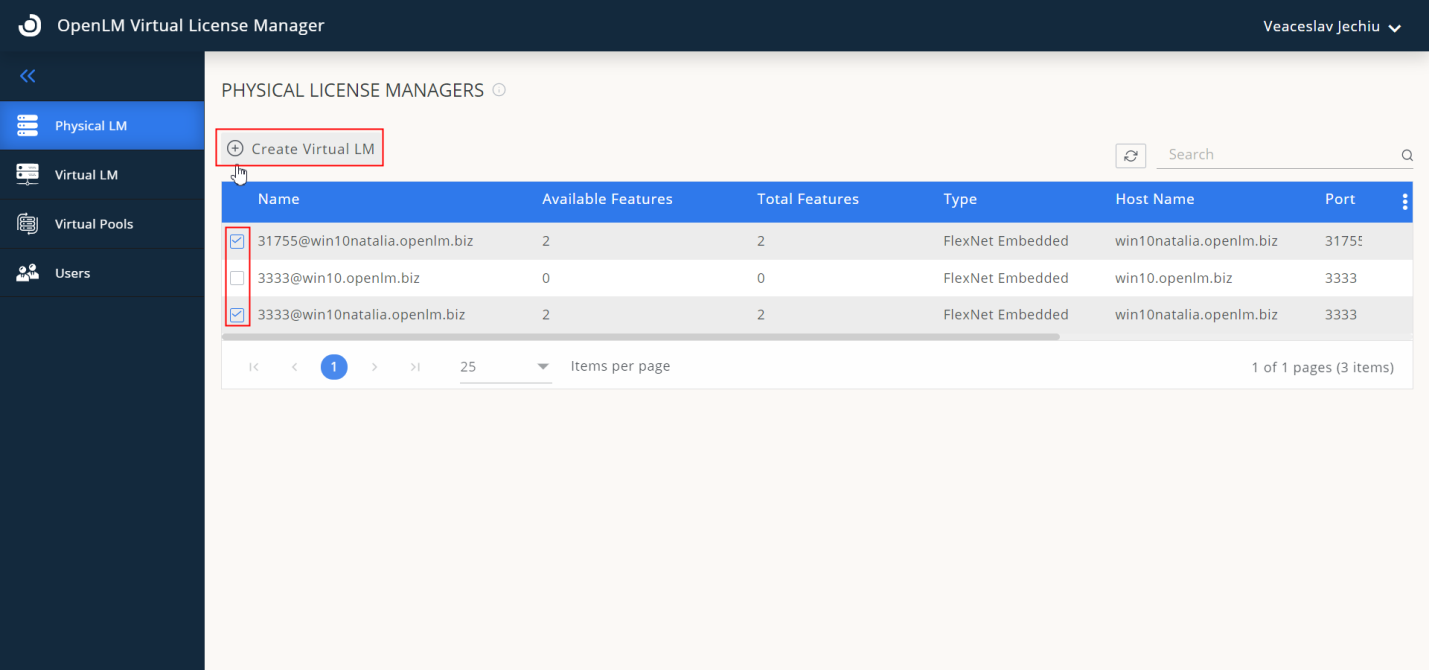
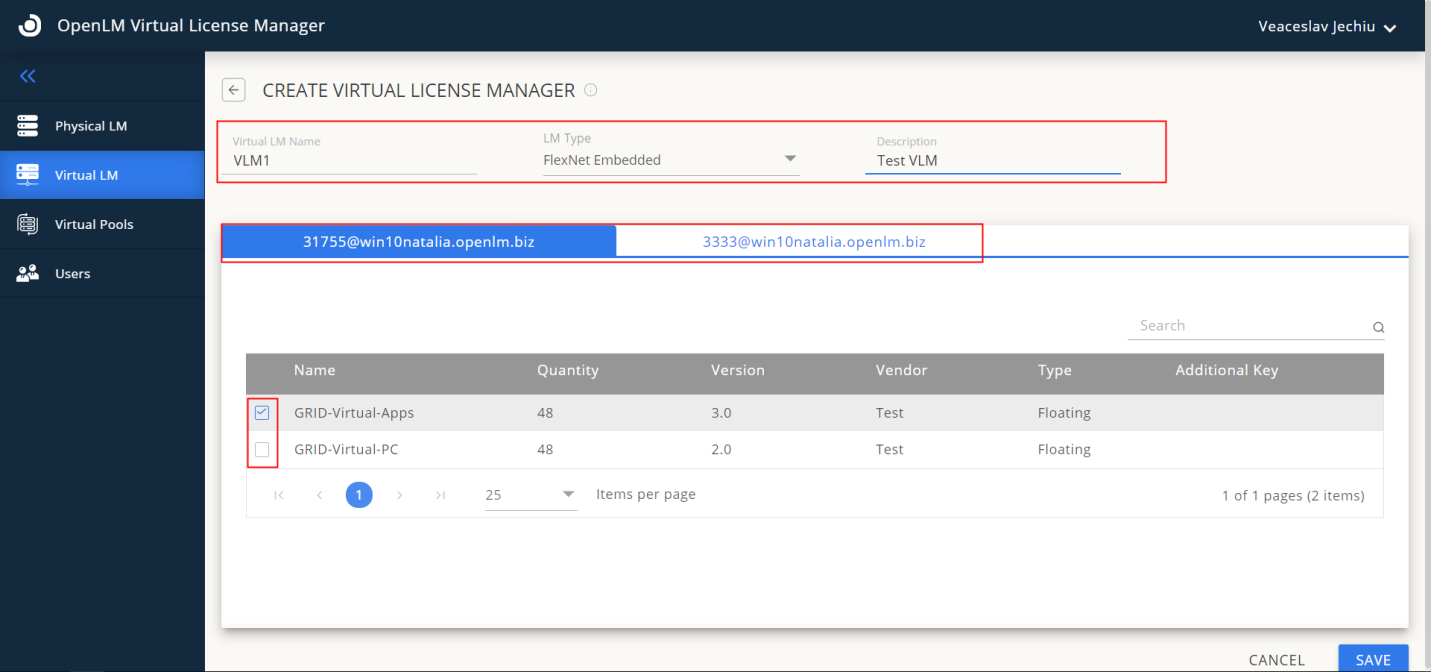
- Fill in the fields with data: a Virtual License Manager name, select the type, and give a free text description
- Once you have selected the desired features from one or both Physical License Managers to assign them to the Virtual License Manager, click “SAVE”. To cancel the operation or return to the previous page, simply click “CANCEL”.
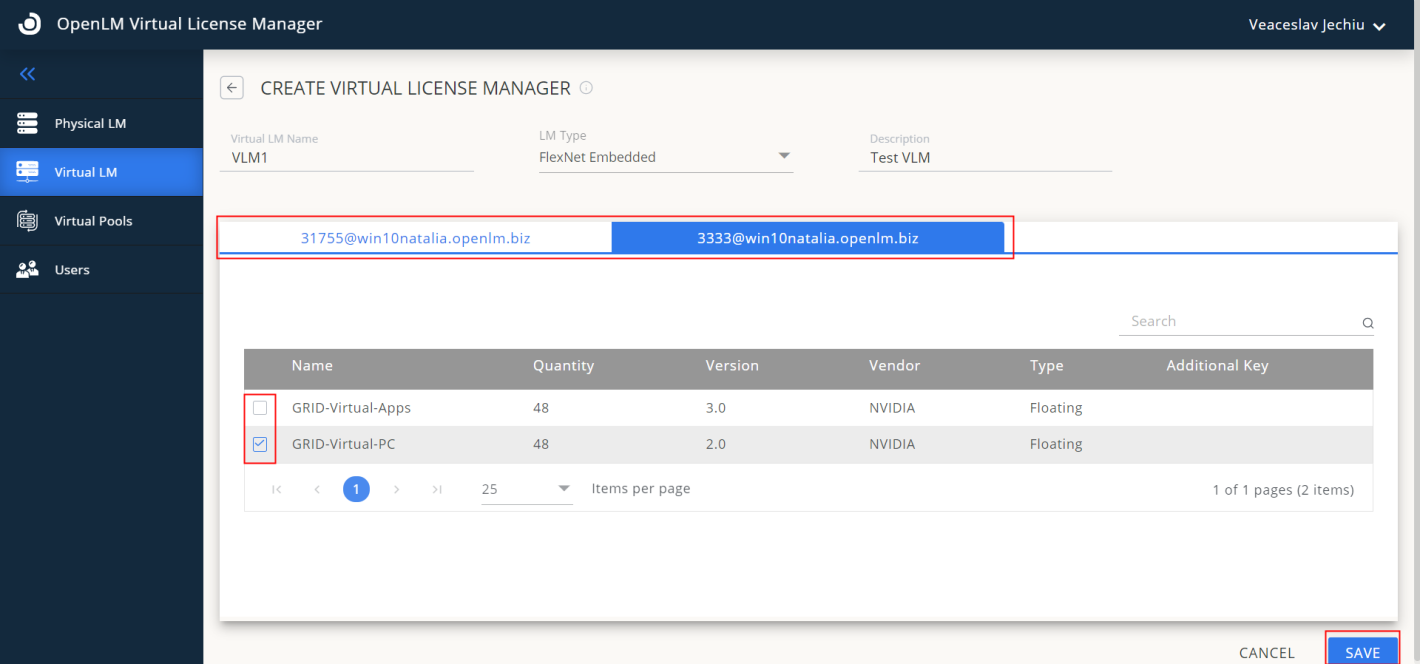
- The Virtual License Manager is successfully created. you will be automatically directed to the Virtual License Managers page with the “Virtual LM” item selected in the left tab.
- You can always navigate back to this page or choose other items from the left tab menu.
- In addition to the self-explanatory columns, there are “Available Features” and “Total Features” columns.
- The “Available Features” quantity indicates the number of features that can be assigned to Virtual Pools.
- When creating a Virtual Pool, you specify the number of licenses to allocate and designate a Manager Role user to manage them.
- As licenses are assigned to Virtual Pools by an Admin Role user, the quantity decreases for each Virtual Pool, eventually reaching zero.
- If the quantity of licenses for a feature becomes zero, it can no longer be used for creating new Virtual Pools and will be removed from the list of available features for that Virtual License Manager
- The Admin can delete Virtual Pools. If a Virtual Pool is deleted, the quantity of licenses of this Virtual Pool is returned back to the feature of Virtual License Manager, from what it was created, increasing its value back to the number of licenses of Virtual Pool deleted, thus “Available Features” quantity is increasing back allowing that feature to be assignable to other Virtual Pool, in case that feature had 0 licenses before.
- The “Total Features” quantity displays the overall number of features associated with the Virtual License Manager, regardless of whether they have available licenses or not, providing an overview of the total features belonging to a specific Virtual License Manager.
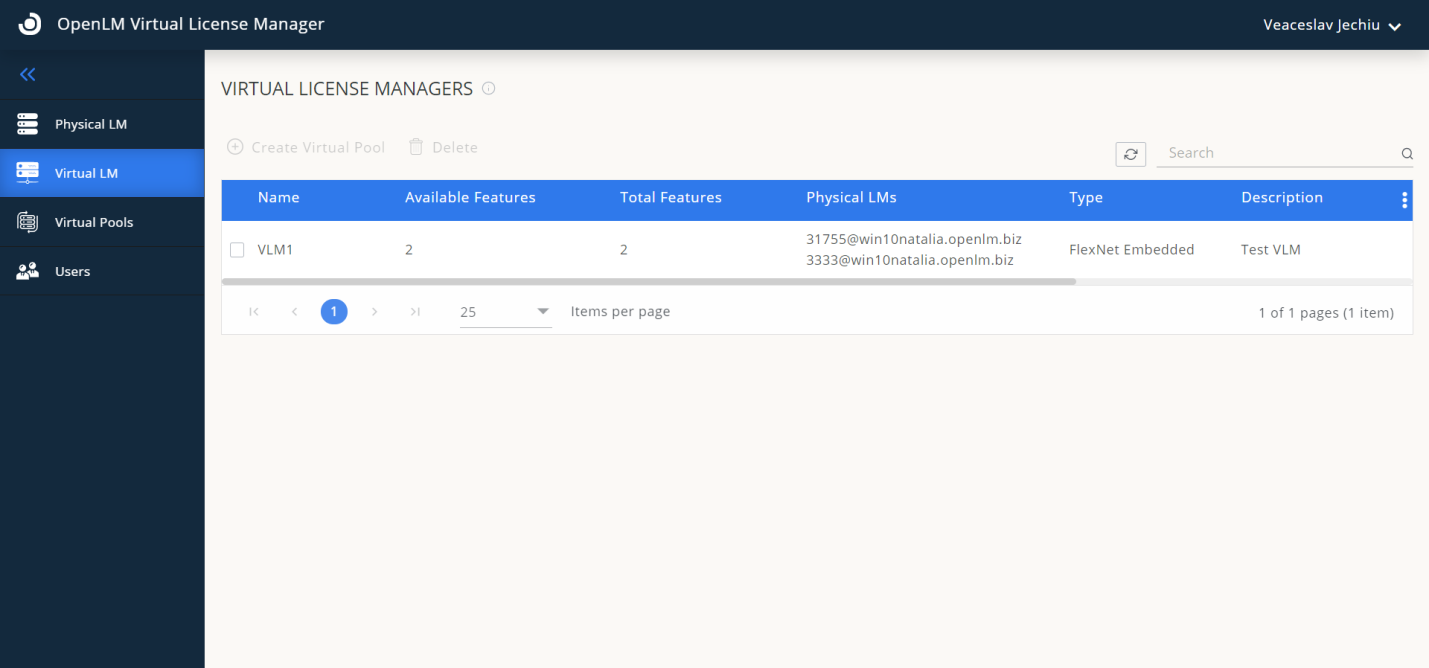
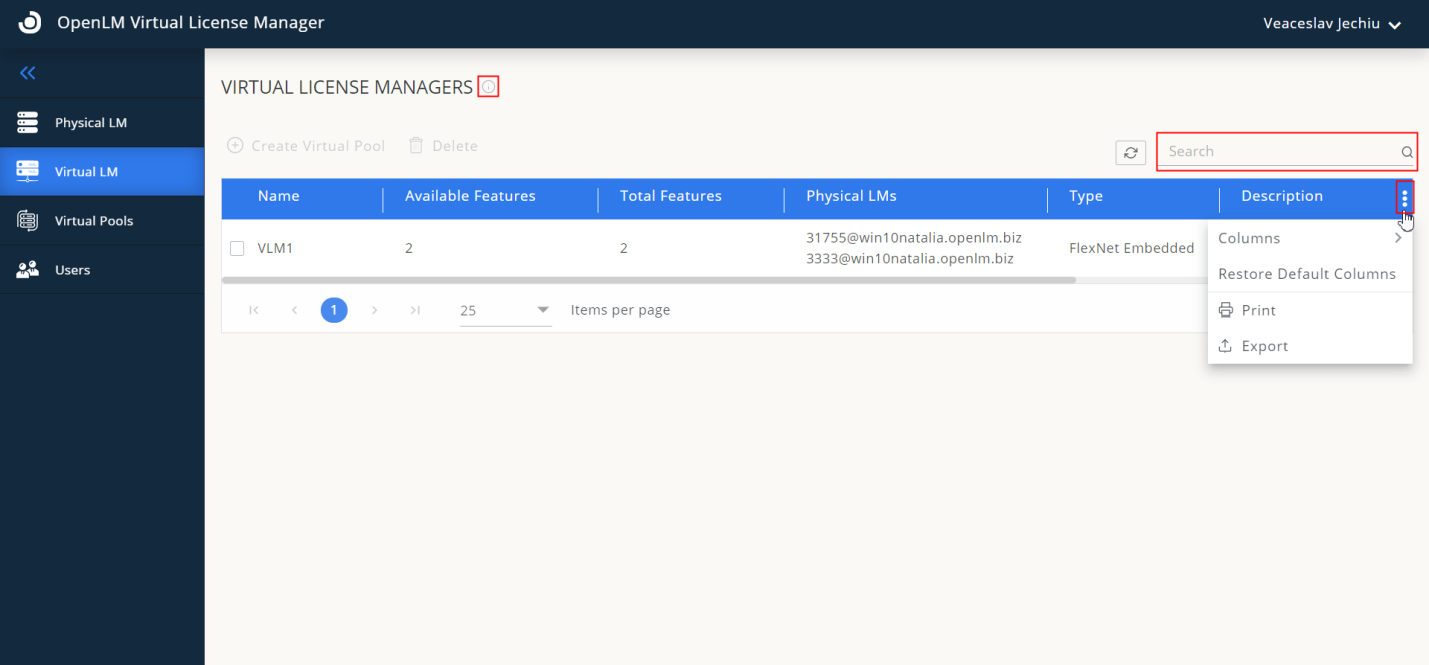
- Search a Virtual License Manager by name using the search field.
- To customize columns in the table, use the three dots icon on the top right of the table header. From there, you can adjust the size, or remove the columns
- The same icon also allows you to print or export the table as a CSV file.
- To access information about the current page or tab, simply click the “i” icon on the right side of the header, displaying the page name.
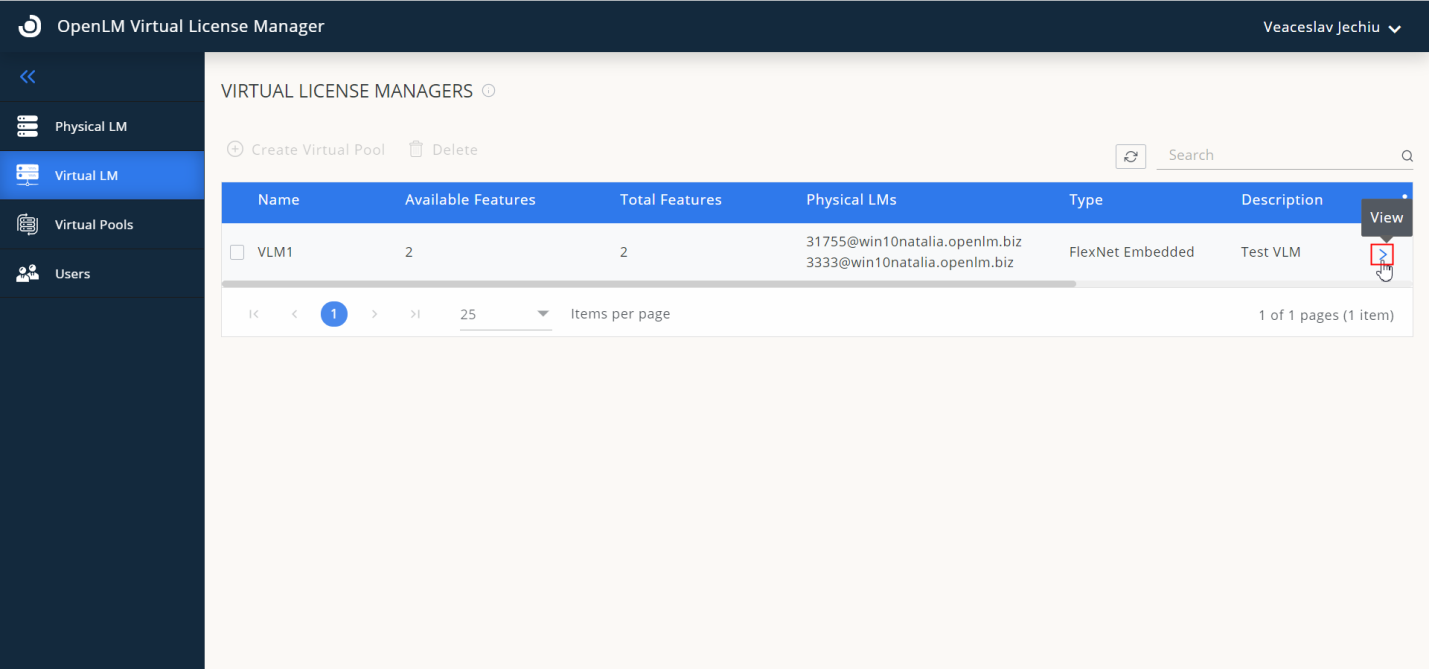
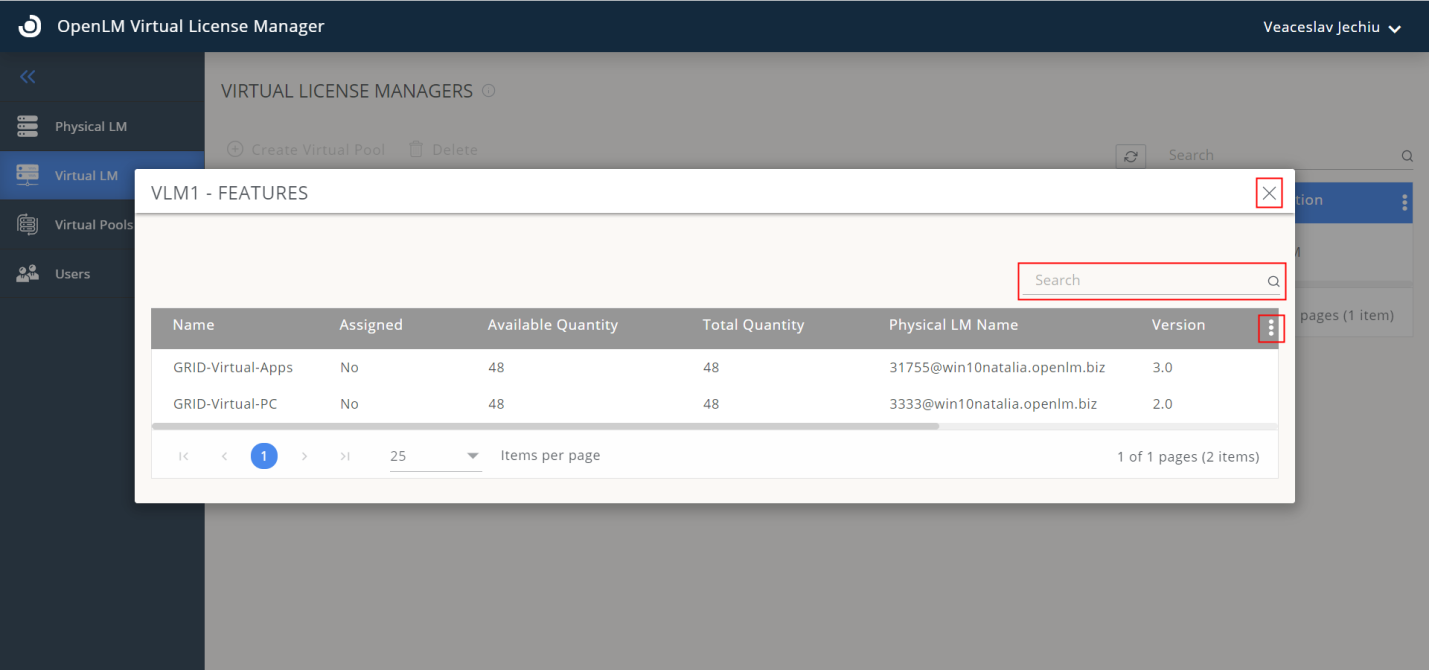
- To view features, click the “View” icon at the end of the Virtual License Manager record.
- Use the search field to find specific features by name.
- To close the features view, click the cross-close icon.
- You can manage columns, print, and export the table in the same manner as the Virtual License Manager table.
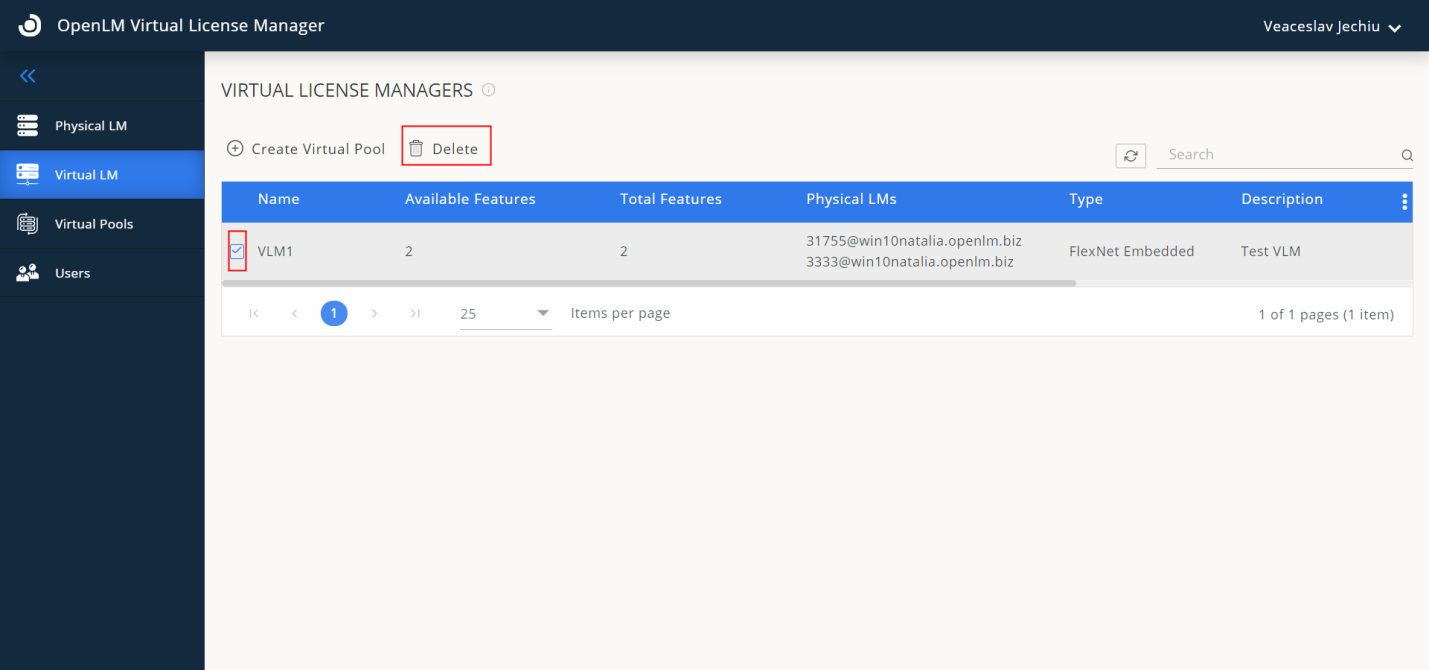
- To delete a Virtual License Manager, select it and click the “Delete” button.
Creating a Virtual Pool
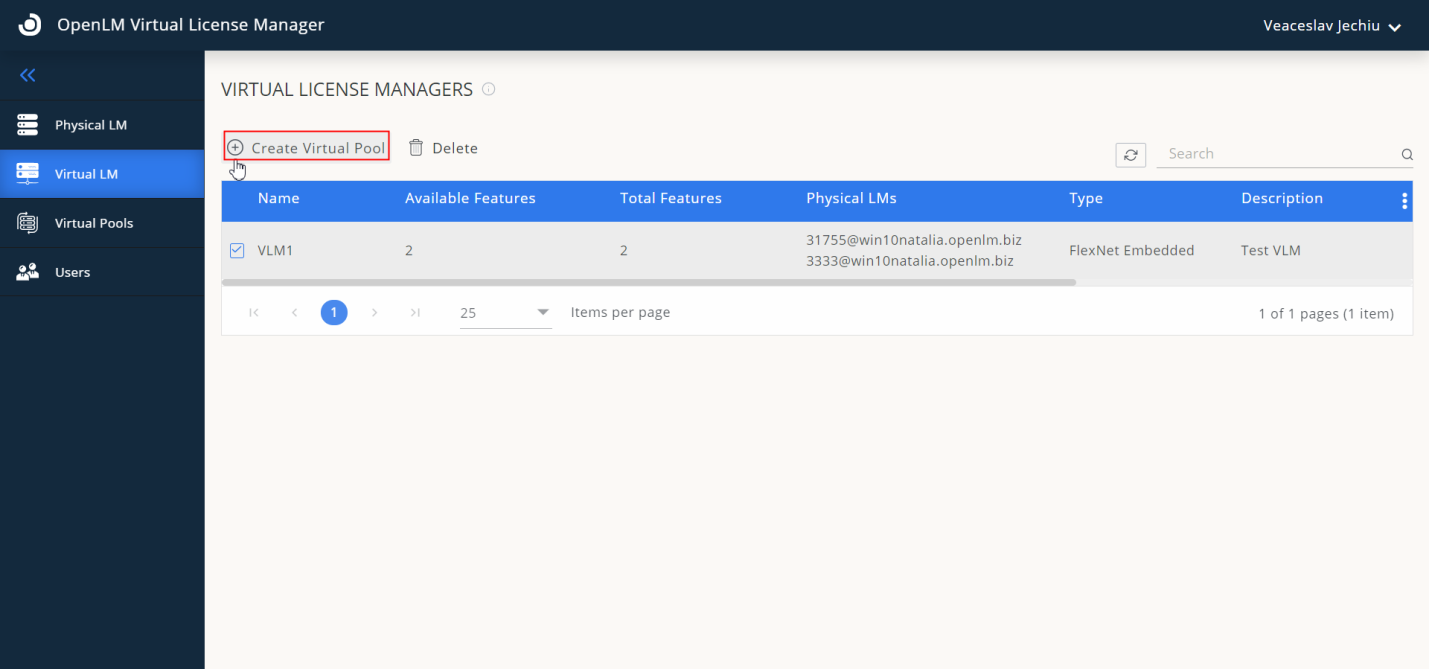
- To create a Virtual Pool, select one Virtual License Manager from the list of tables and click the “Create Virtual Pool” button.
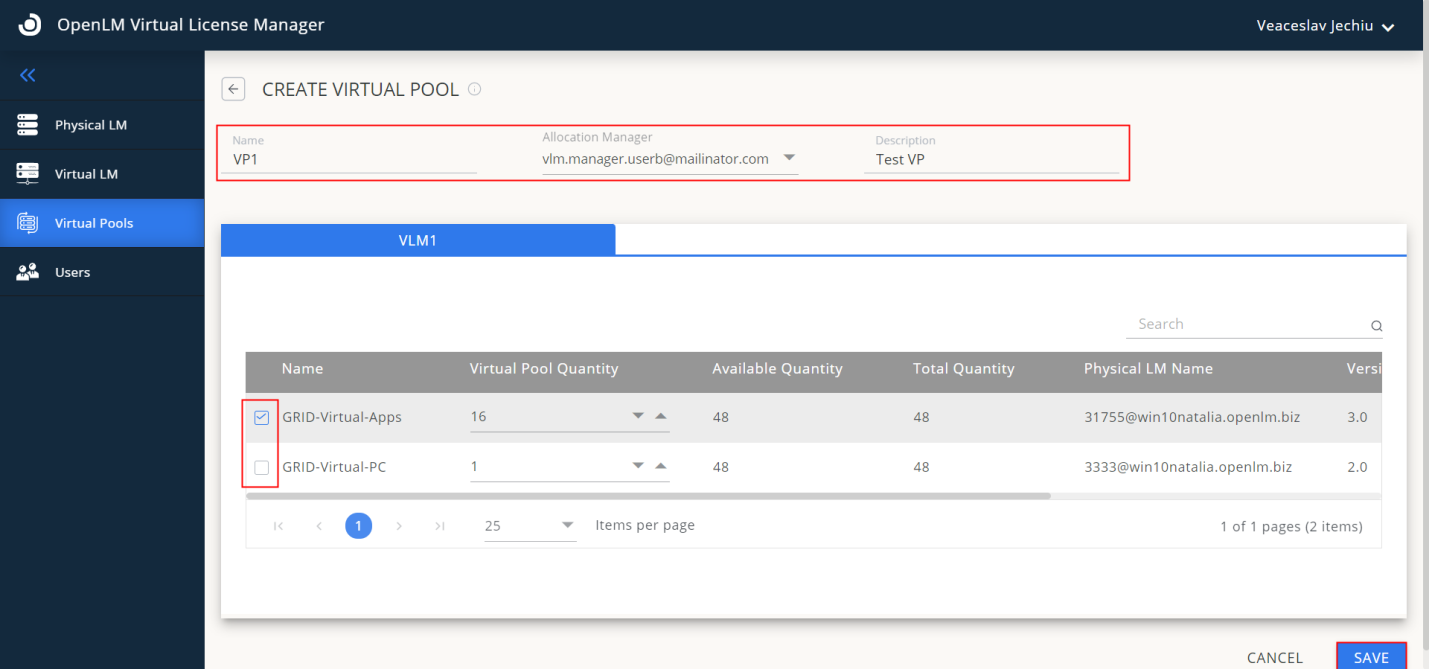
- Fill in the header fields with data: Give Virtual Pool a name, select Allocation Manager to whom to assign this Virtual Pool, and give a free text description.
- Select one feature from Virtual License Manager set the value of the quantity of licenses of this feature type you want to insert into the Virtual Pool and click “SAVE”.
- To return to the previous page or cancel the operation you always can click “CANCEL”.
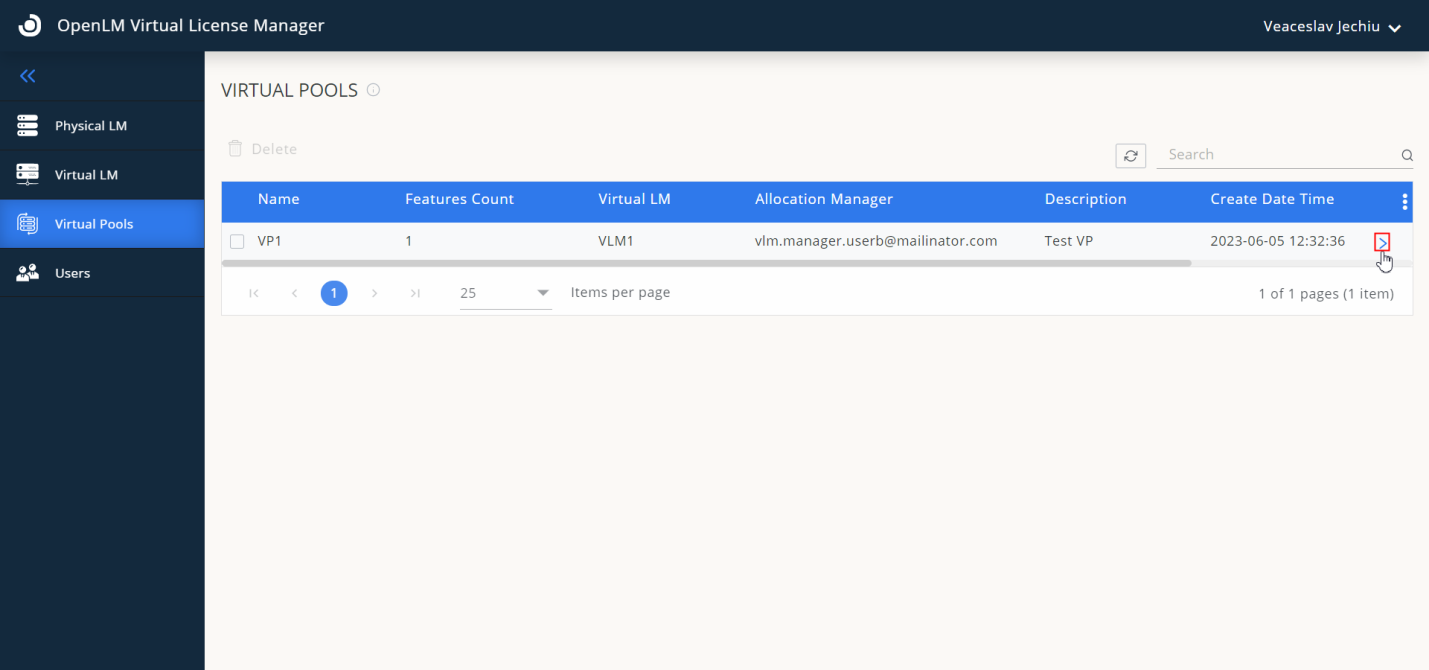
- The Virtual Pool is now created. You will get automatically a page of Virtual Pools with the item “Virtual Pools” from the left tab selected. You always can return to this page or any other of selecting items from the left tab menu.
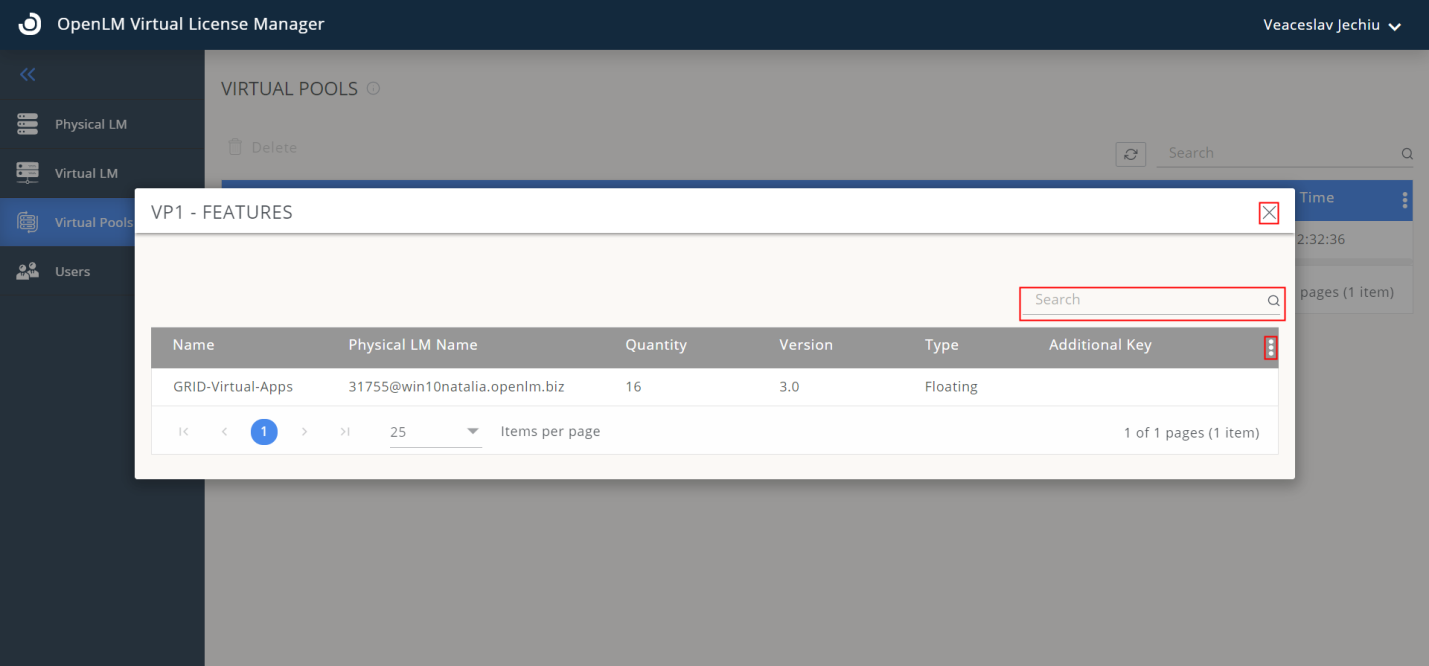
- Visualize the available Features by clicking the “View” icon at the end of the record of Virtual Pool.\To search Features by name use the search field.
- To close the Features view – click the cross-close icon. You can manage columns, print, and export tables in the same way as the Virtual Pool table.
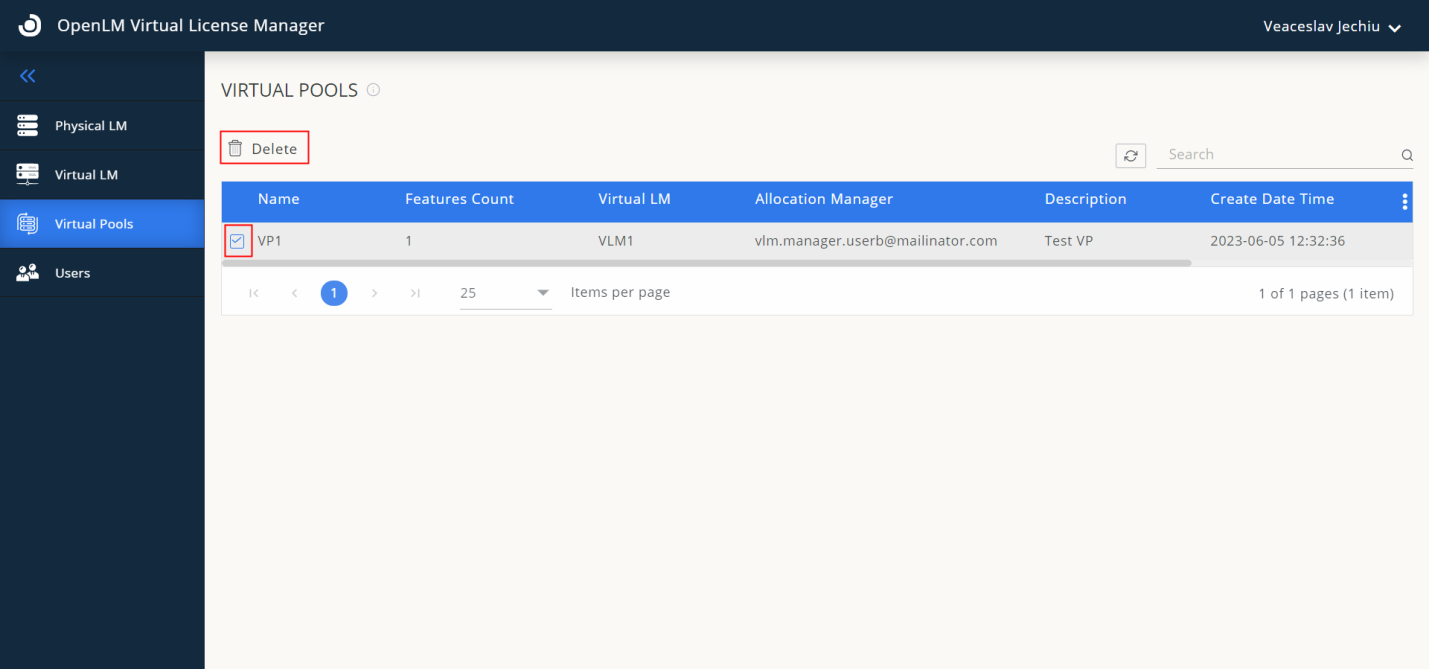
- To delete a Virtual Pool, select it and click the “Delete” button.
Users
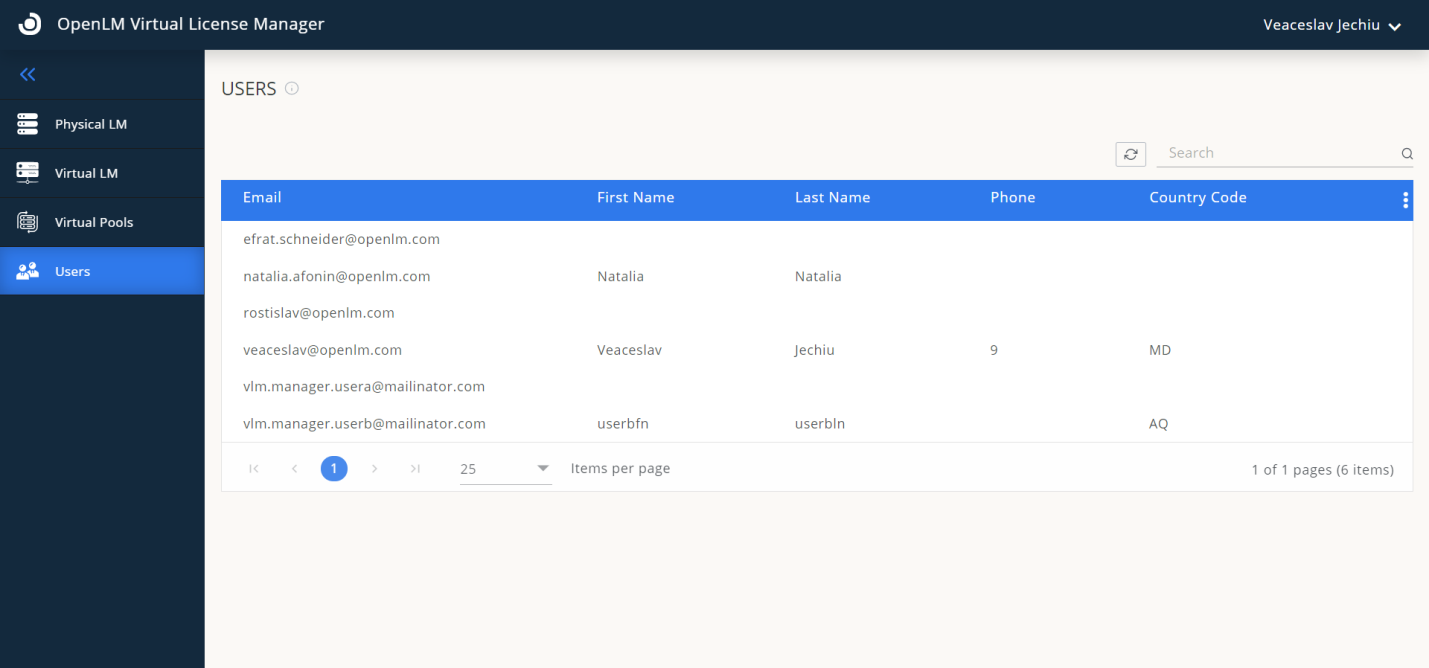
- To visualize users with a Manager Role, select the “Users” tab.
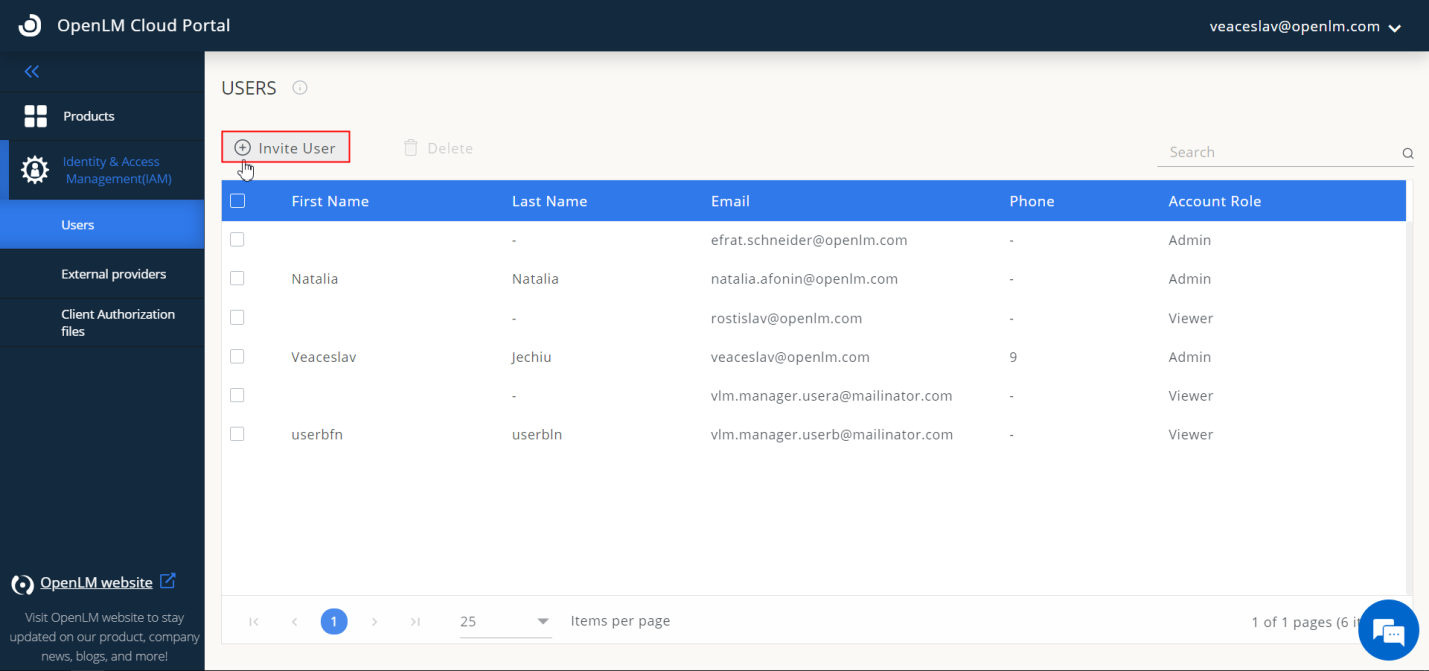
- To create a user with Manager Role for OpenLM Virtual License Manager, you have to log in to Cloud Portal, from the left tab menu select the item “Identity & Access Management(IAM) → Users” and click the “Invite User” button.
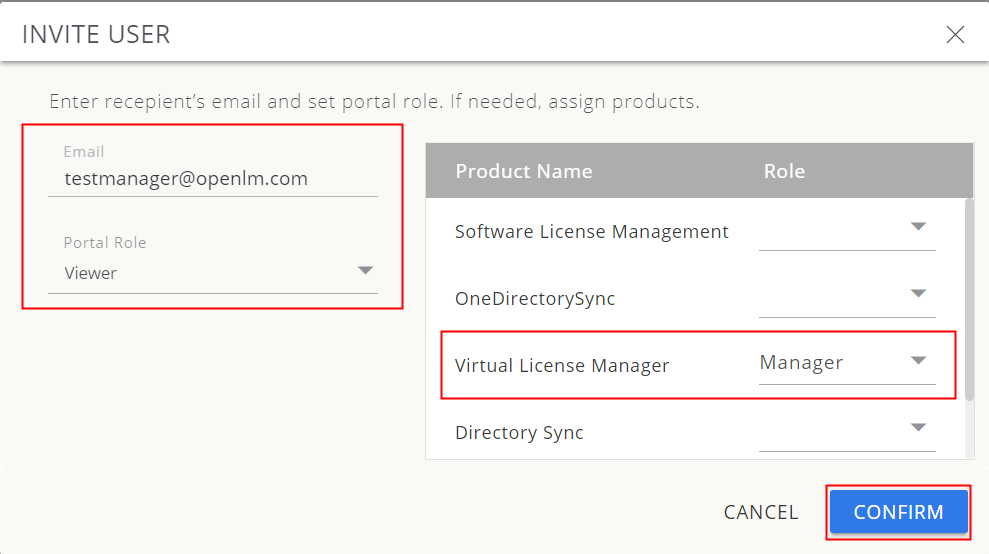
- Fill out the form with the data using an email from your company.
- Set the Portal Role to “Viewer” and set the “Manager” role for the Virtual License Manager product.
- Click “Confirm”.
- The user will receive an email to register for Cloud Portal, with a temp password.
- The User has to click a link from the email and set its password and after this, he or she will be able to log in to Virtual License Manager with “Manager Role” (the user will also have access to Cloud Portal with “Viewer” role, being able to access Virtual License Manager from products list of Cloud Portal).
Manager Role User Guide
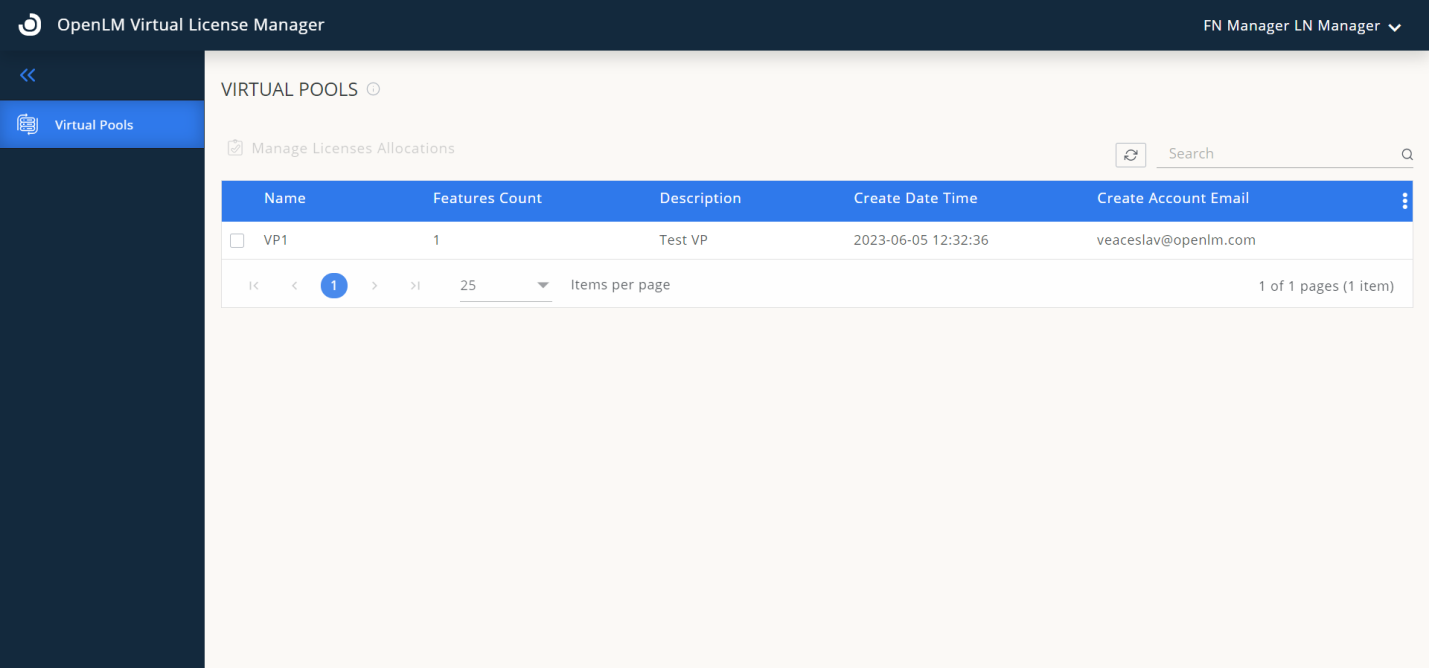
- The available tab for the Manager role is the Virtual Pools tab. Below is a series of features and actions an Admin can do and see:
Searching virtual pools
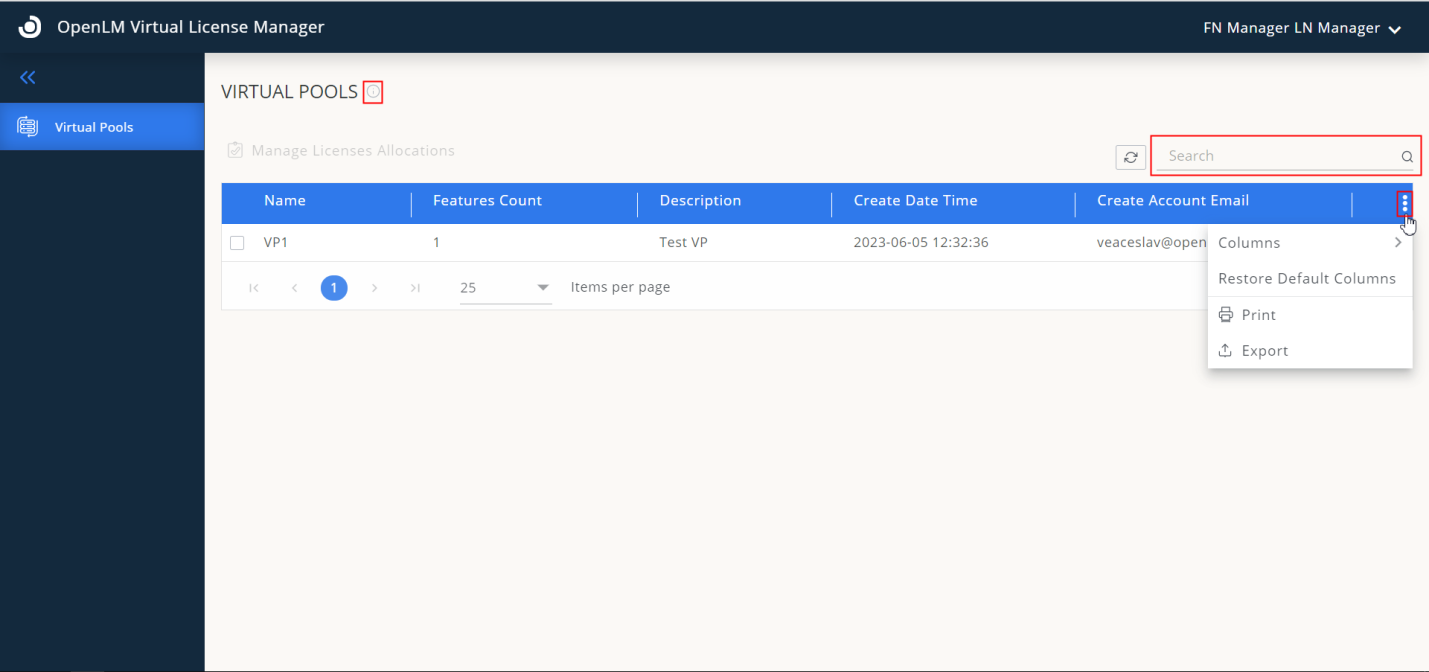
- A manager can search Virtual Pools by name using the search field.
Managing the appearance of the columns
- Manage columns, change their place, and size, or remove them from the table by using 3 dots in one line icon on the top right of the table header. Also using that icon an admin user can print or export the table to a CSV file. To get info about the current page or tab from the menu – click the info “i” icon on the right of the header showing the name of the page.
Obtaining features information
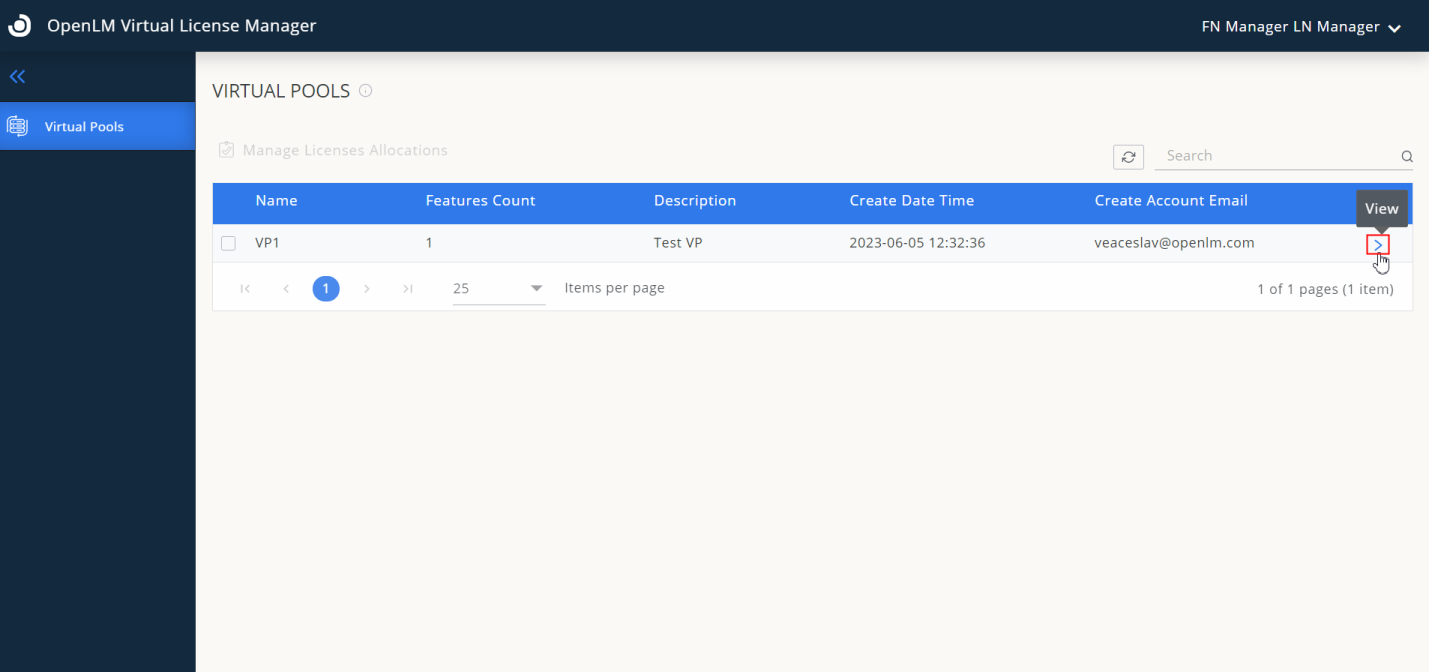
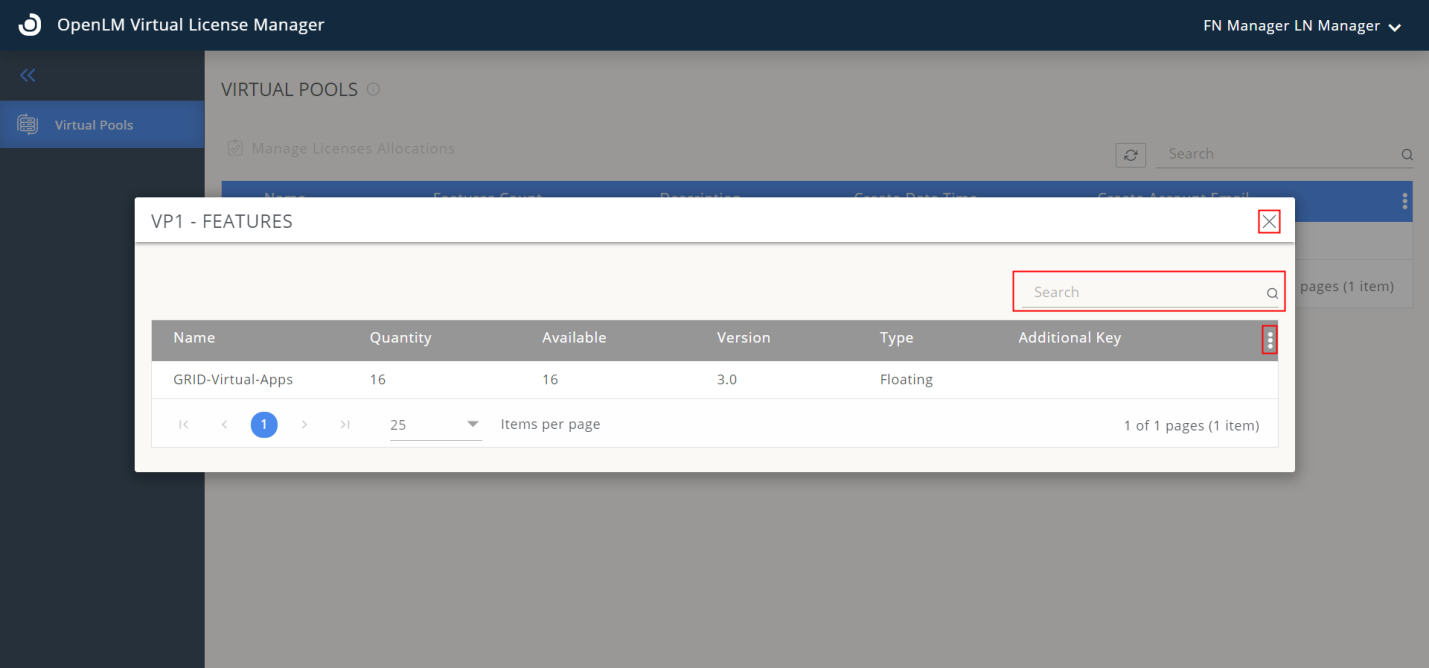
- A manager can visualize Features by clicking the “View” icon at the end of the record of the Virtual Pool. To search Features by name use the search field. To close the Features view – click the cross-close icon. You can manage columns, print, and export tables in the same way as the Virtual Pool table.
Managing License allocation
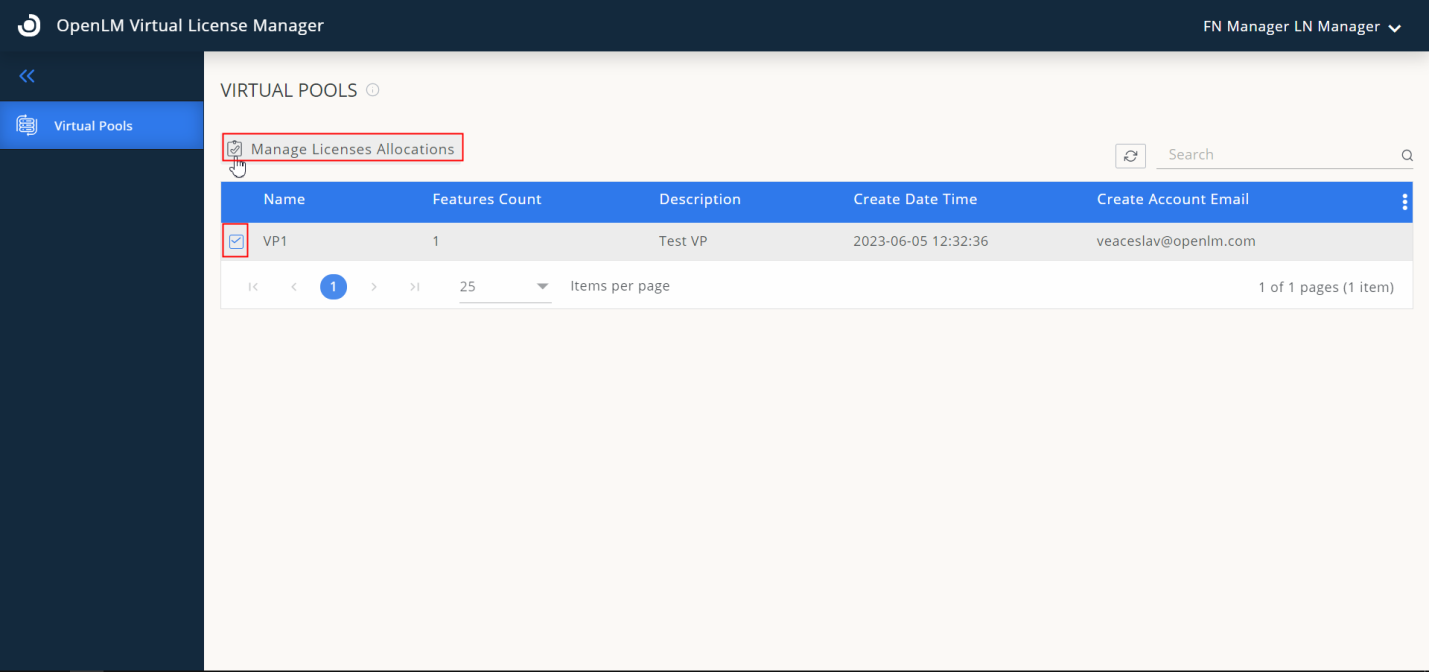
- A manager can manage license allocations of the Virtual Pool by selecting one Virtual Pool from the list of tables and clicking the “Manage Licenses Allocations” button.
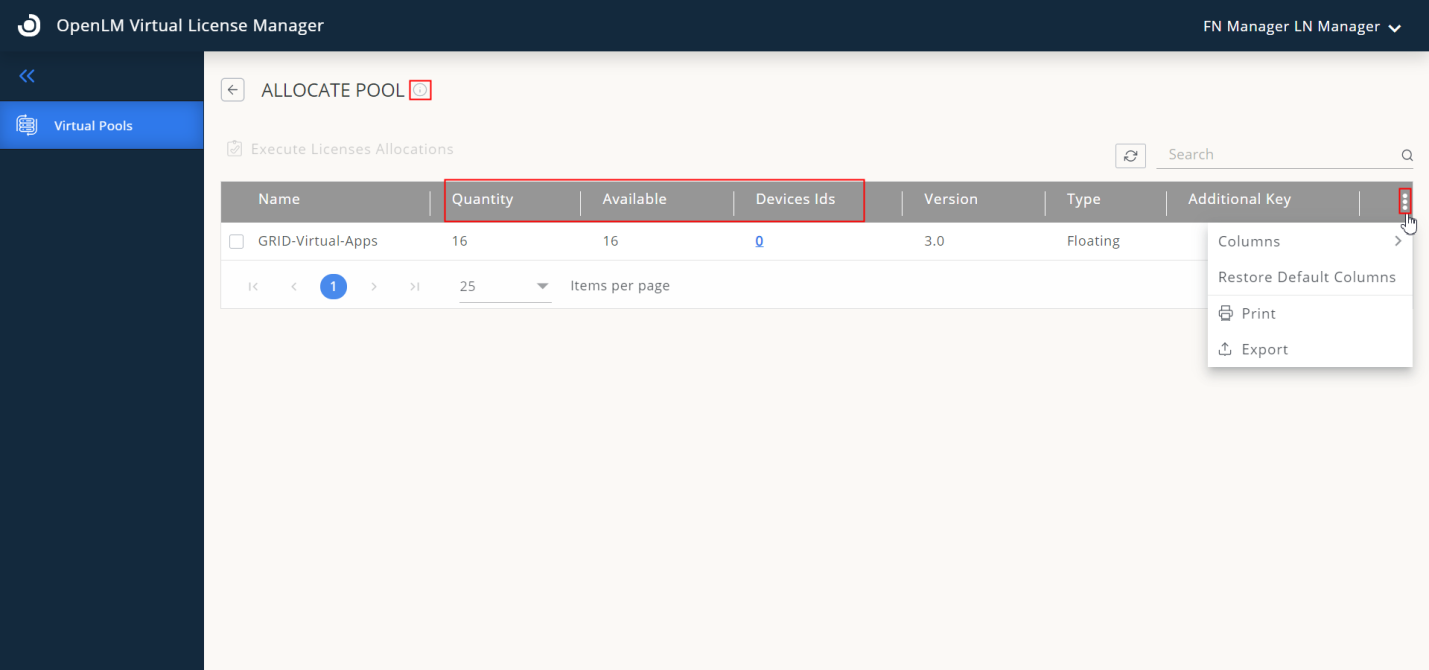
- You will reach the “ALLOCATE POOL” page.
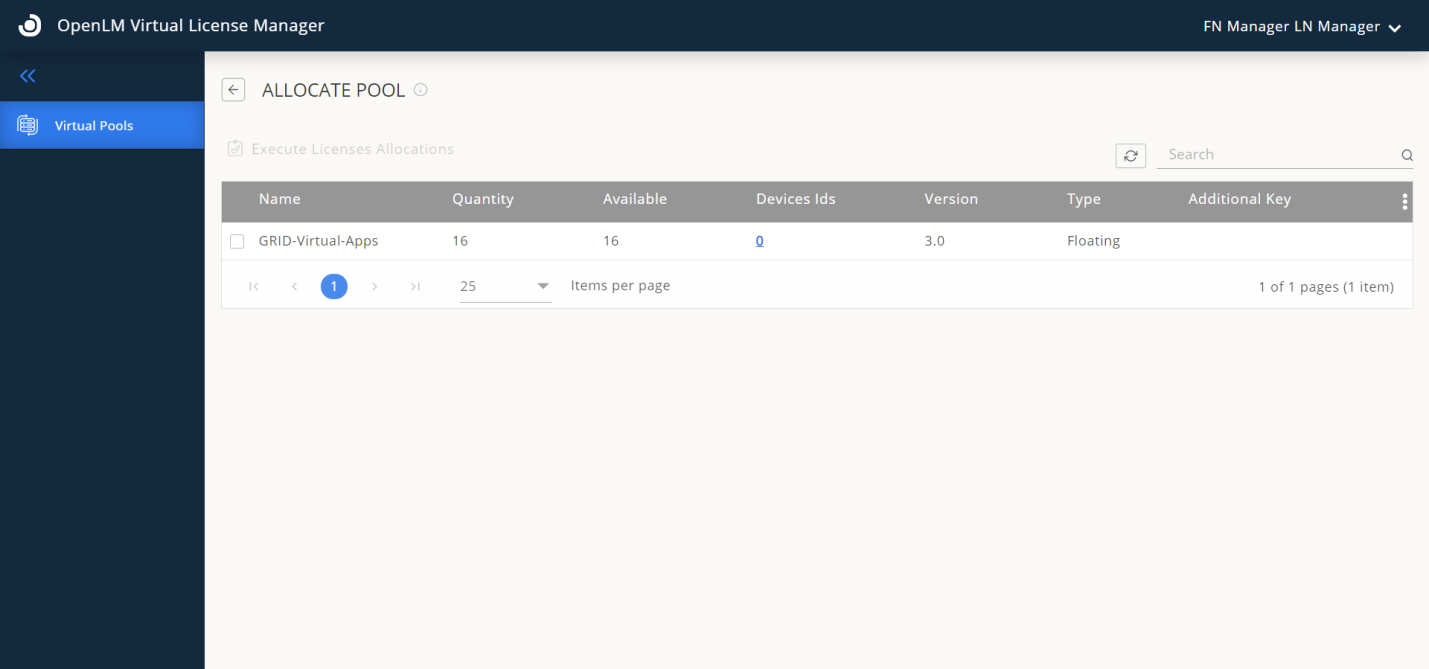
- Manage columns: Use the three-dot icon in the top right of the table header to change column placement, and size, or remove columns.
- Print/export table: Use the same icon to print or export the table to a CSV file.
- Get page/tab info: Click the info “i” icon on the right of the header displaying the page name.
- Column details: The table includes columns like “Quantity” (total number of licenses), “Available” (licenses available for allocation), and “Device Ids” (number of devices/users with a license).
- Device/User details: The “Device Ids” column is a link that leads to a page where you can remove allocations and modify device/user descriptions.
- Allocation changes: Allocating a license decreases the “Available” count but increases the “Device Ids” count while removing an allocation has the opposite effect.
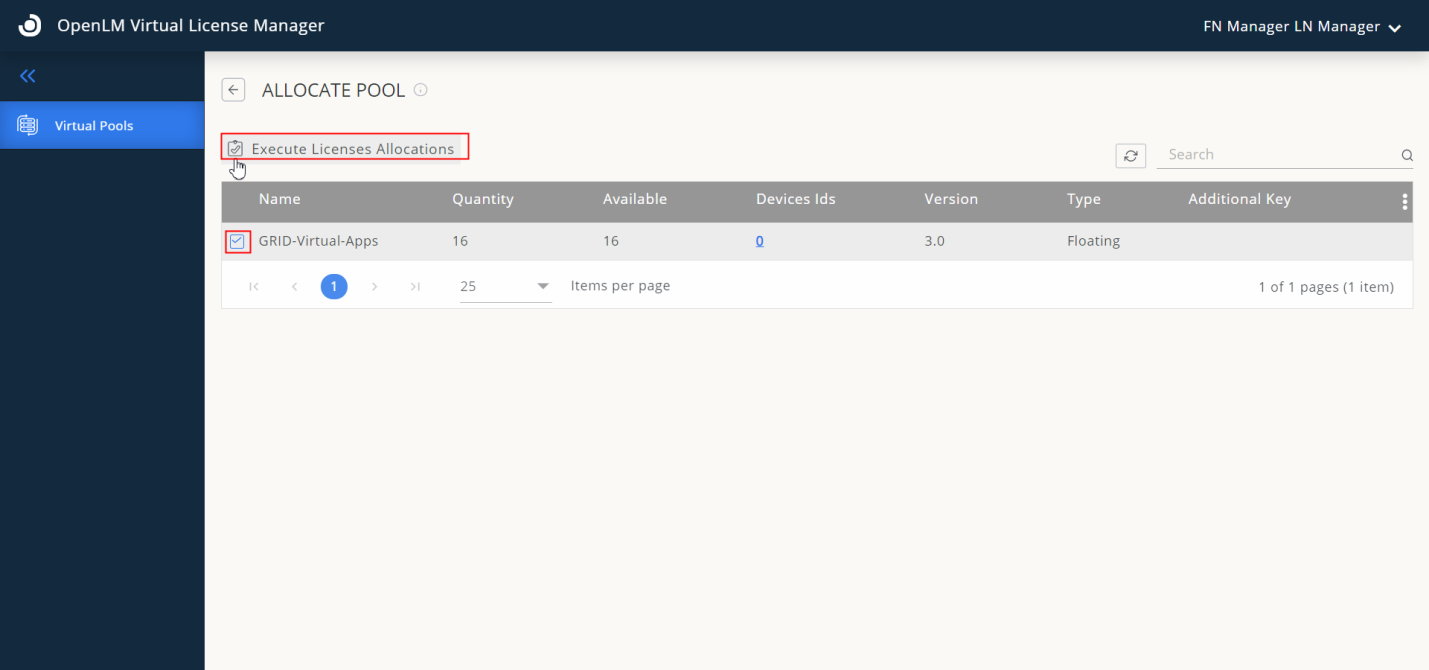
- To allocate a license to a Device or User select the feature from the table and click “Execute Licenses Allocations”.
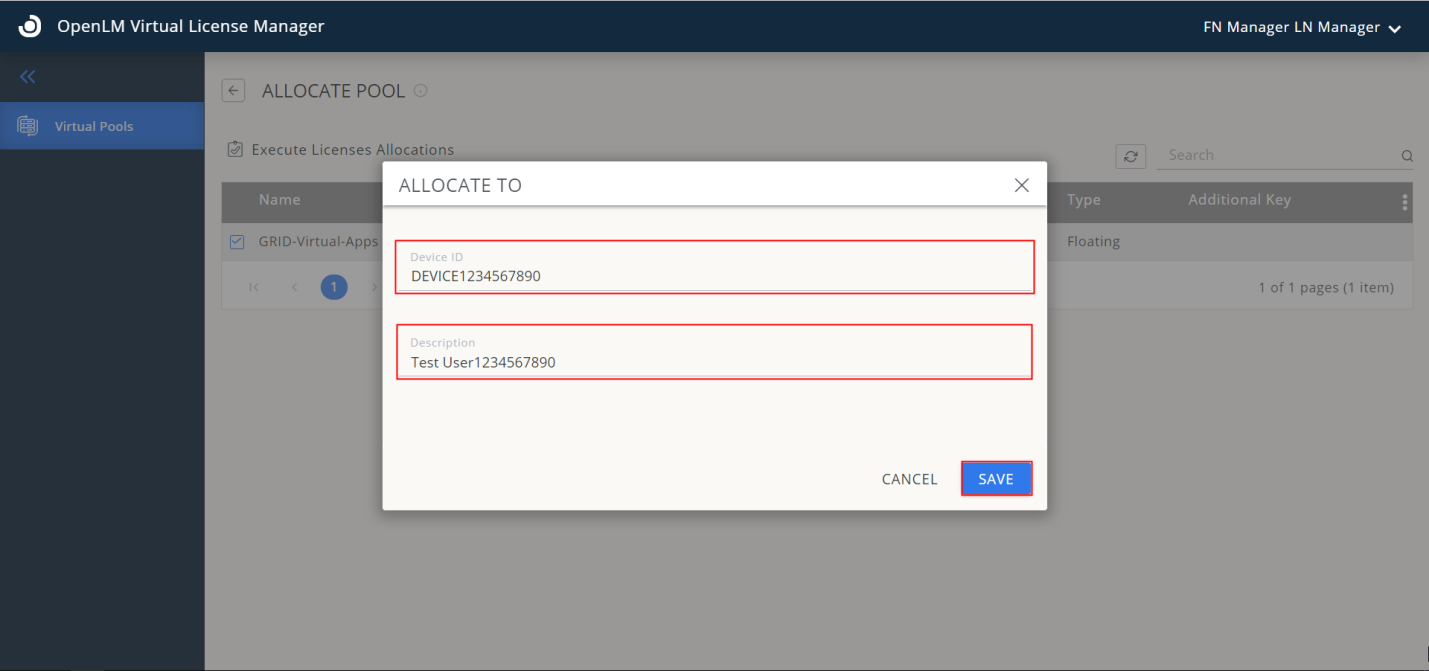
- Fill out the form: Enter data, including Device ID and Description.
- Encryption: User information is encrypted, so Managers cannot identify users by Device ID alone.
- Add notes/description: Managers can add notes or descriptions to Device IDs during license allocation.
- Manage allocations: Managers can access a special page by clicking on the number of Device IDs in the Virtual Pool feature.
- Save changes: Click “SAVE” to apply the changes.
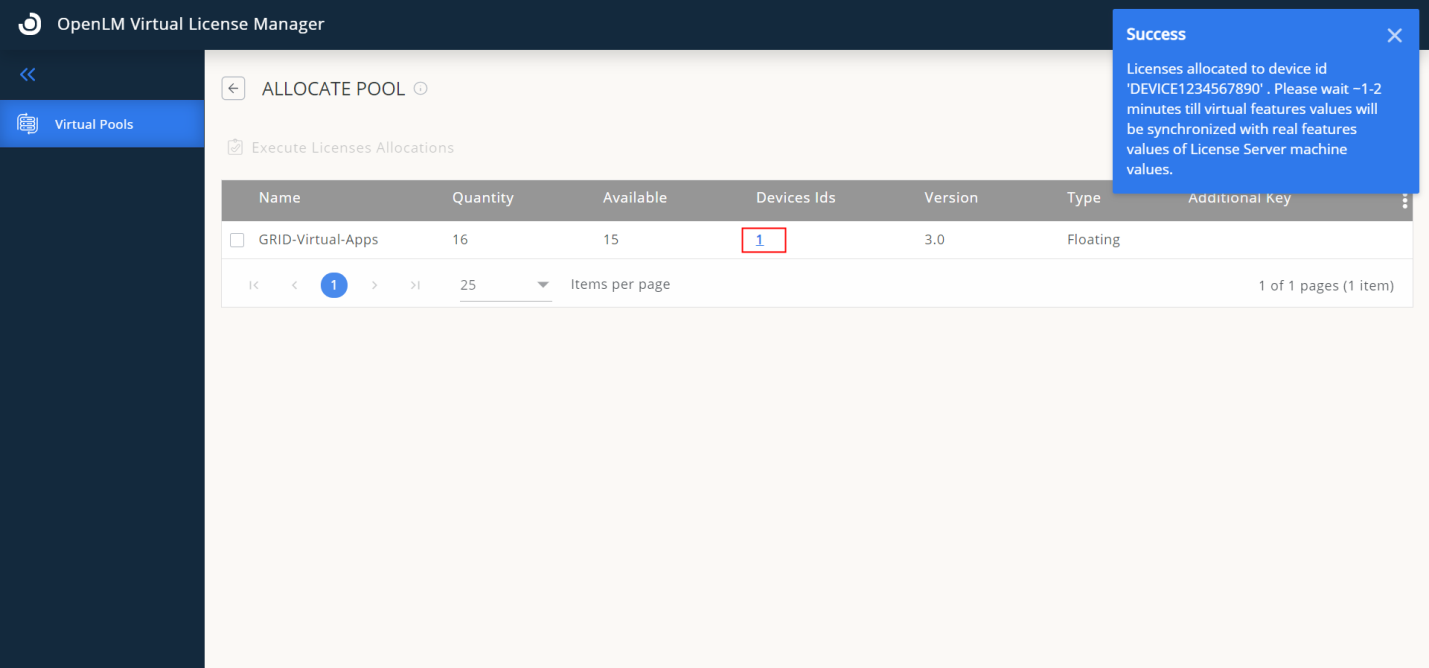
- License is allocated to the Device or User.
- You will return back to “ALLOCATE POOL” \
- Observe that the quantity of “Device IDs” has increased.
- Note that the allocation of the license to the Device or User may take some time on the real machine/server where the license managers are located.
- There is a synchronization time of 1-2min between the OpenLM Virtual License Manager and the real machine/server.
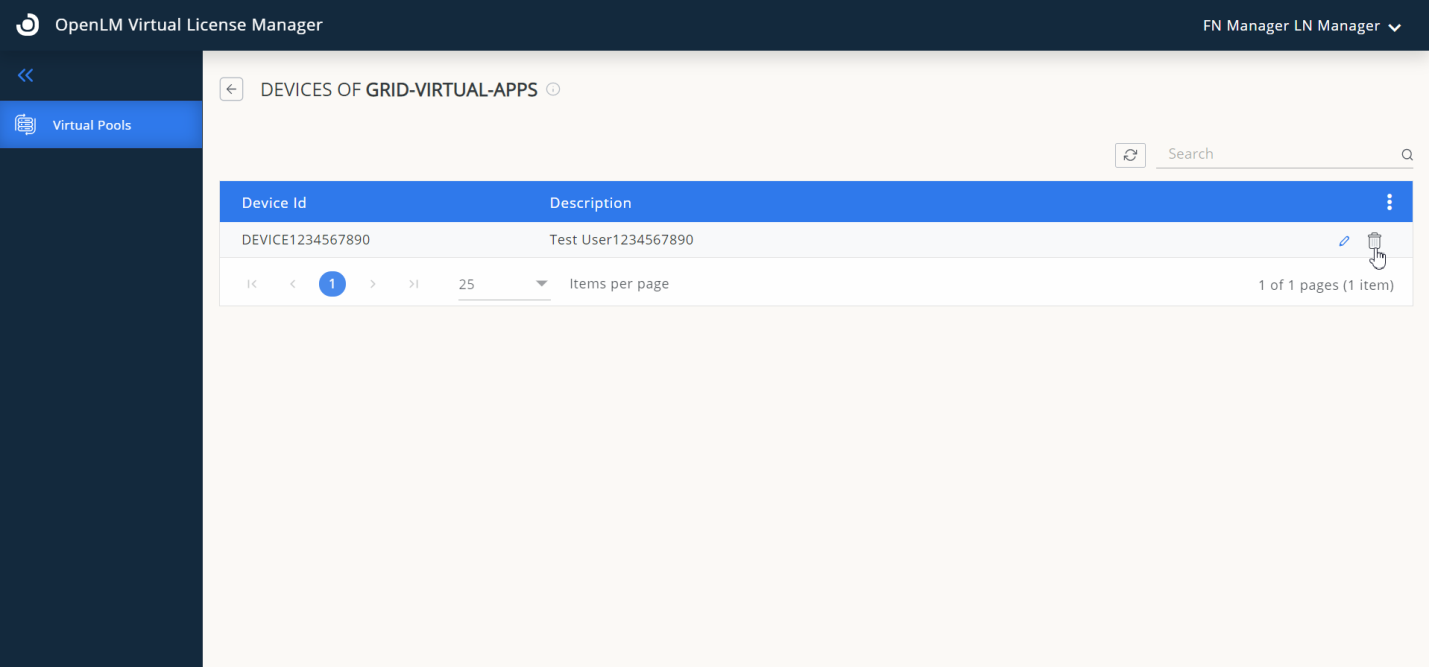
- To remove the allocations of the licenses and change the description of Devices or Users, click the number of the “Device Ids” column, the number itself is a link. You will reach the following page:
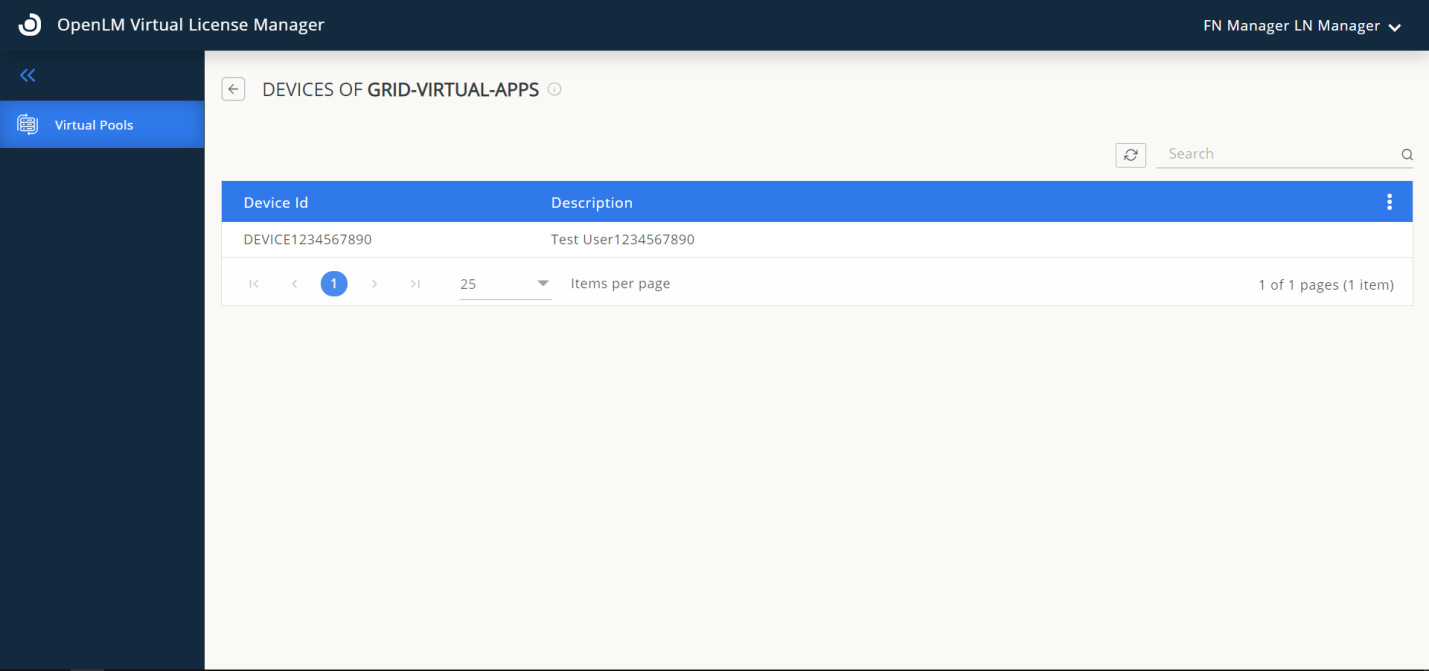
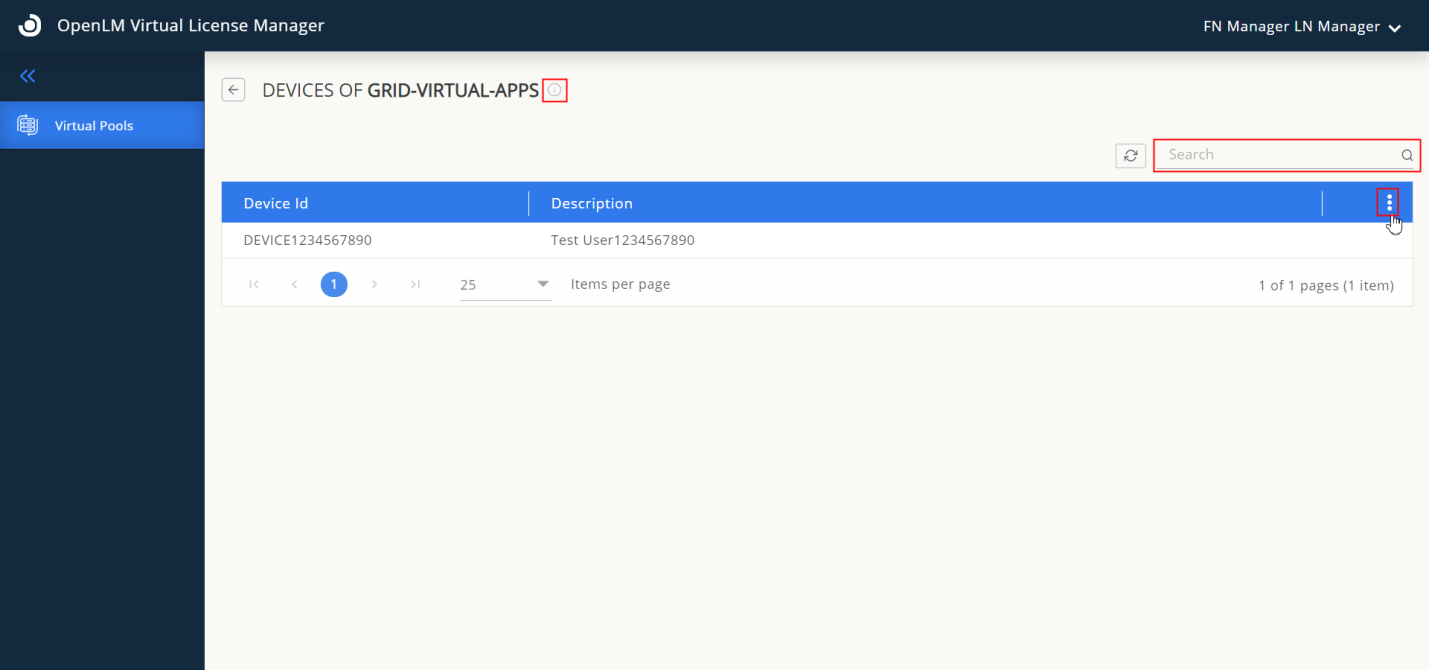
- Use the Search field to search for Devices or Users by ID using the search field.
- Manage the columns by changing their place, and size or removing them from the table using the 3 dots in one line icon on the top right of the table header.
- Also using that icon you can print or export the table to a CSV file.
- To get info about the current page or tab from the menu – click the info “i” icon on the right of the header showing the name of the page.
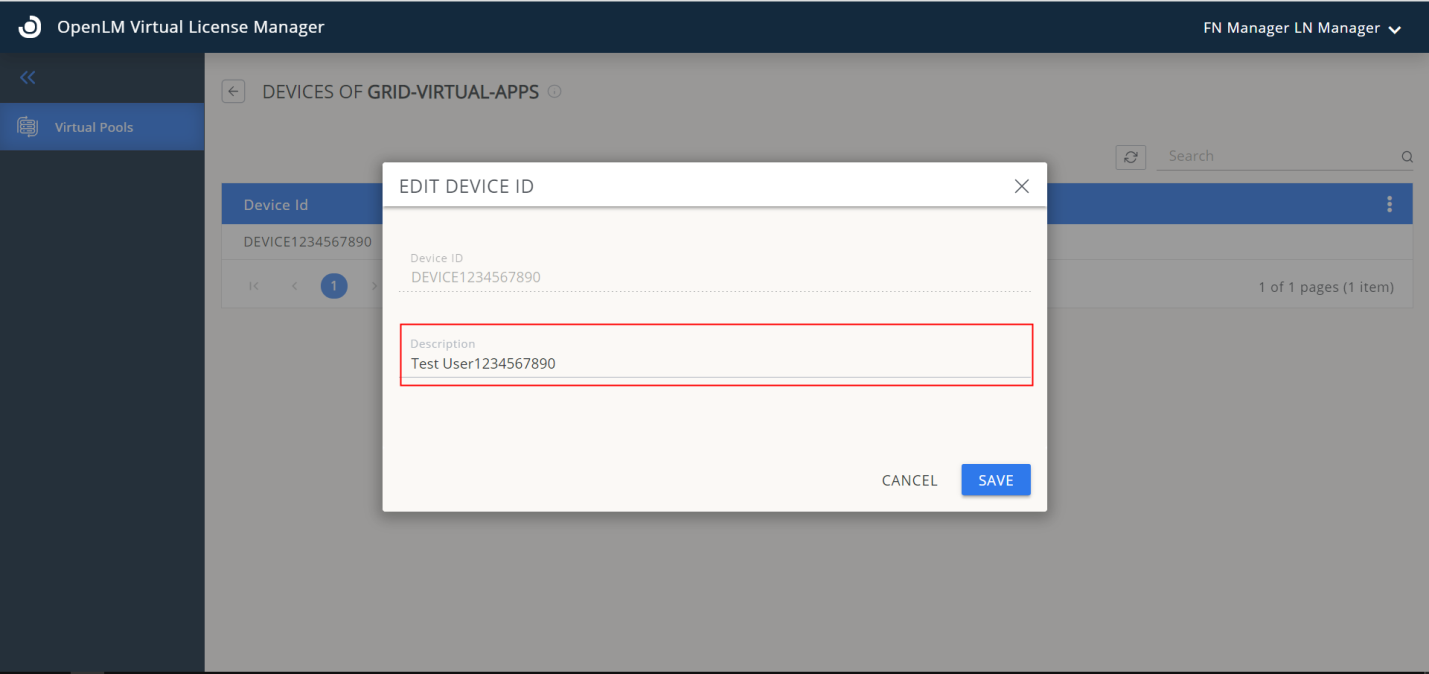
- To edit the description of the Device or User, click the “Edit” button at the end of the record of the Device or User. As result, you will get a form where you can change your description:
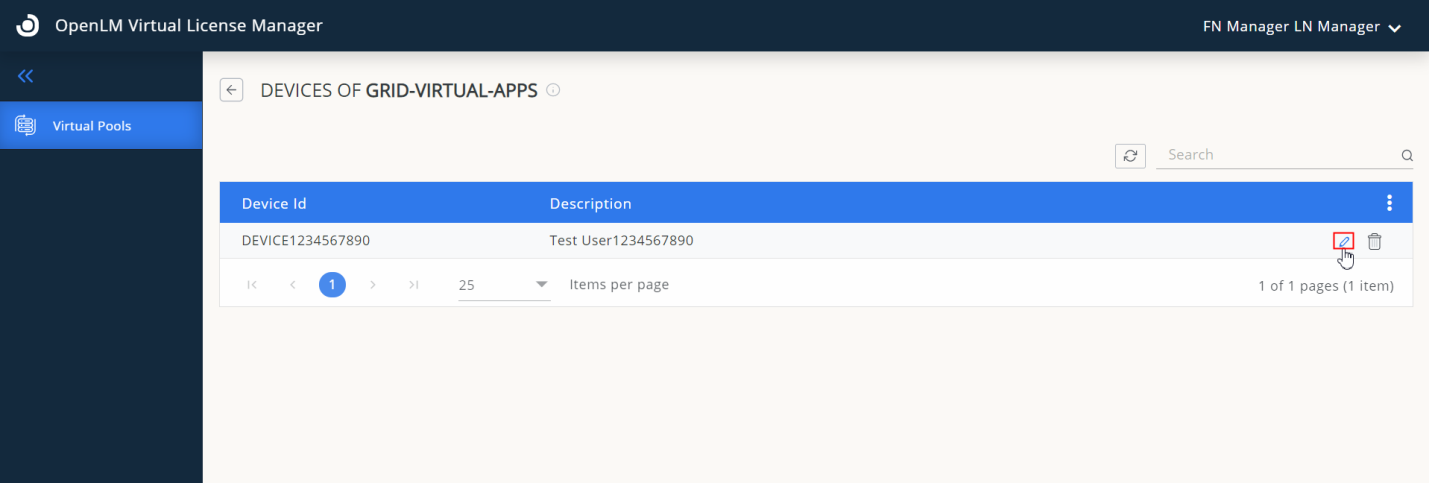
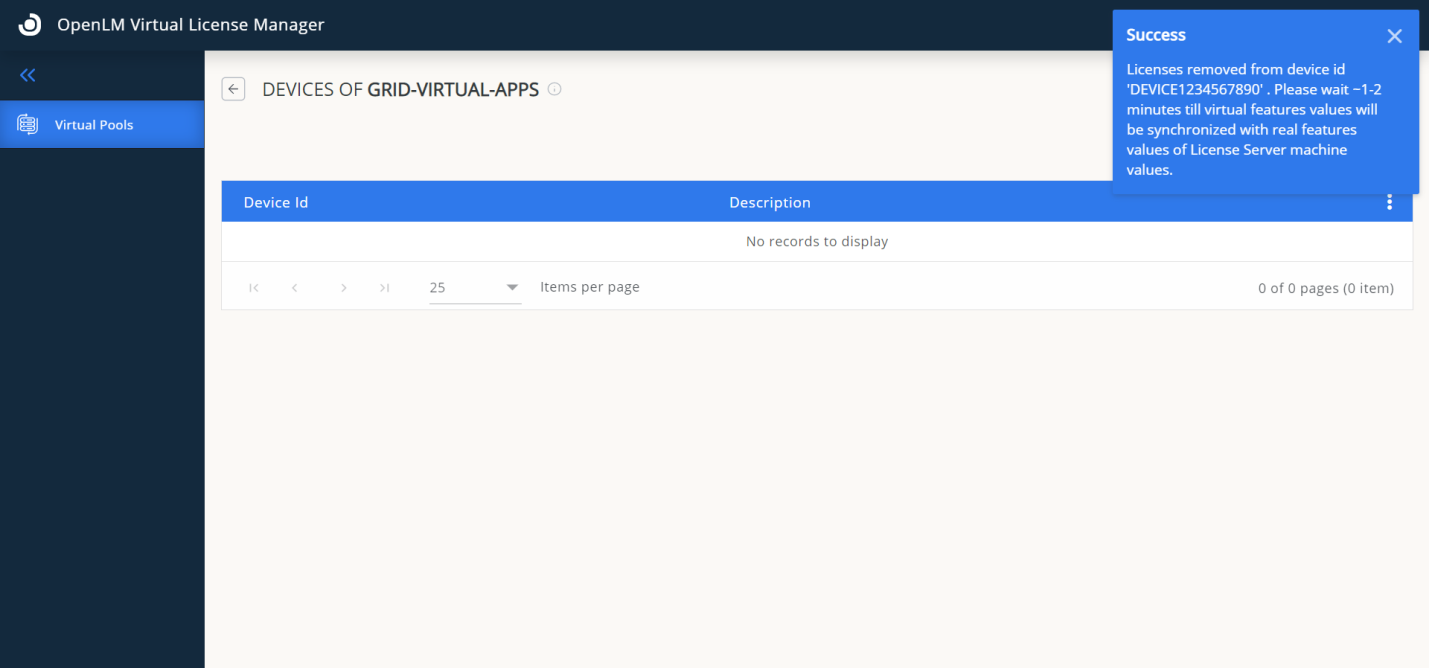
- To remove an allocation of a license to a Device or User, click the “Delete” button at the end of the record of Device or User.
- Note the moving of allocation of license of Device or User takes time on real machine/server that resides license managers.
- There is a synchronization time of 1-2min between OpenLM Virtual License Manager and real machine/server.
