GitLab
OpenLM は OpenLM Cloud Broker を介して GitLab のシート使用状況とライセンス割り当てを監視します。
はじめに
- 有効な OpenLM Platform テナント。
- Broker Hub で承認された OpenLM Cloud Broker。
- パーソナルアクセストークンを発行できる GitLab の Owner、Maintainer、またはインスタンス Administrator アカウント。
GitLab パーソナルアクセストークンの生成
- トークンを発行する権限を持つユーザー(Owner、Maintainer、またはインスタンス Administrator)として GitLab にサインインします。
- 右上のアバターを開き、Edit profile を選択します。
- 左サイドバーで Access tokens を選択します。
- Add new token を選択します。
- トークン名と(オプションで)有効期限を入力します。
- OpenLM Cloud Broker がシートデータとユーザーデータを読み取れるように、トークンに少なくとも
read_apiおよびread_userのスコープを付与します。 - Create personal access token を選択します。
- トークンをコピーして安全に保管します。GitLab はトークンの値を一度しか表示しません。
ヒント
セルフマネージド GitLab の場合、トークンの UI は https://<your-gitlab-host>/-/user_settings/personal_access_tokens にあります。GitLab.com の場合は https://gitlab.com/-/user_settings/personal_access_tokens を使用します。
OpenLM Cloud Broker に認証情報を登録
-
OpenLM Cloud Broker ダッシュボードを開きます。
-
GitLab 連携を見つけます。
-
次の値を入力します。
- GitLab ホスト URL(例:
https://gitlab.comまたはセルフマネージドの URL) - パーソナルアクセストークン
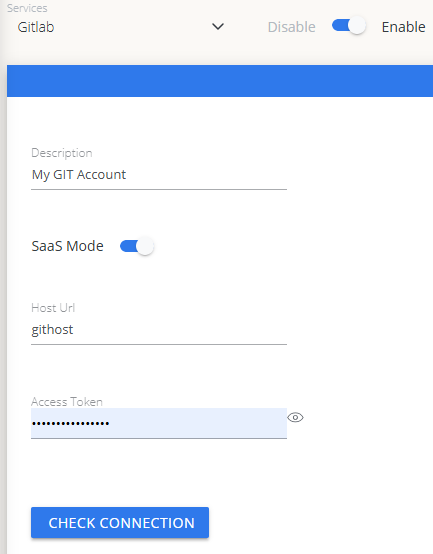 Cloud Broker での GitLab 認証情報の設定
 - GitLab ホスト URL(例:
-
Test connection を選択し、テストが成功することを確認します。
-
Save を選択します。
OpenLM Platform で GitLab を承認
- OpenLM Platform にサインインします。
- メニューから License Servers → Pending Server を開きます。
- GitLab データソースを選択し、Approve and Merge をクリックします。
連携の検証
- OpenLM Platform で Allocation を開きます。
- GitLab の利用状況データが表示されることを確認します。
注意
承認後、データの反映まで最大 3 分かかります。
OpenLM Platform で GitLab を承認
- OpenLM Platform にサインインします。
- メニューから License Servers → Pending Server を開きます。
- GitLab データソースを選択し、Approve and Merge をクリックします。
連携の検証
- OpenLM Platform で Allocation を開きます。
- GitLab の利用状況データが表示されることを確認します。
注意
承認後、データの反映まで最大 3 分かかります。
レポートの閲覧
- ユーザーアクティビティの推移 — プラットフォームで活発に活動しているユーザーを把握し、シートの再配分に活用できます。
- 期限切れまたは未使用ライセンス — 非アクティブなユーザーを特定し、シートを回収します。