Integration between Microsoft Entra ID (Formerly Azure AD) and OpenLM
This document describes the steps required to configure Microsoft Entra ID with the Identity Service and set Microsoft Entra ID as the external identity provider for OpenLM.
Prerequisites
- Access to the Azure Portal with permissions to register applications
- For on-premise users: OpenLM SLM and Identity Service must be SSL secured
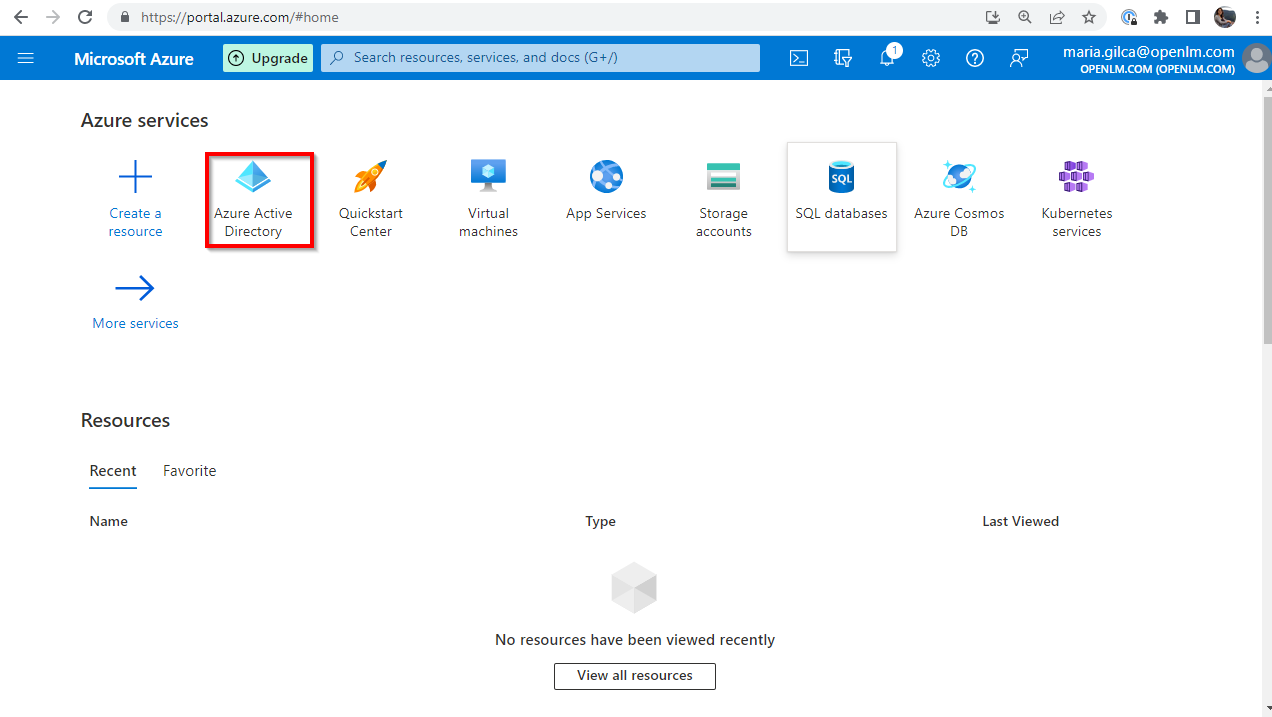
Microsoft Entra ID configuration
-
Log in to the Azure Portal. Navigate to your Microsoft Entra ID directory.
-
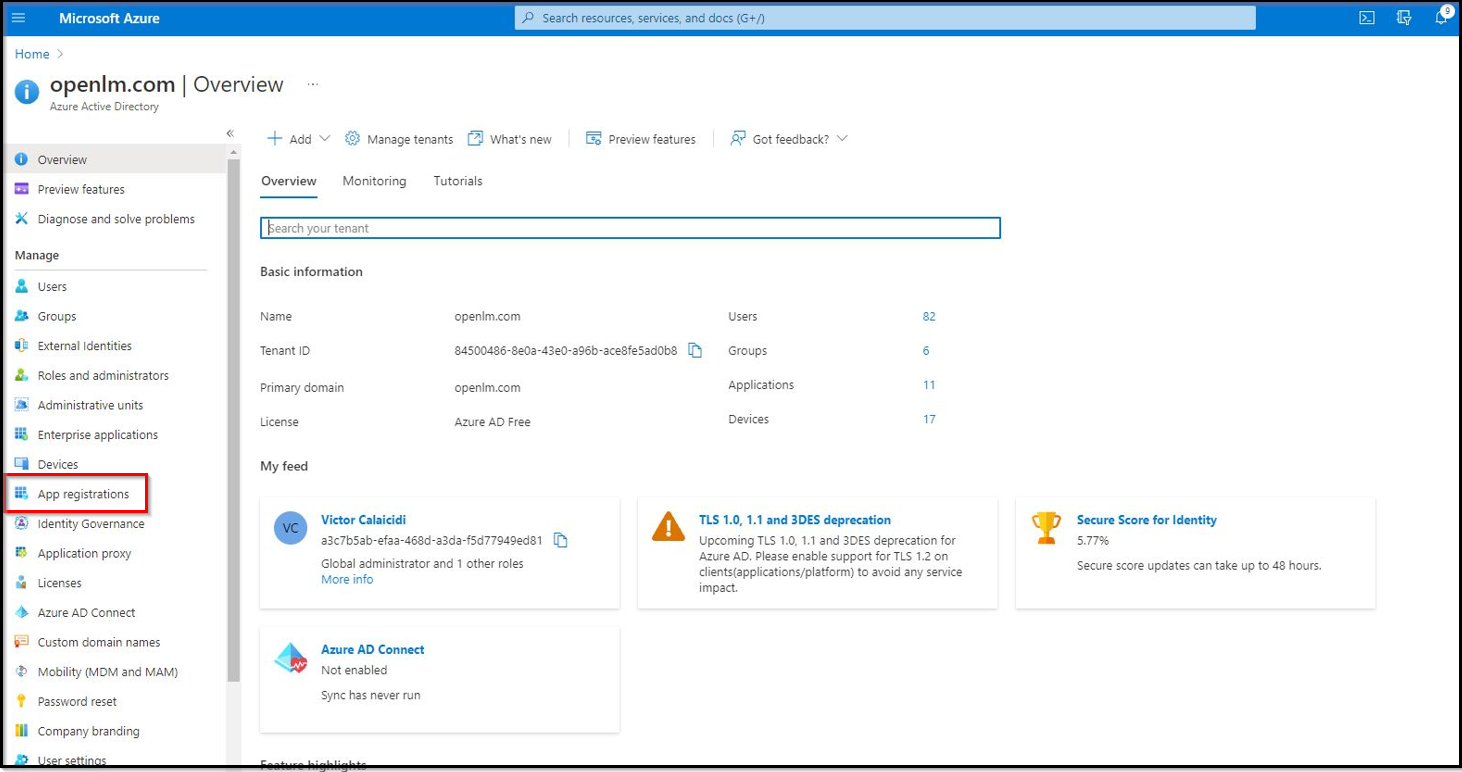
Navigate to the App Registrations section.
-
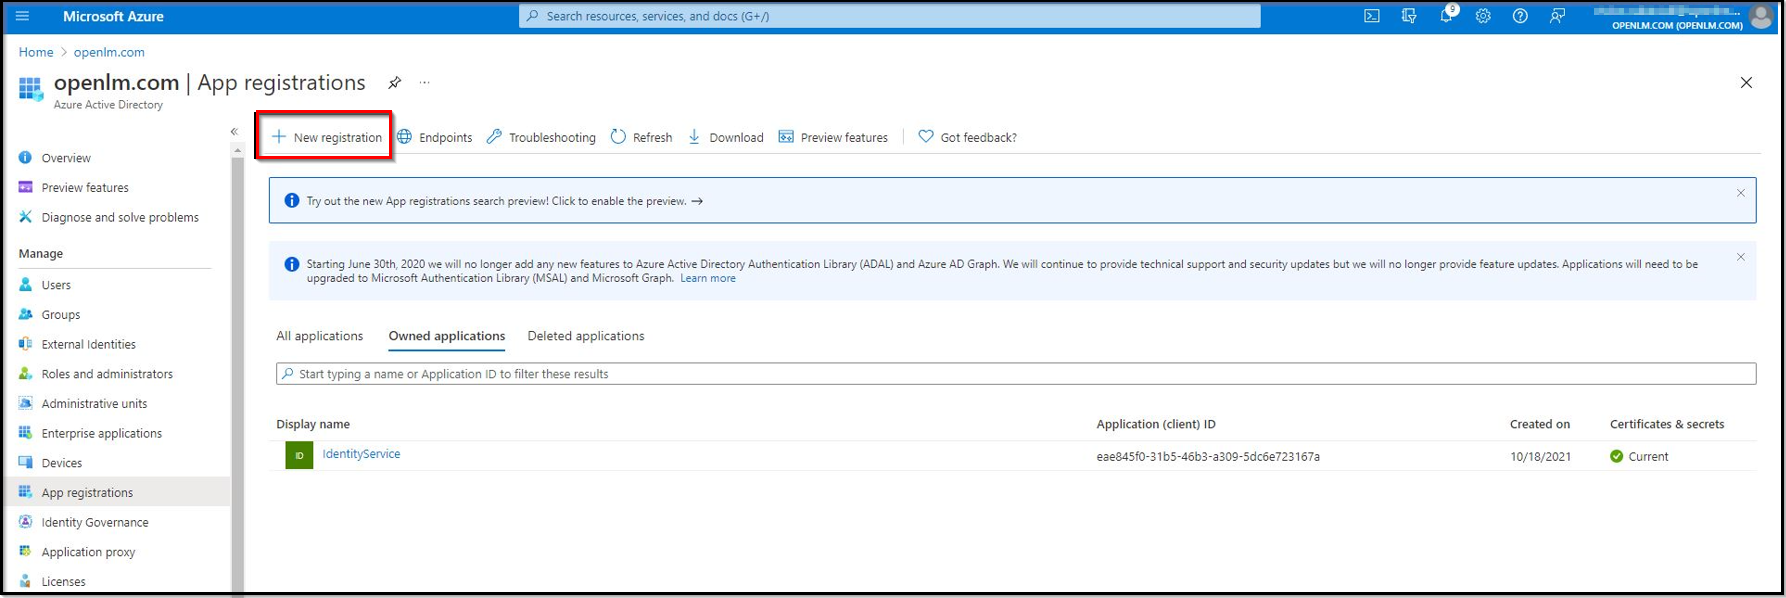
Create a new registration. Select the New Registration button.
-
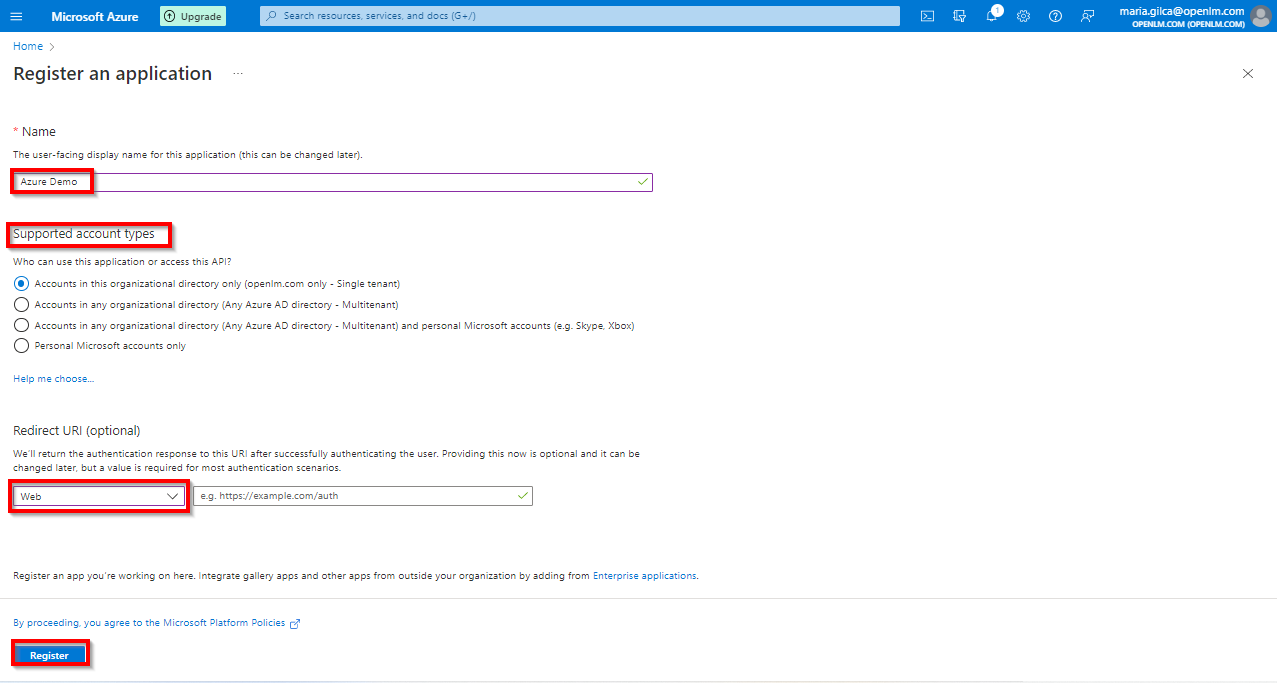
Provide the application display name (for example Identity Service). In the Redirect URI field, from the drop-down list select Web. Leave the URI field empty, as we will come back to this step and update it later during configuration. Select the Register button.
-
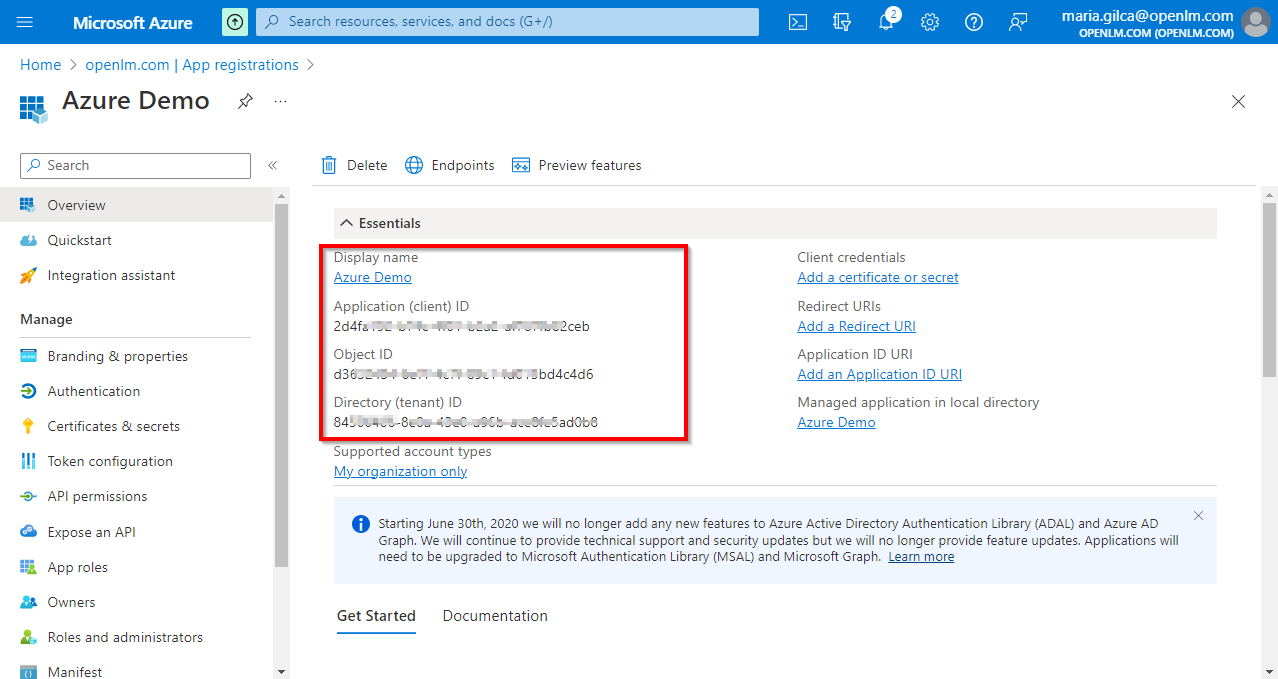
The application is now registered. Note the Application (client) ID and Directory (tenant) ID shown on the overview page — you will need these values in the steps below.
-
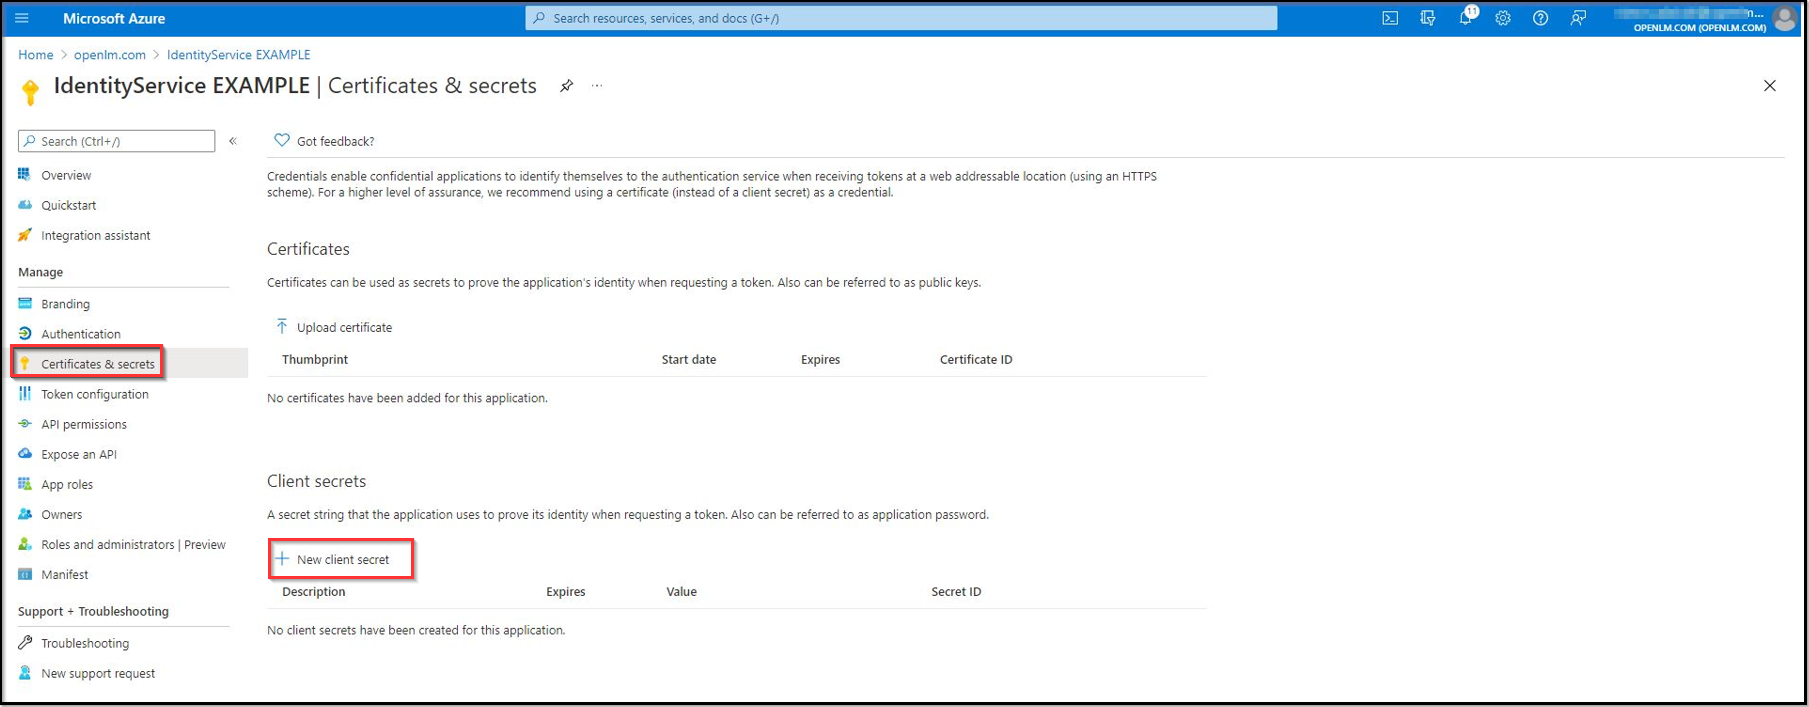
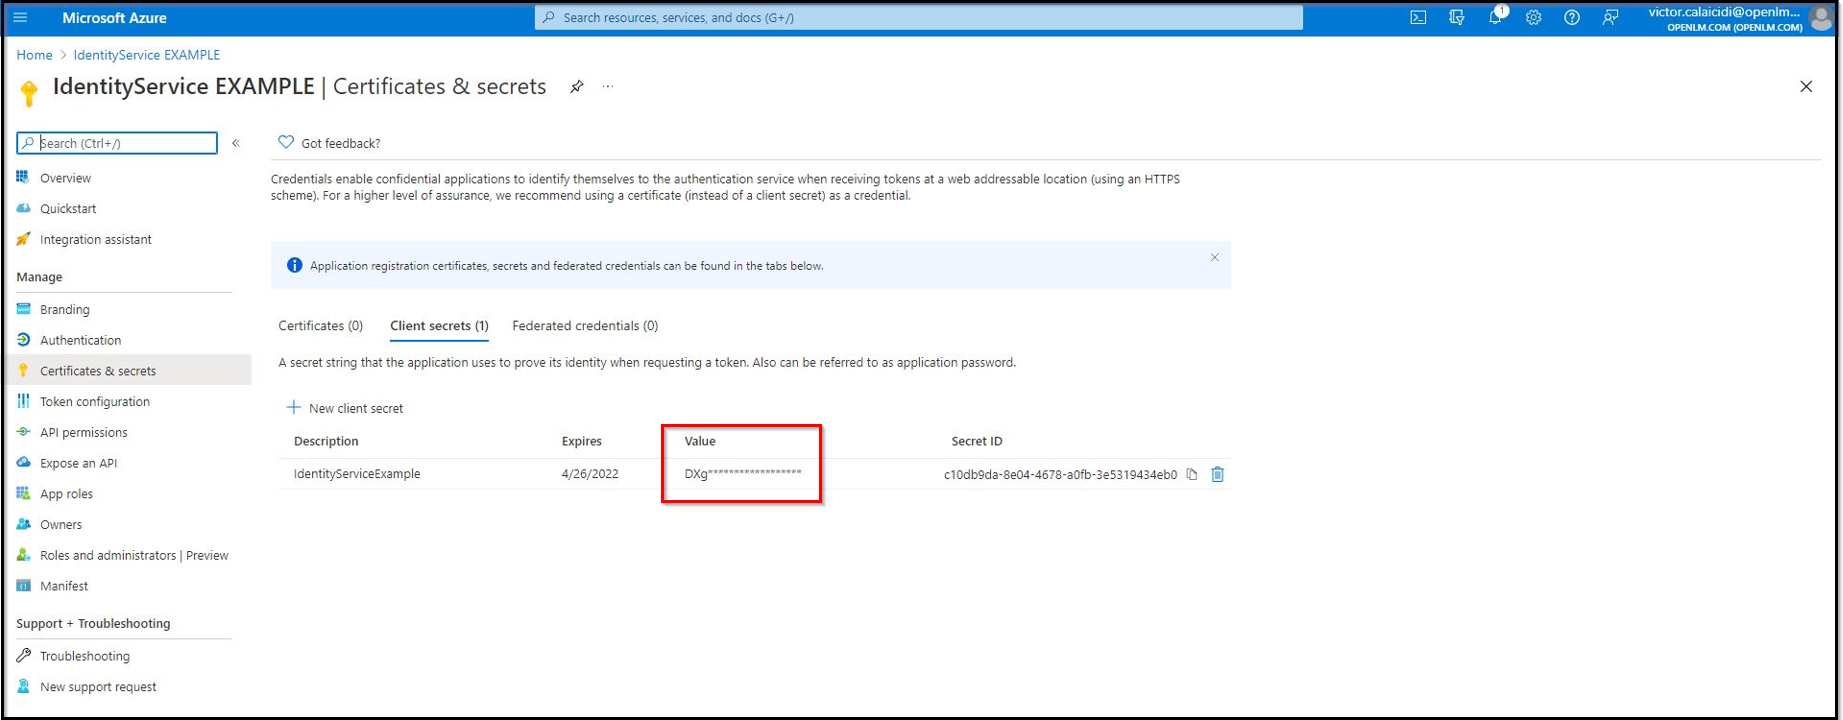
Navigate to the Certificates & Secrets section to create a new client secret. Select New client secret.
Pro tip: open this section in a new tab.
-
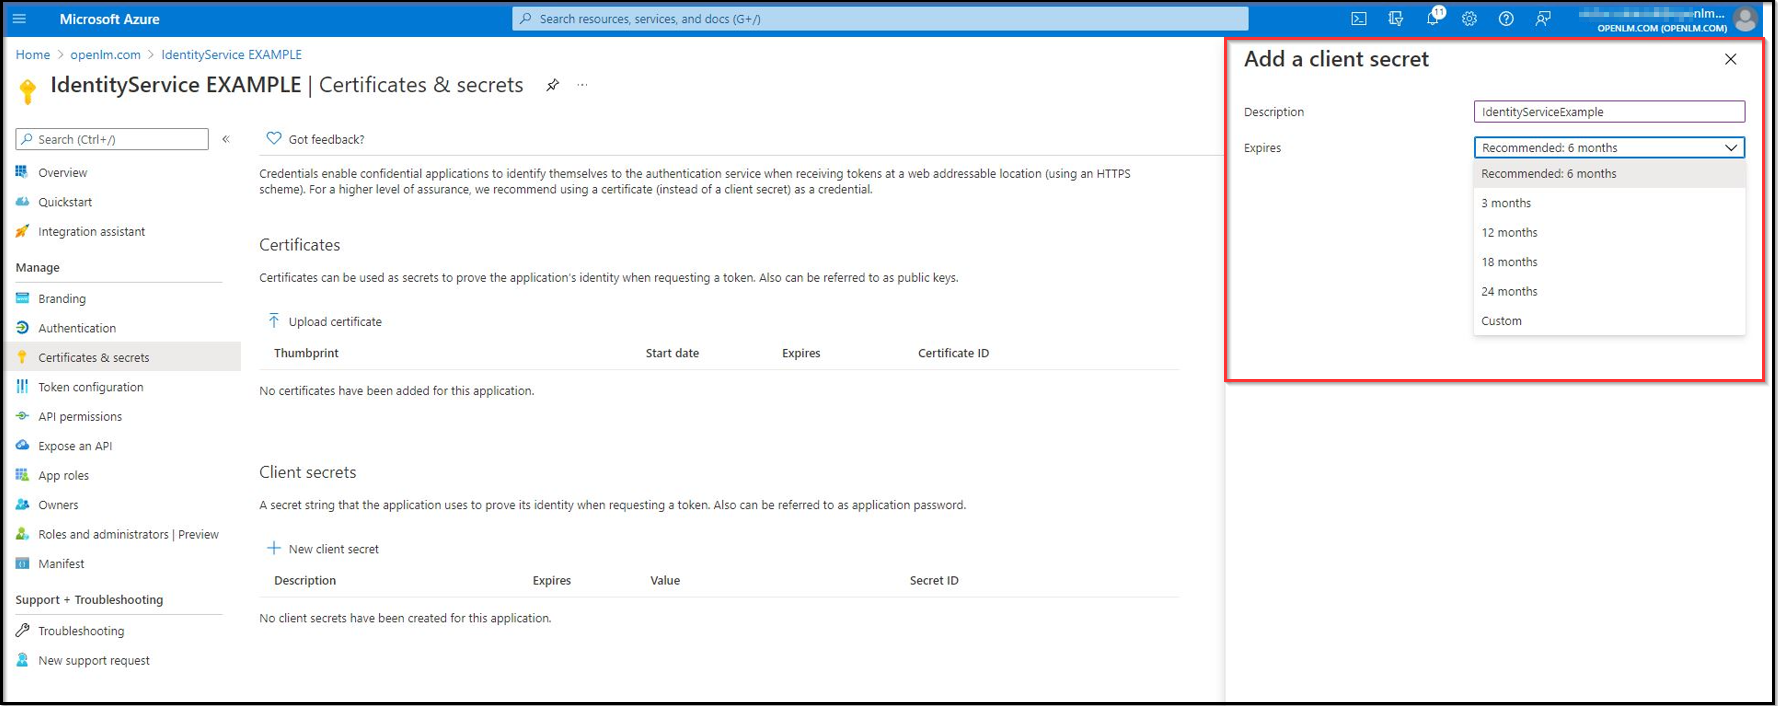
Provide a description for the client and select its lifespan. Select ADD.
-
The client secret is now created. Note the Value and Secret ID.
warningClient secret values cannot be viewed except immediately after creation. Be sure to save the secret value before leaving the page.
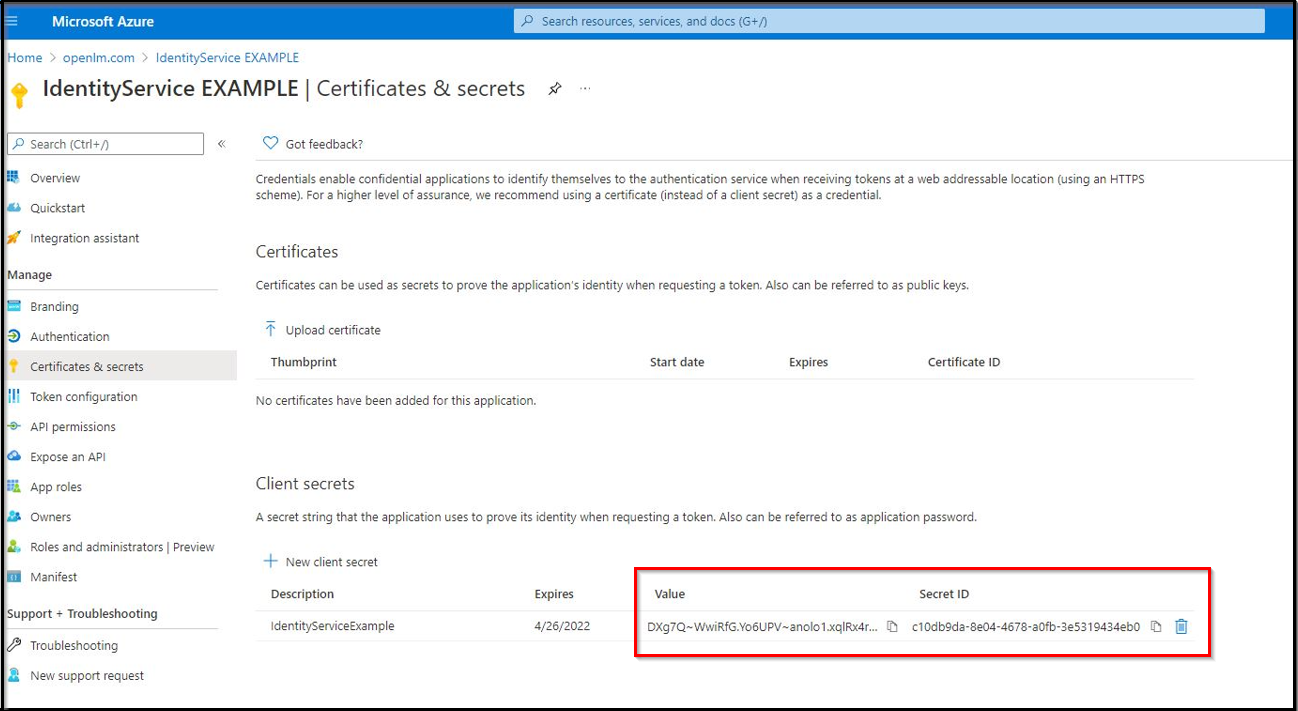
After navigating away, the value will be hidden and impossible to retrieve:
OpenLM on-premise users — adding Microsoft Entra ID as an external identity provider
-
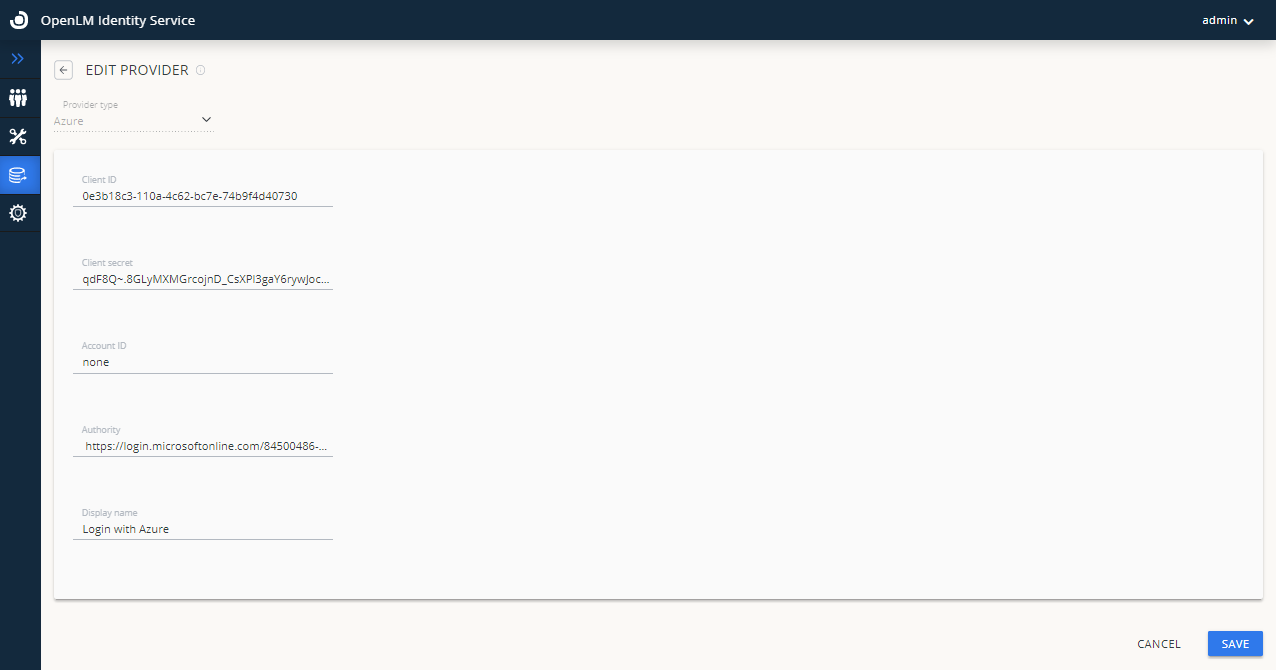
Navigate to your Identity Service account → Select on the External Providers icon to add the external provider.
-
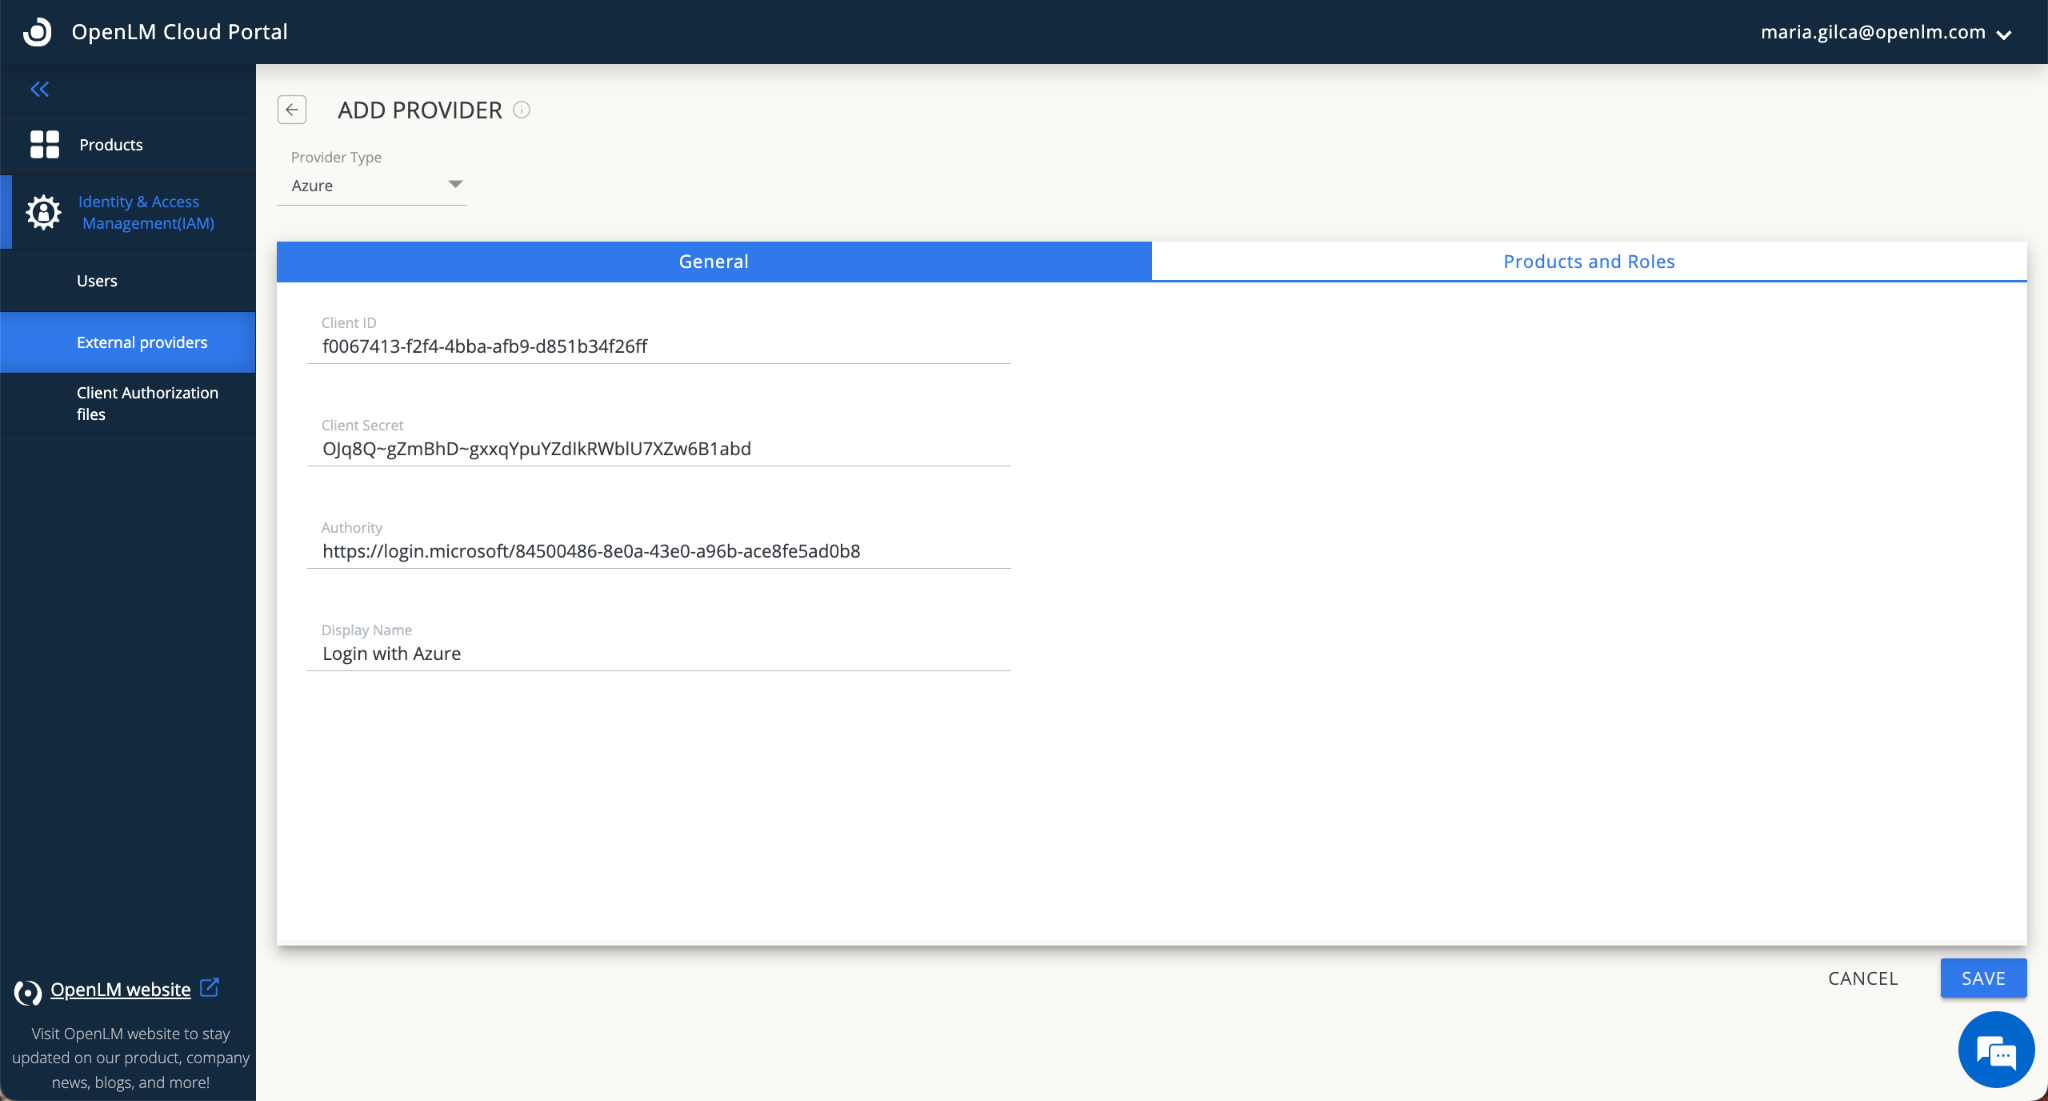
Select the provider type Azure from the drop-down options.
-
Enter the Client ID — this is the Application (client) ID from step 5 above.
-
Enter the Client Secret — this is the Value from step 8 above.
-
In the Account ID field, type none.
warningDo not leave the Account ID field blank — you must explicitly enter
none. Leaving it blank will cause the configuration to fail. -
Enter the authority URL in the Authority field using the format:
https://login.microsoftonline.com/{Directory (tenant) ID}
Replace{Directory (tenant) ID}with the tenant ID from step 5 above. -
Enter the display name for the provider in the Display Name field, for example Login with Azure.
-
Select Save.
-
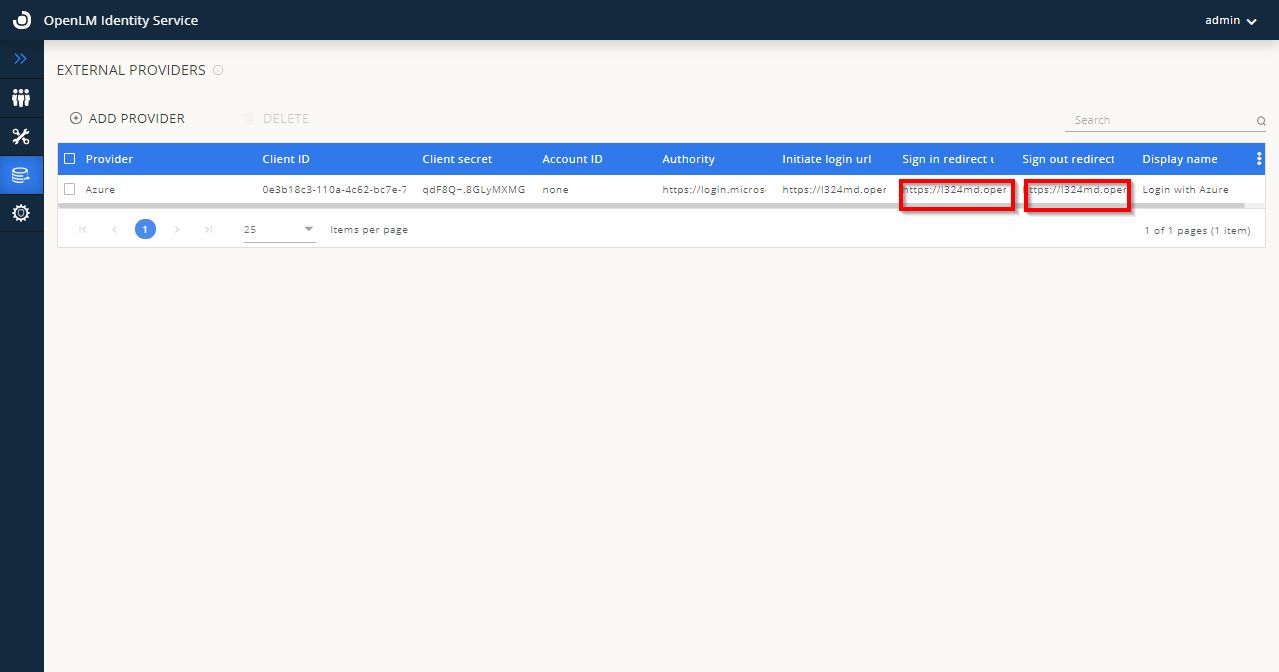
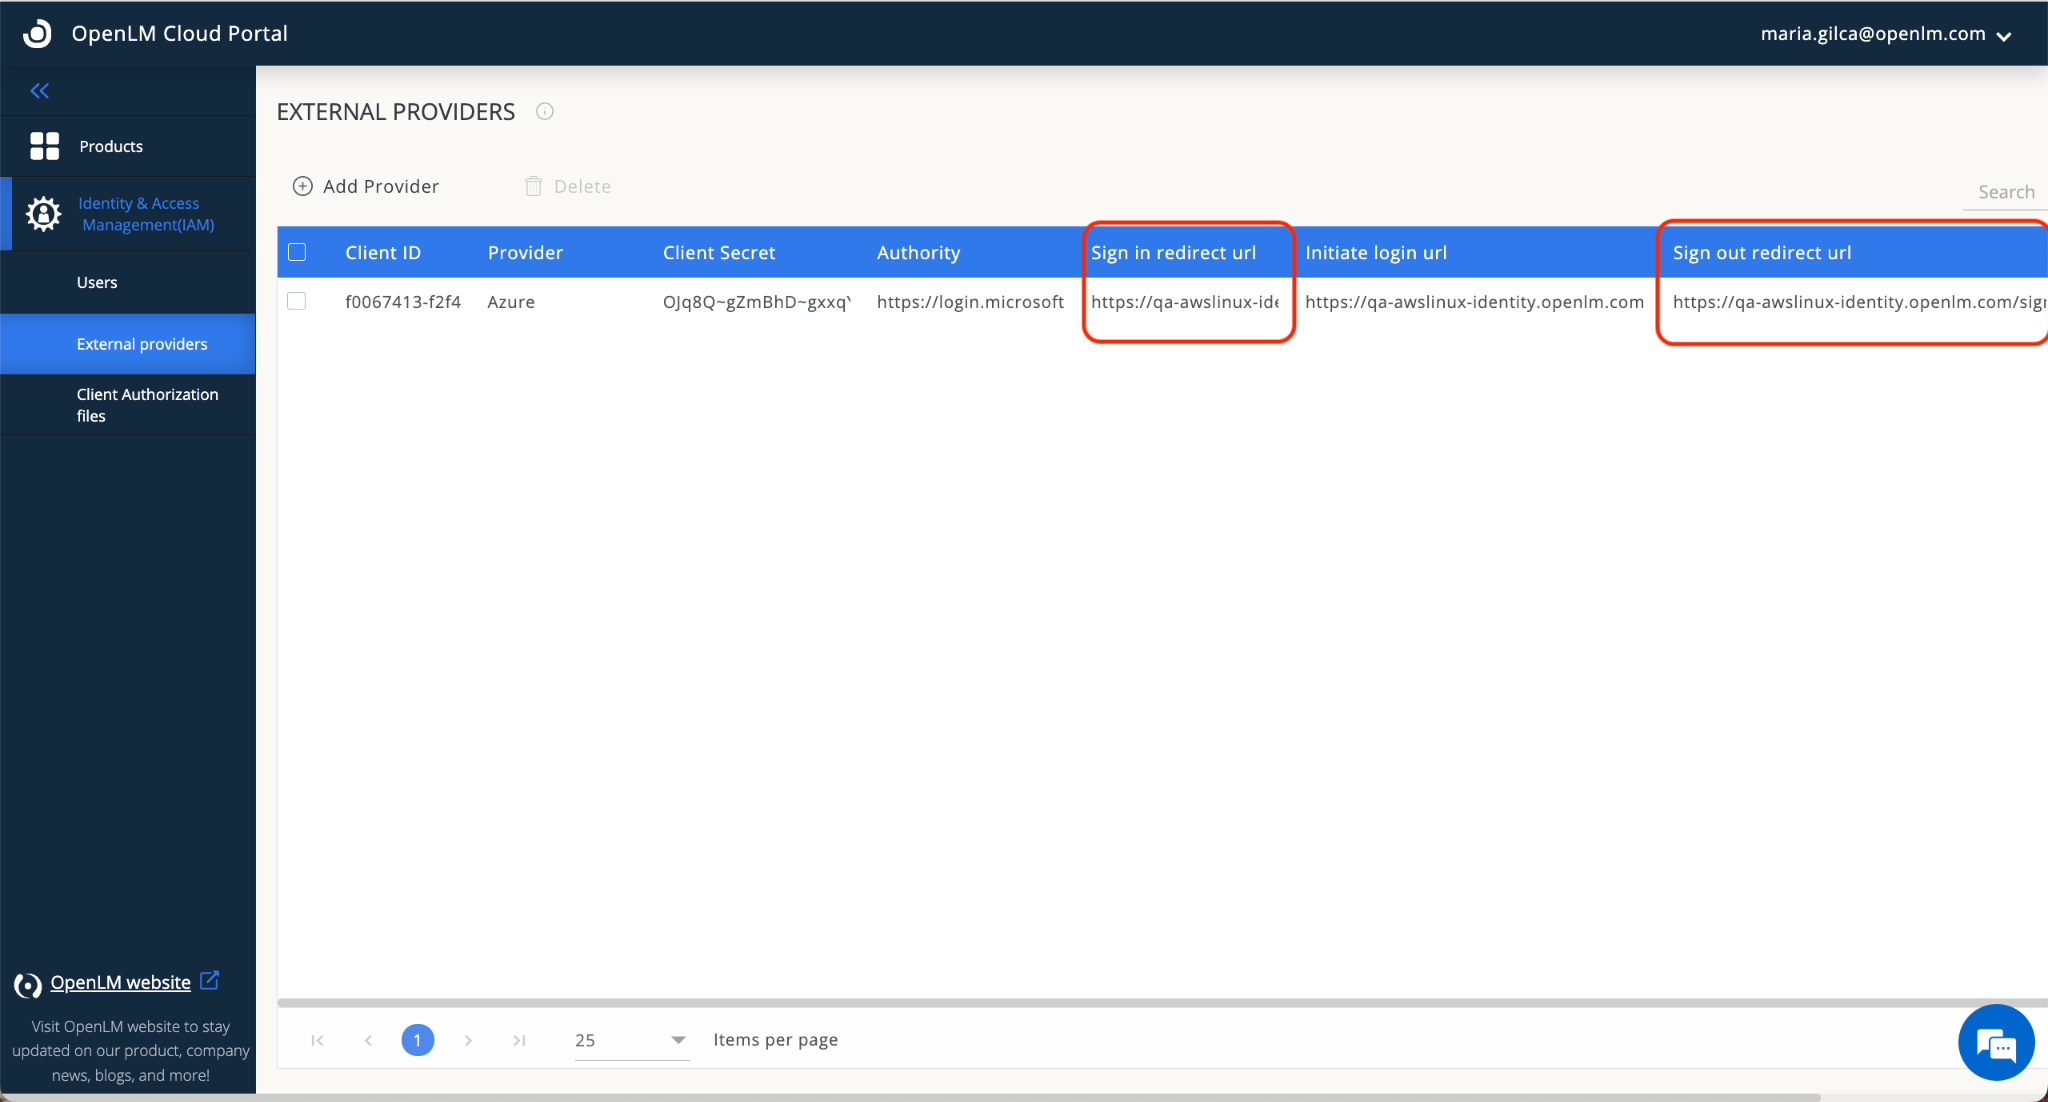
After selecting Save, the external provider (Azure) is displayed in the External Providers list. Note the Redirect URLs shown on screen — you will need these in the next step.
-
Keep this window open — you will need the Redirect URLs displayed here.
-
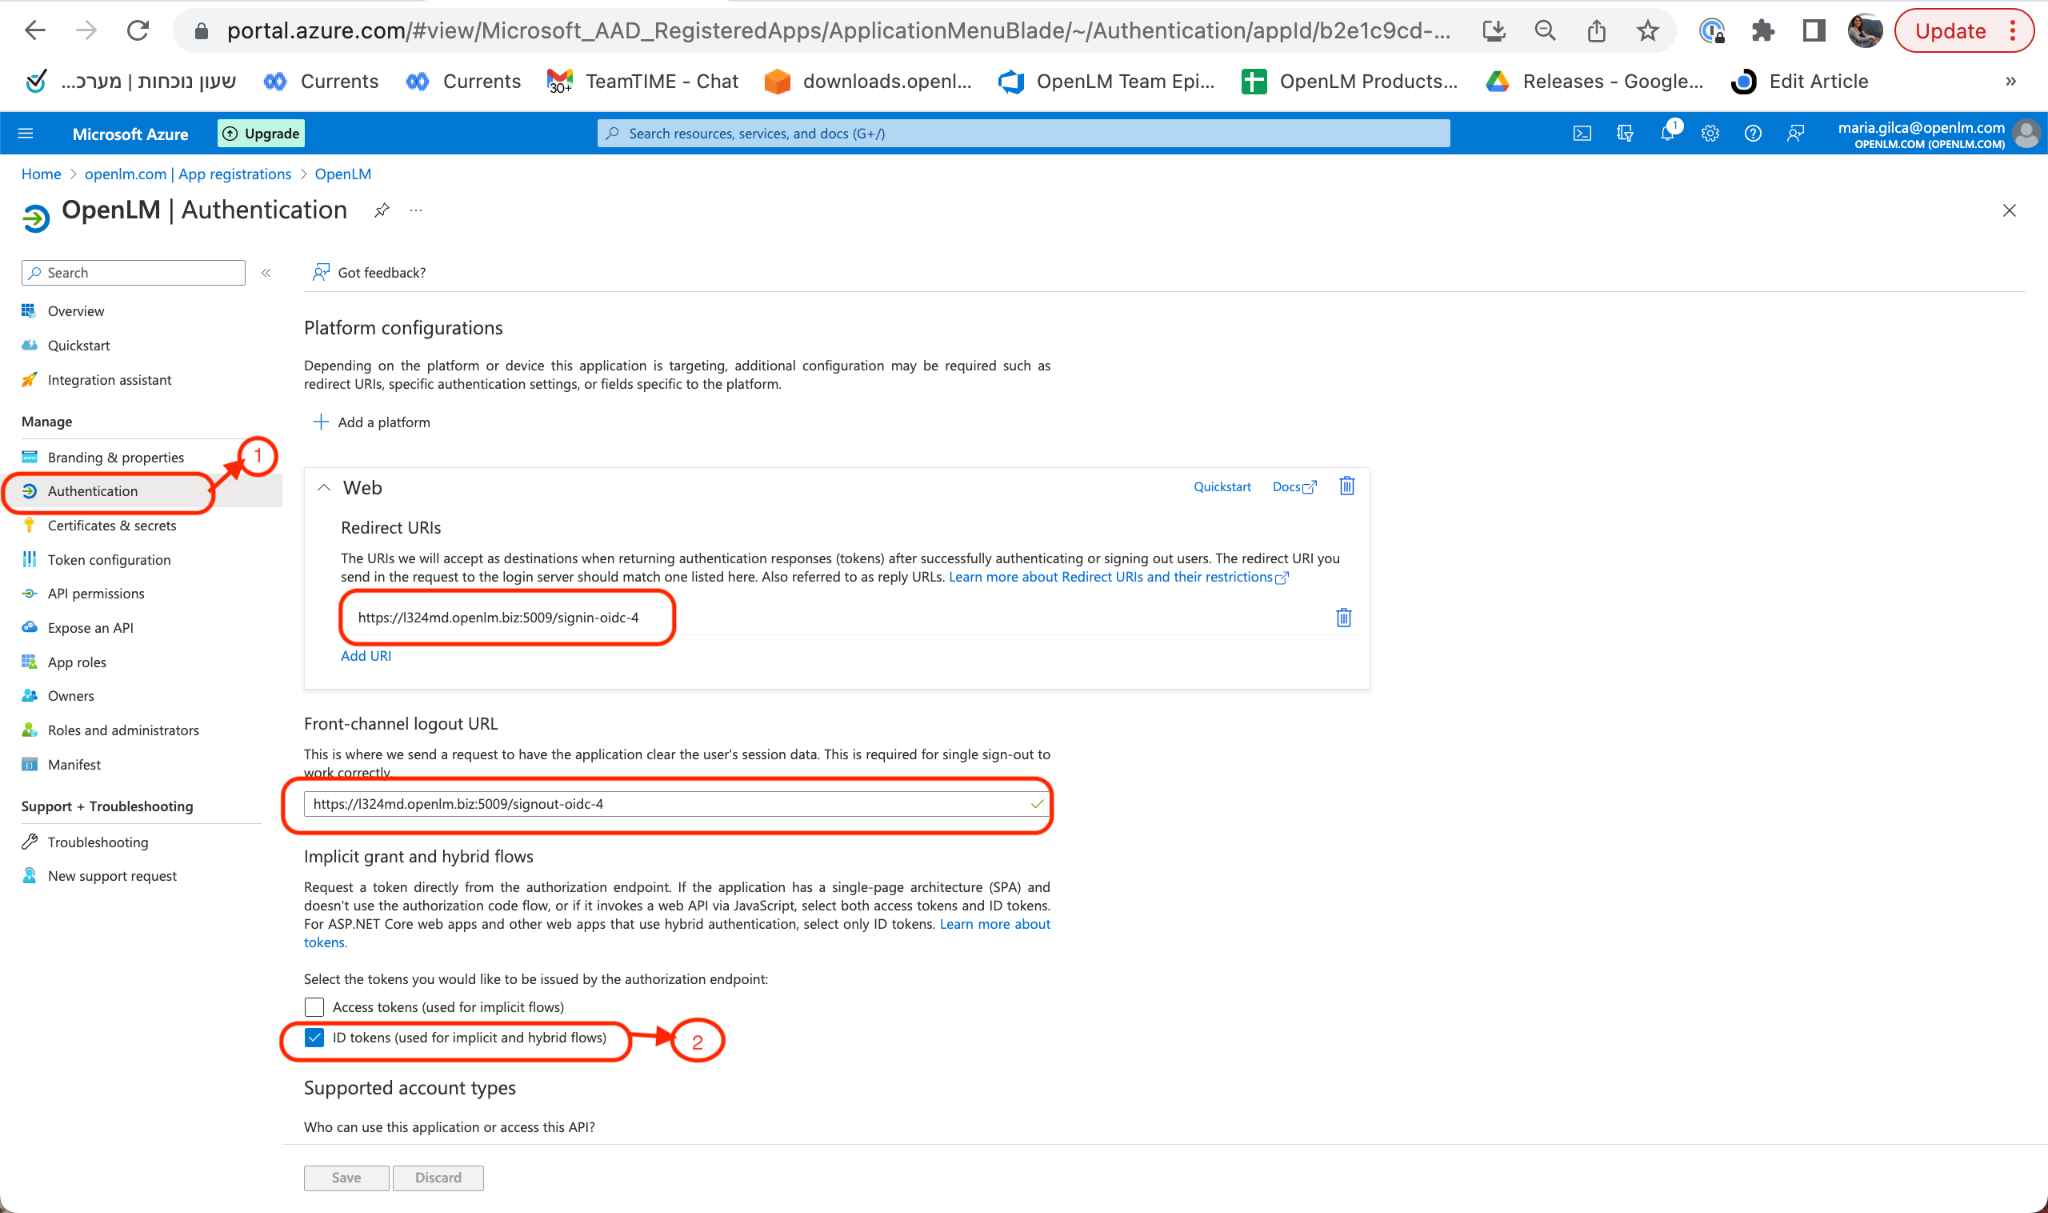
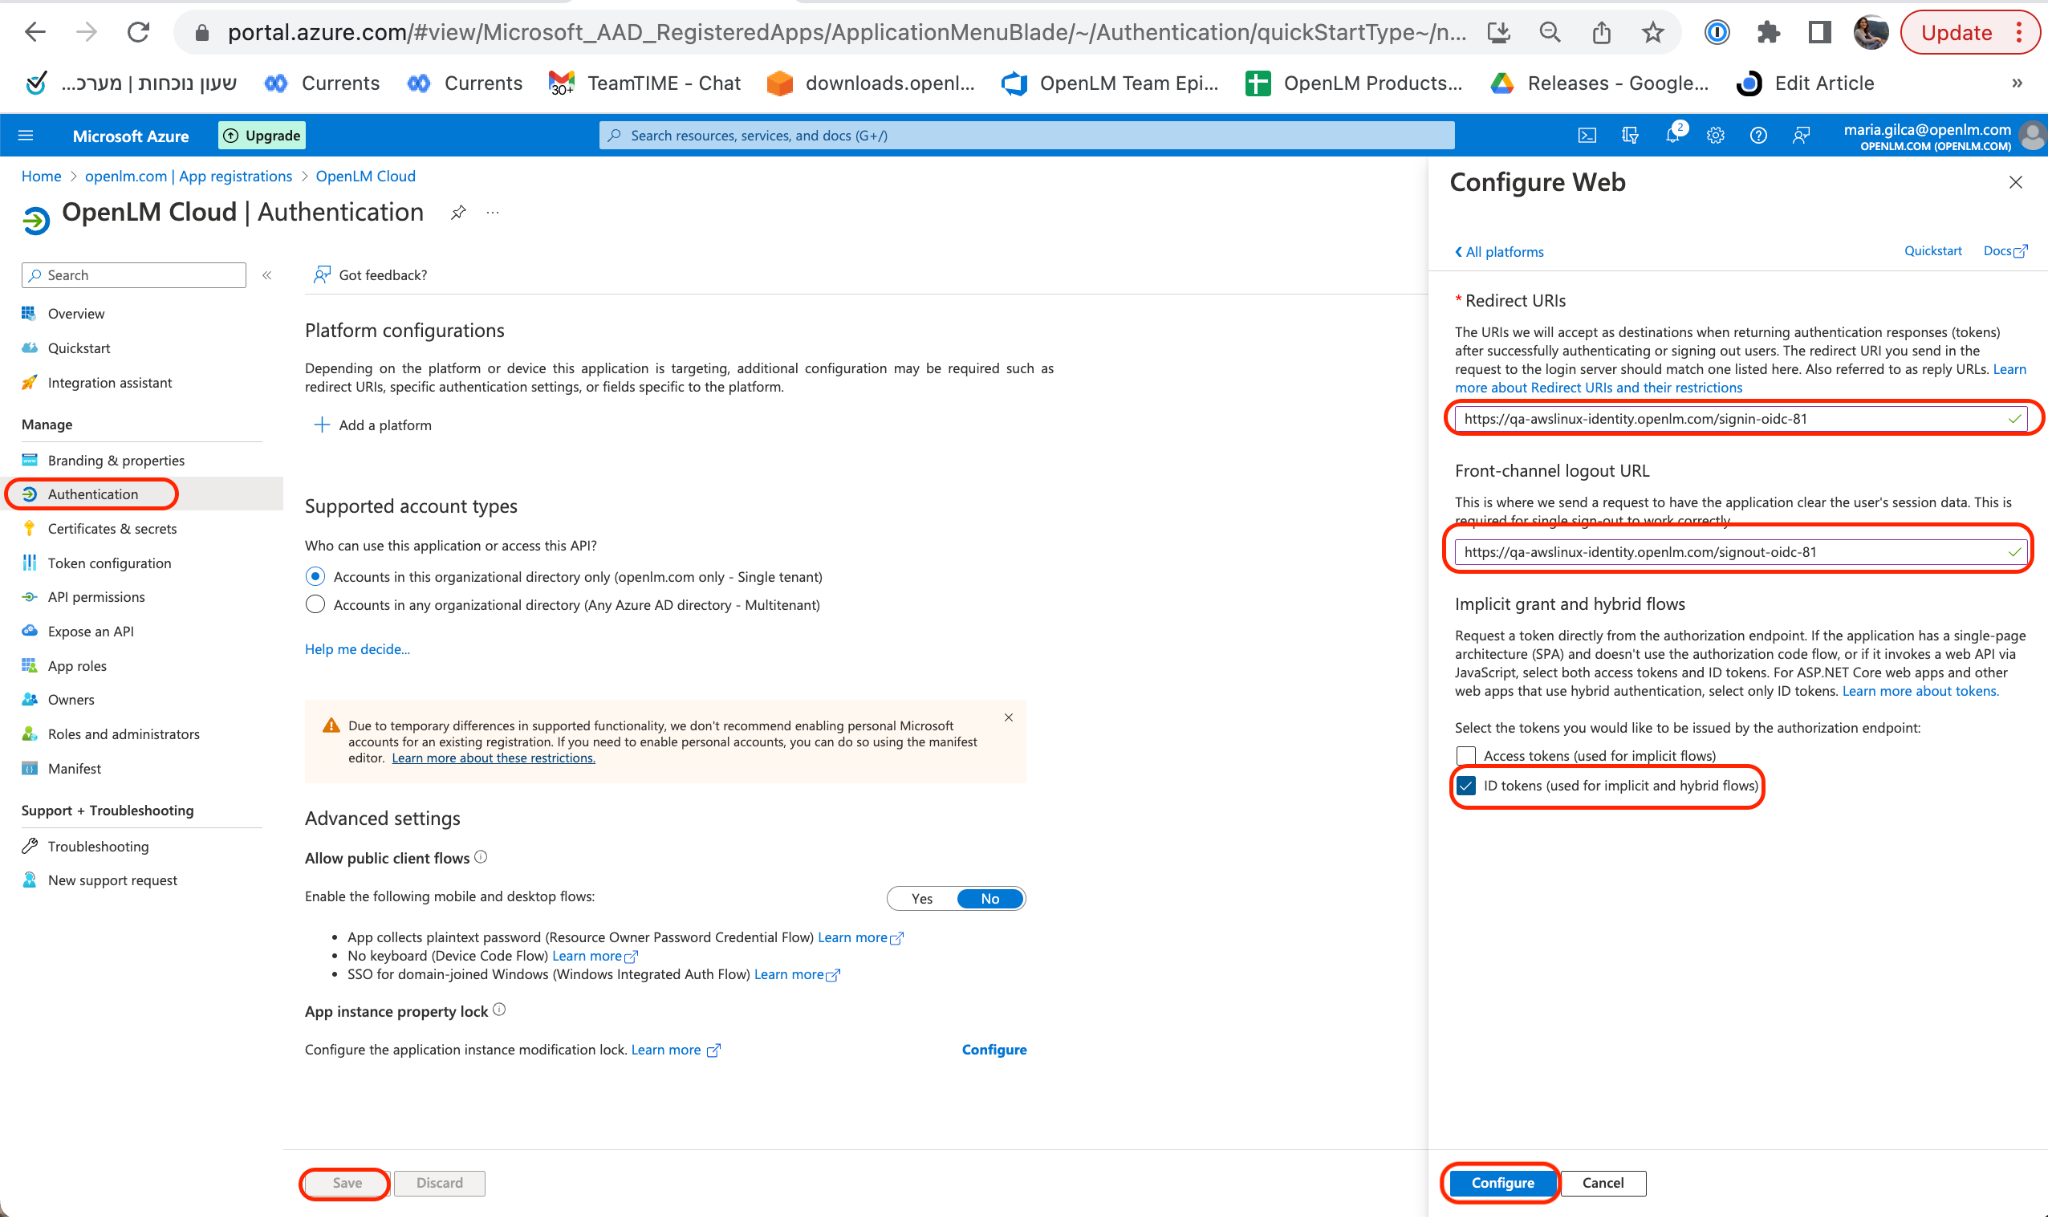
Return to your Microsoft Entra ID account. Navigate to the Authentication section. Select Add Platform. Select Web, then provide the following:
- Front-channel Logout URL
- Web Redirect URL
Check ID Tokens and select who can use this application. Select Configure, then Save.
noteThe Redirect URLs must be copied from the OpenLM Identity Service UI (as shown in step 9 above).
-
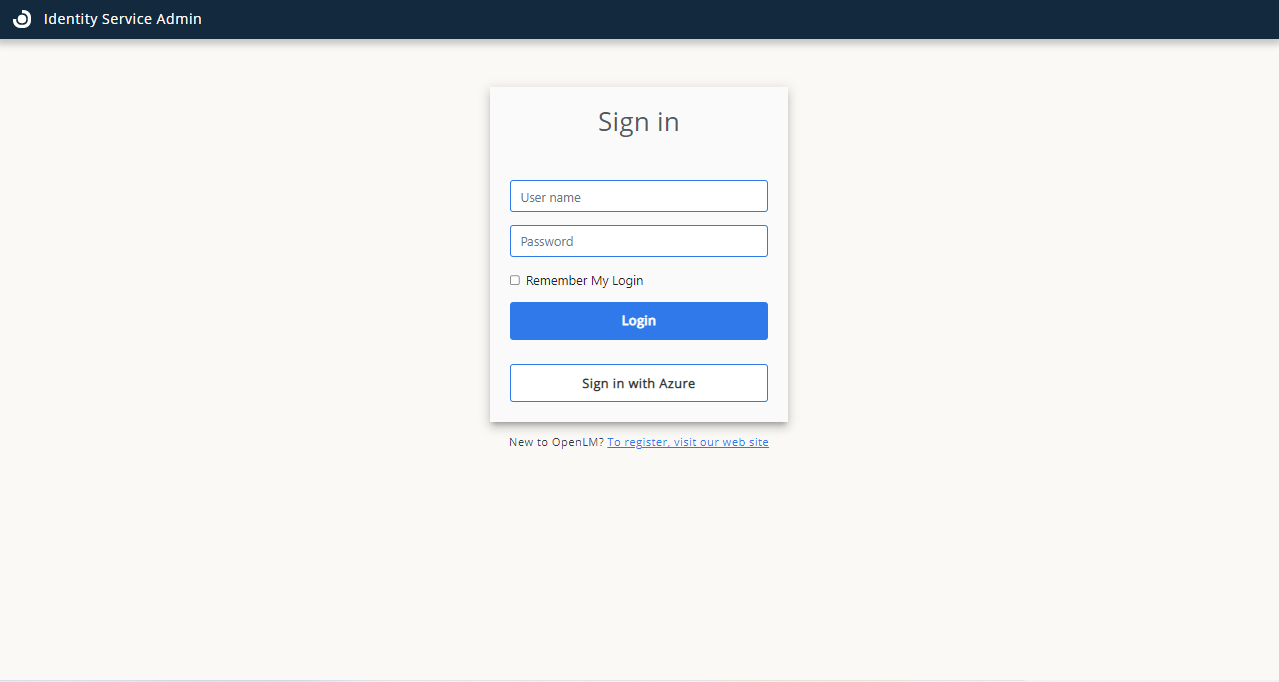
Navigate to your Identity Service account and log out. The Azure Login button now appears as a login option:
OpenLM Platform users — configure Microsoft Entra ID as an external identity provider
-
Navigate to your OpenLM Portal → External Providers tab. Select Add Provider.
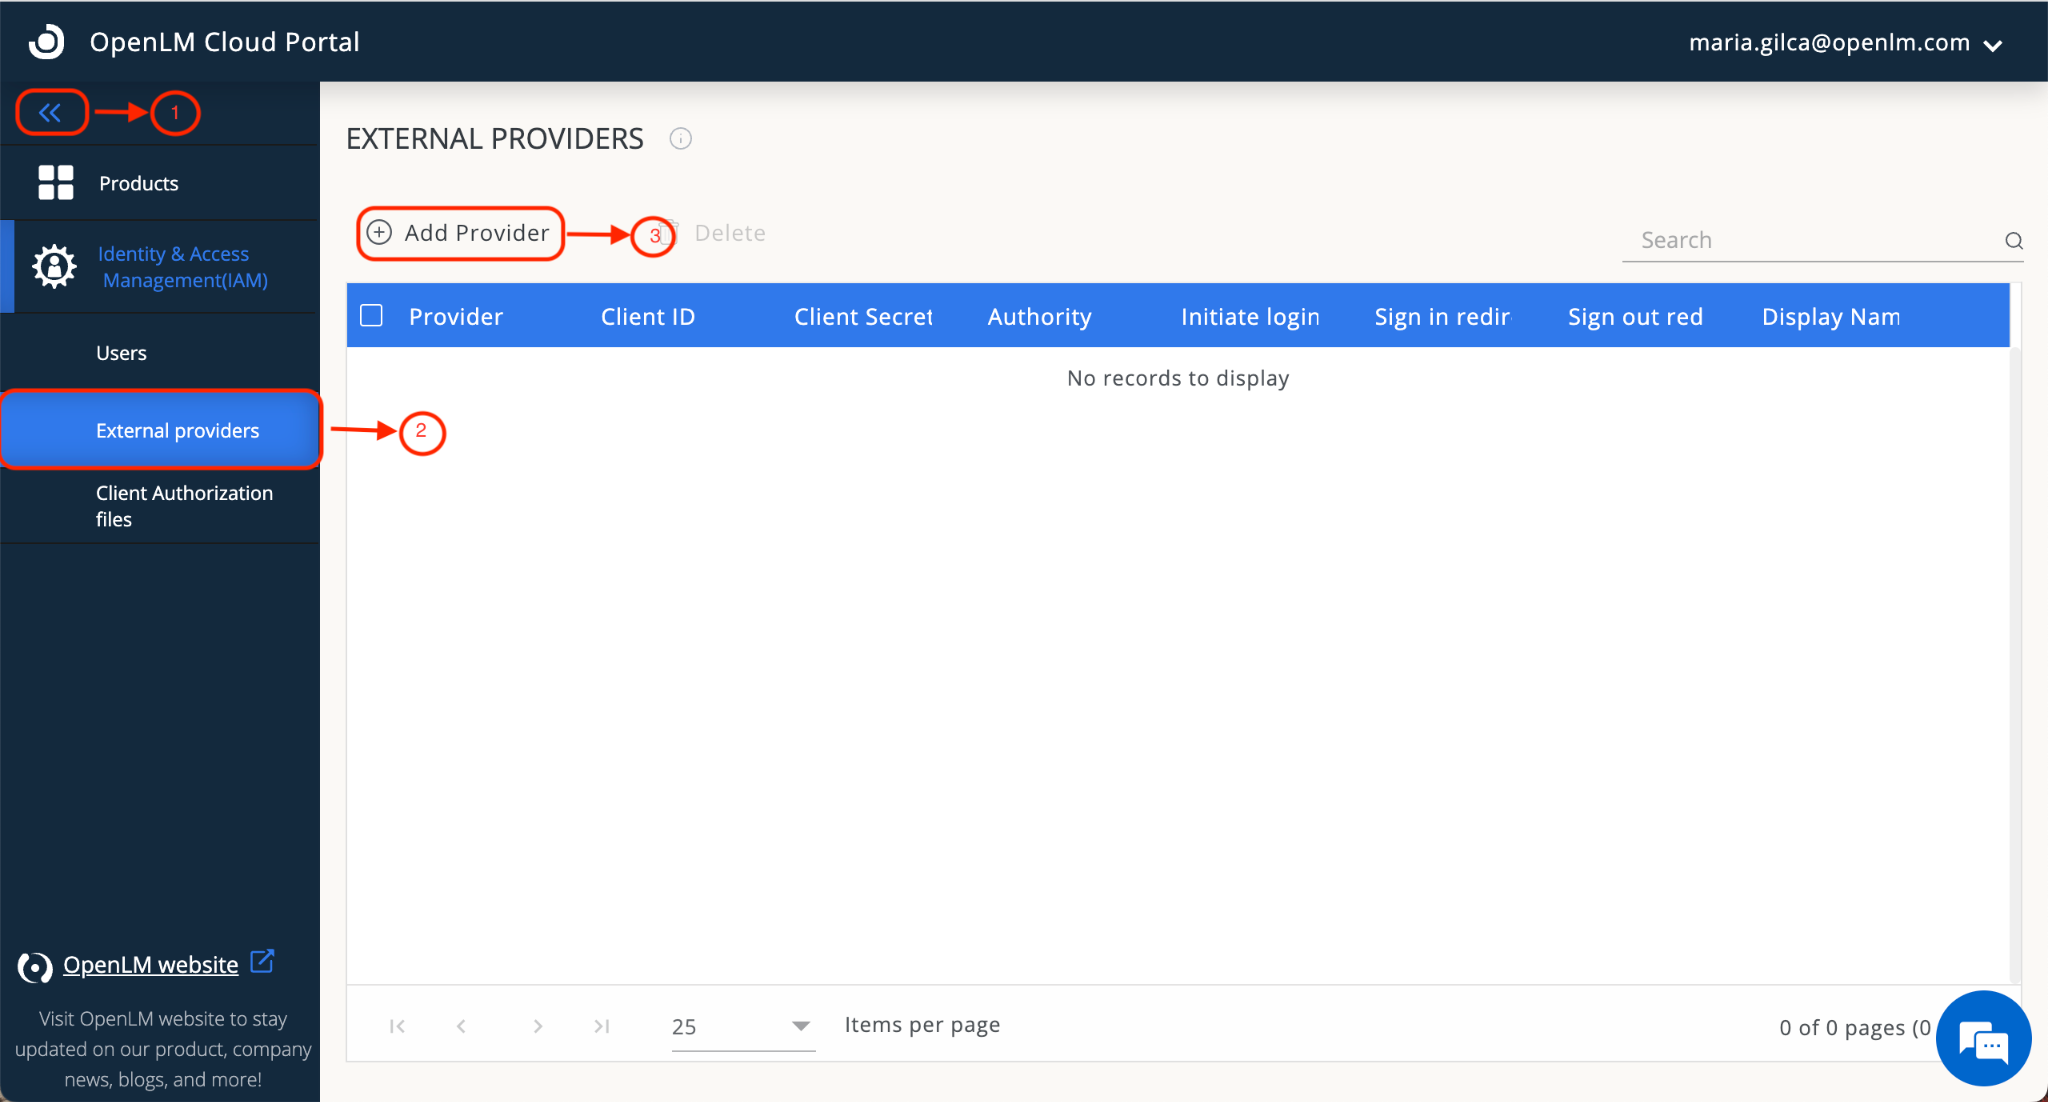
-
Enter the Client ID — this is the Application (client) ID from step 5 above.
-
Enter the Client Secret — this is the Value from step 8 above.
-
In the Authority field, enter:
https://login.microsoftonline.com/{Directory (tenant) ID}
Replace{Directory (tenant) ID}with the tenant ID from step 5 above. -
Enter the display name, for example Login with Azure.
-
Select Save.
-
After selecting Save, the external provider (Azure) is displayed in the External Providers list. Note the Redirect URLs shown on screen — you will need these in the next step.
-
Keep this window open — you will need the Redirect URLs displayed here.
-
Return to your Microsoft Entra ID account. Navigate to the Authentication section. Select Add Platform. Select Web, then provide the following:
- Front-channel Logout URL
- Web Redirect URL
Check ID Tokens and select who can use this application. Select Configure, then Save.
noteThe Redirect URLs must be copied from the OpenLM Portal (as shown in step 7 above).
-
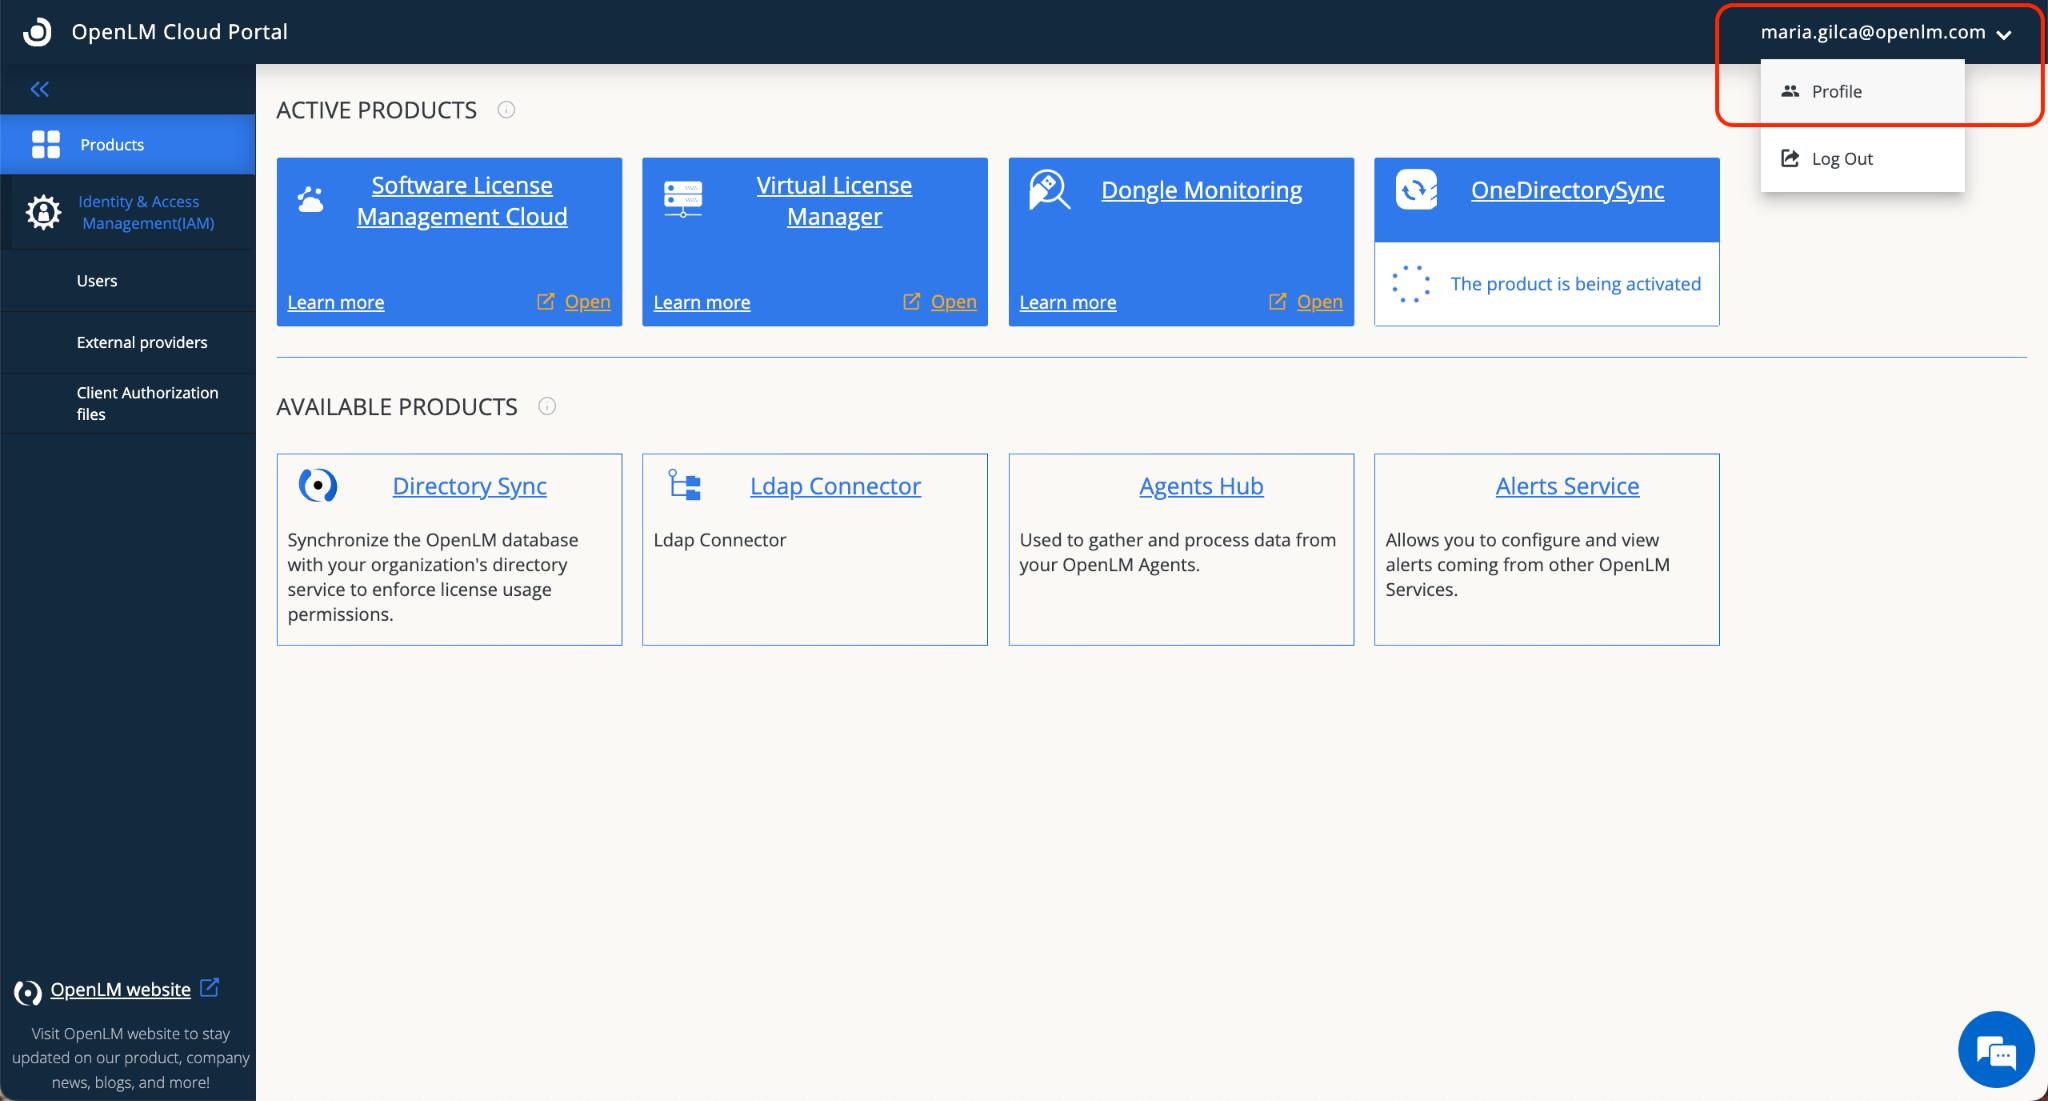
Go to your Cloud Portal. Select on your username (upper right corner) to see your profile information.
-
Note and copy your OpenLM account ID.
-
To access the OpenLM Platform account using Microsoft Entra ID, use one of the following URLs:
https://cloud.openlm.com/portal?loginAccountId=<YOUR_ACCOUNT_ID>or
https://eu-cloud.openlm.com/portal?loginAccountId=<YOUR_ACCOUNT_ID>Replace
<YOUR_ACCOUNT_ID>with the account ID copied in step 11.
Clear your browser cache before accessing the Cloud Portal with the new configuration.