This document describes the steps required to configure Azure Active Directory (AAD) with the Identity Service and set the Azure Active Directory as the external Identity provider for OpenLM. The following steps are to be performed to achieve this configuration:
Azure Active Directory Configuration
- Log in to the Azure Portal, link: https://portal.azure.com. Navigate your Azure Active Directory (AAD).
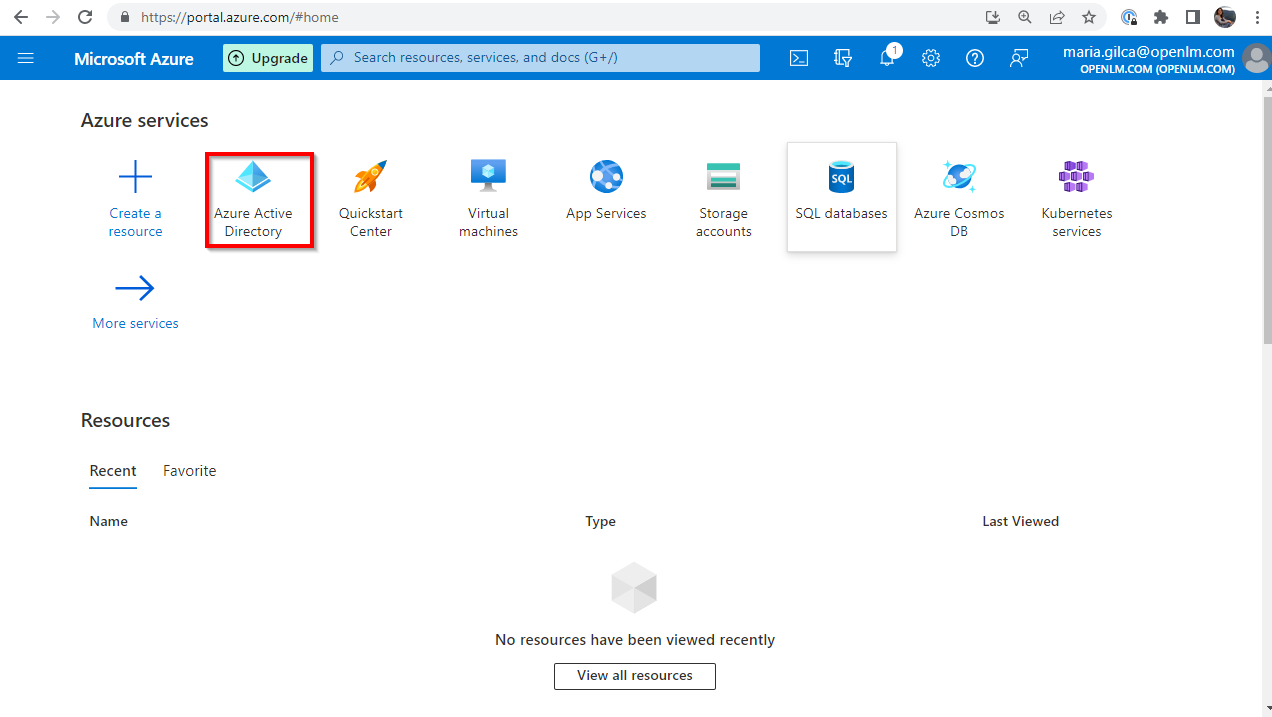
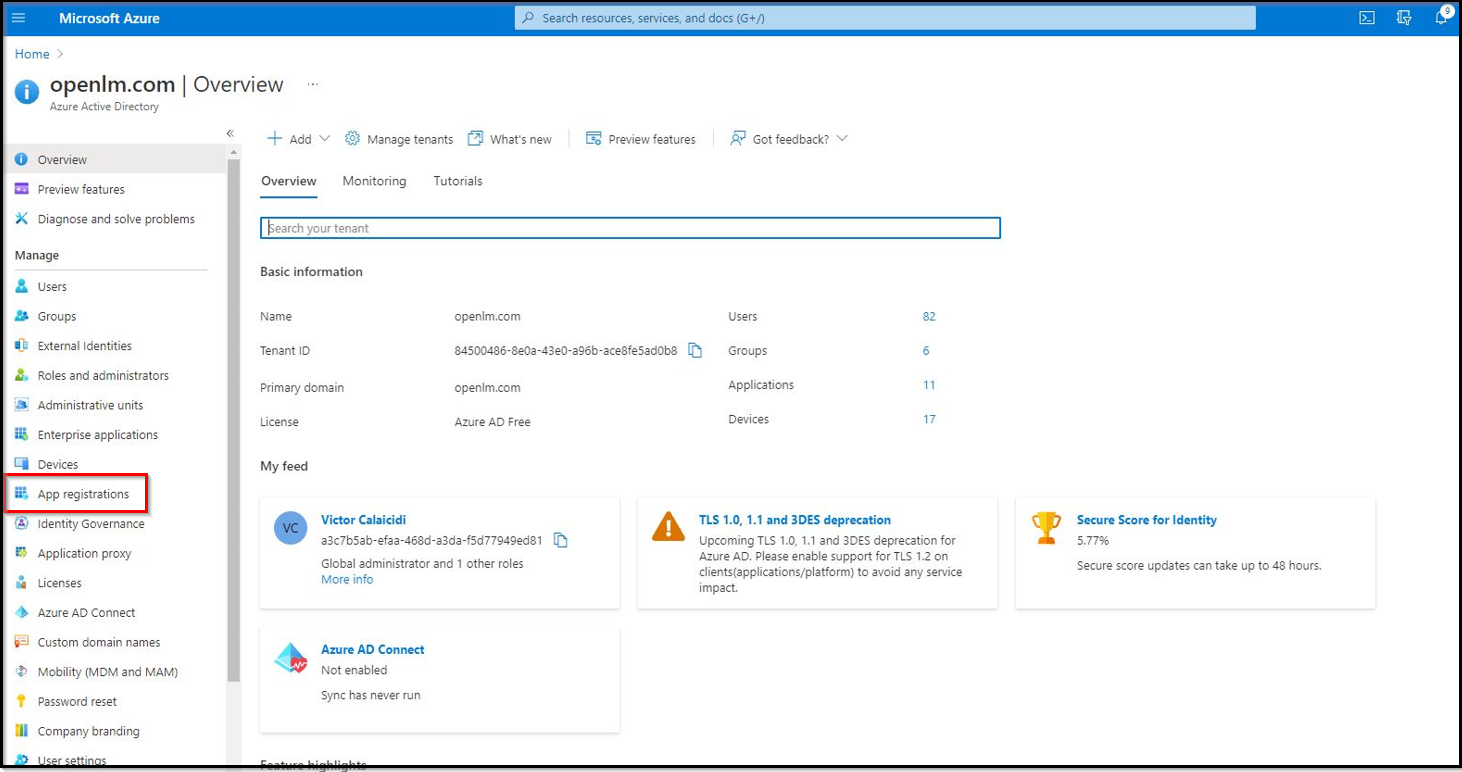
- Navigate to the App Registrations section.
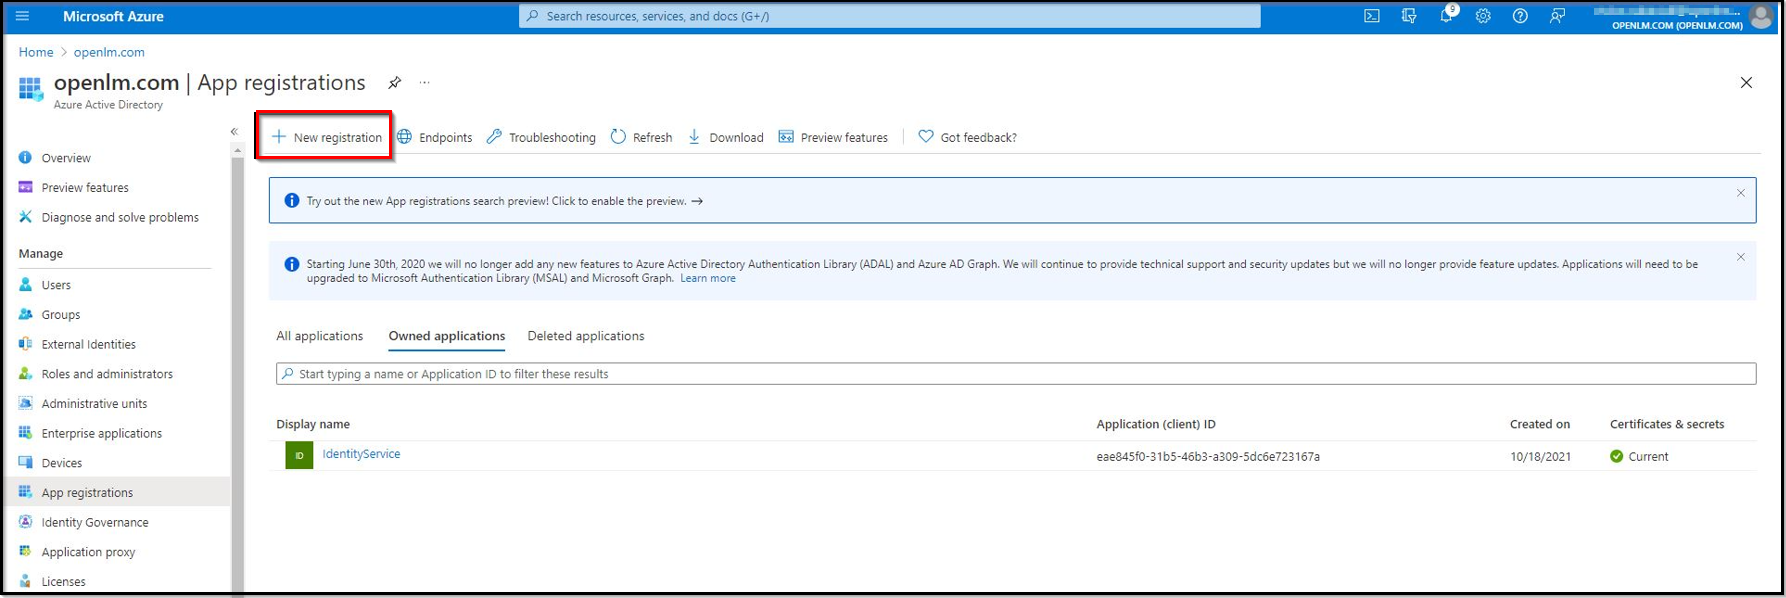
- Create a new registration. Click the New Registration button.
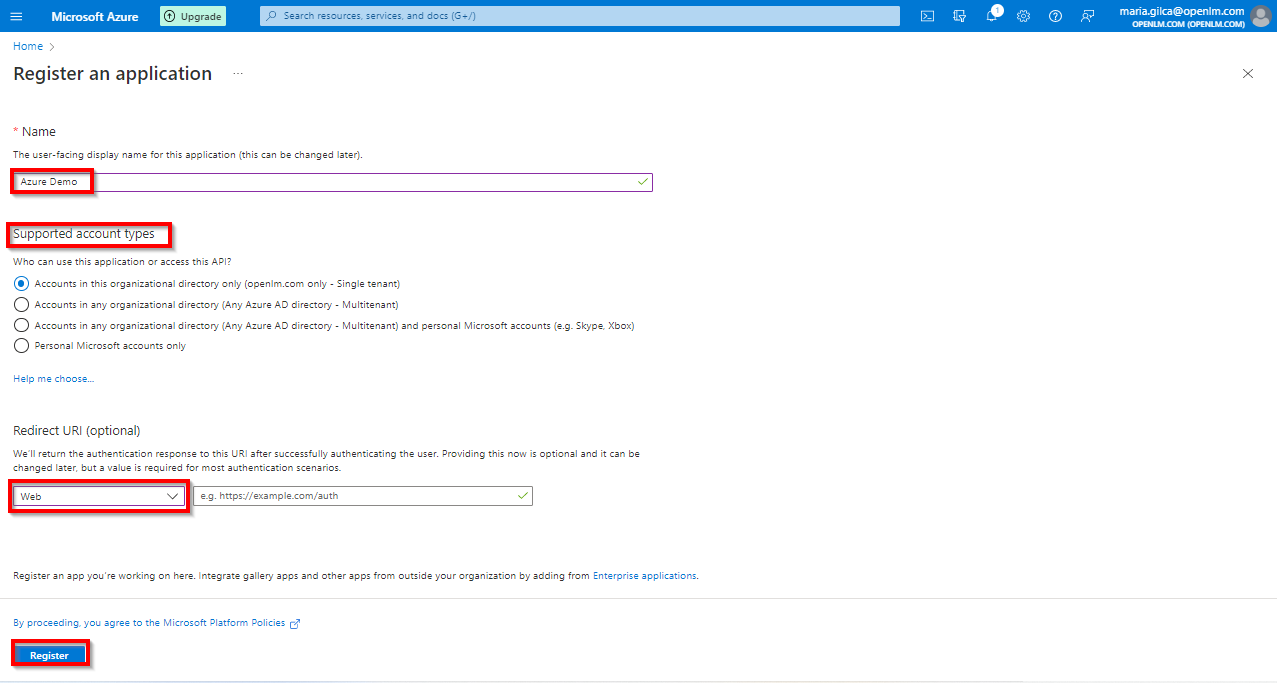
- Provide the application display name (for example Identity Service). In the Redirect URI field, from the drop-down list select Web. Leave the URI field empty, as we will come back to this step and update it later during configuration. Click the Register button.
- The Application is now registered. Please have handy the information depicted below – Application (client) ID and Directory (tenant) ID (it appears after clicking the Register button).
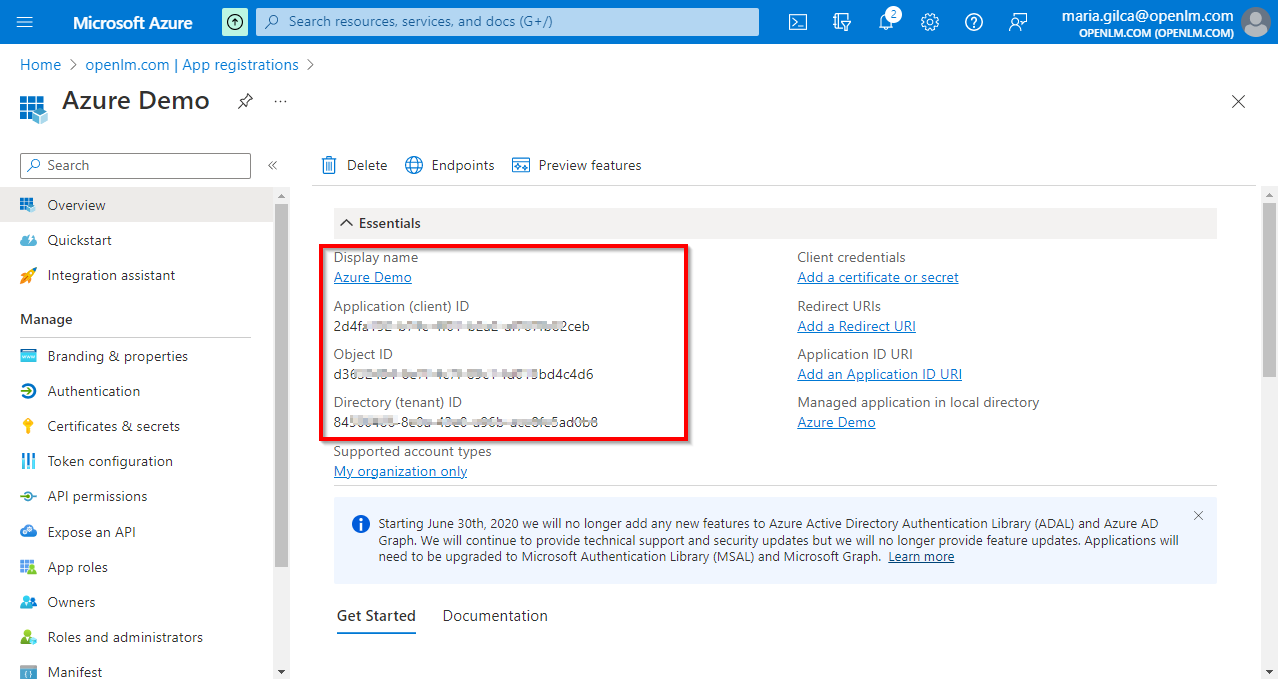
- Navigate to the Certificates & Secrets section to create a new client secret. Click New client secret.
Pro tip: open this section in a new tab.
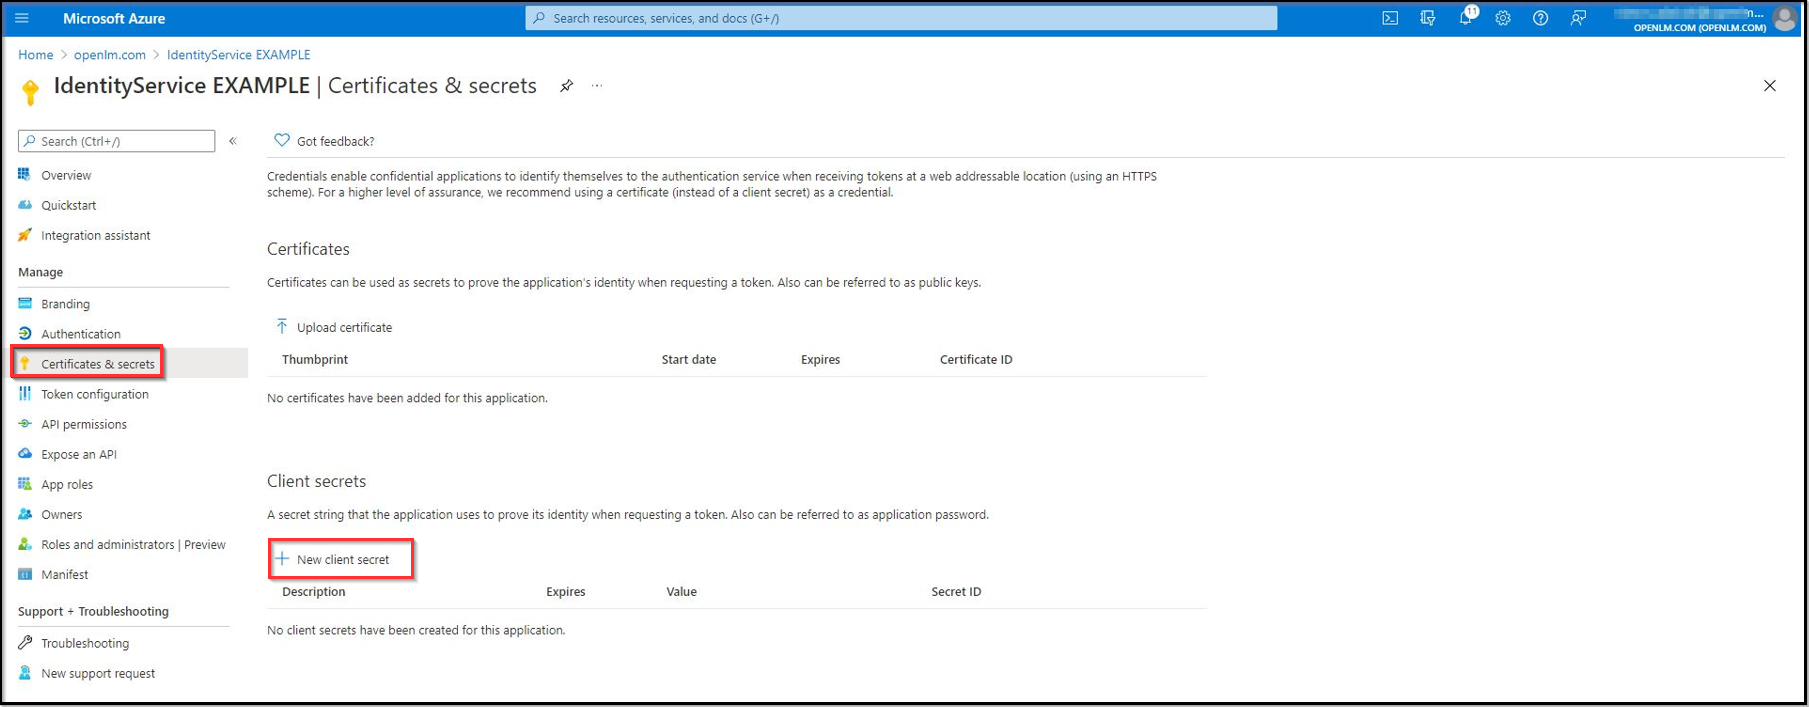
- Provide a description for the client and choose its lifespan. Click ADD.
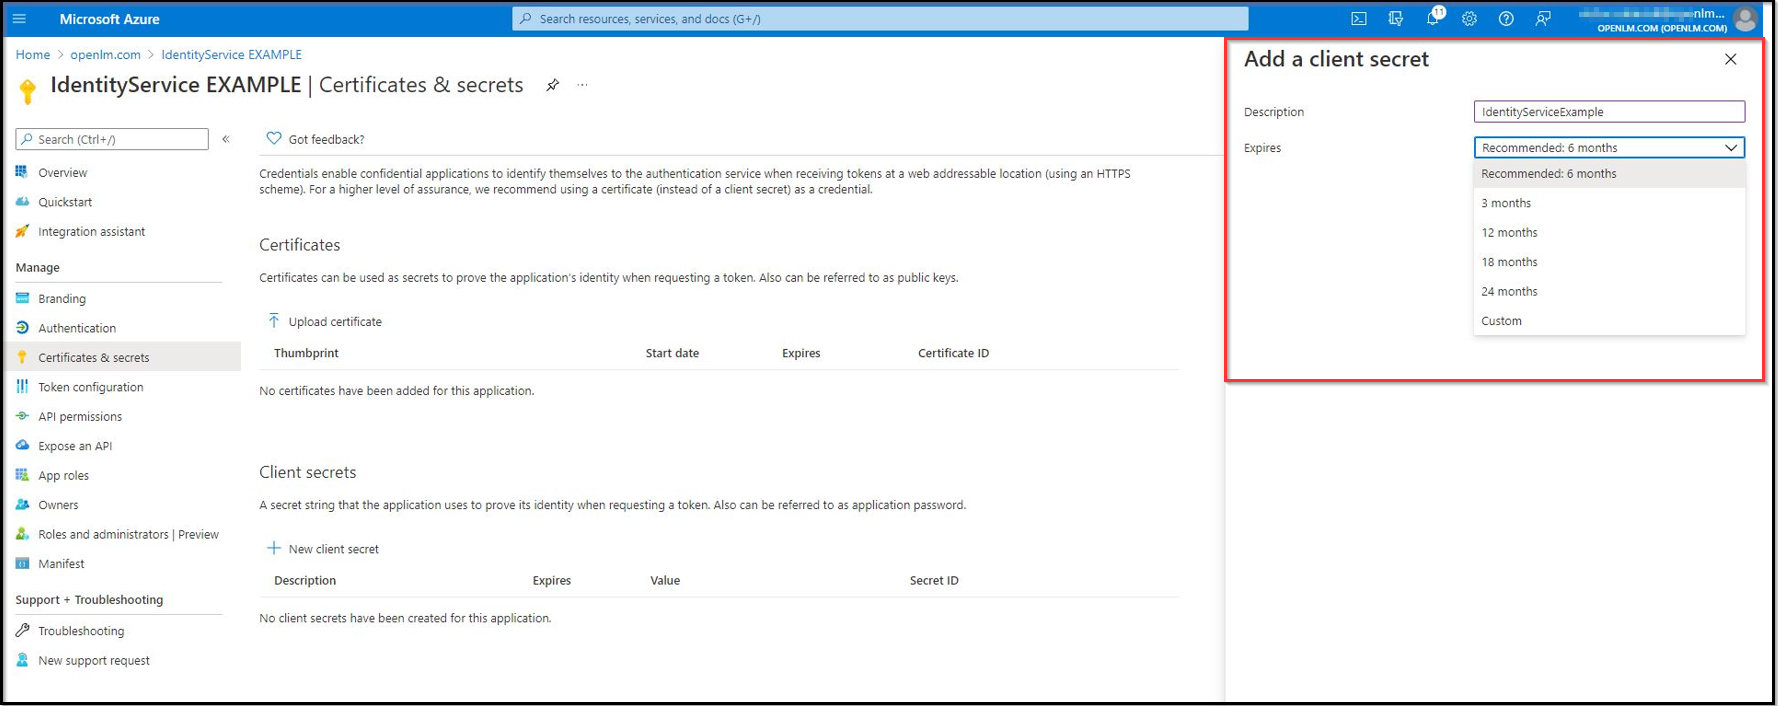
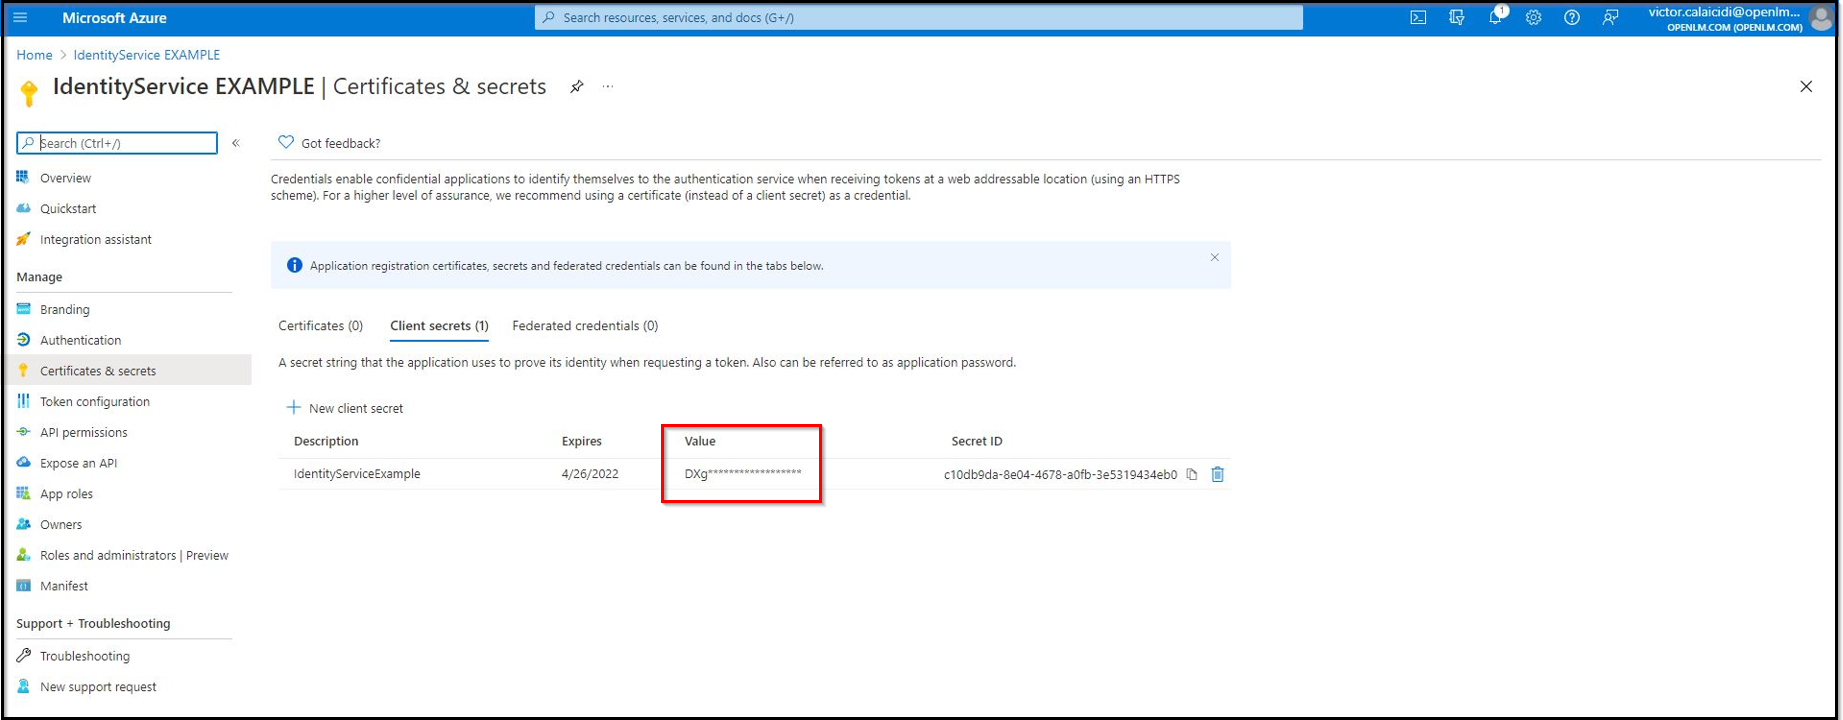
- The Client Secret is now created. Note the Value and Secret ID.
Important! Client secret values cannot be viewed, except immediately after creation. Be sure to save the secret ID when created before leaving the page.
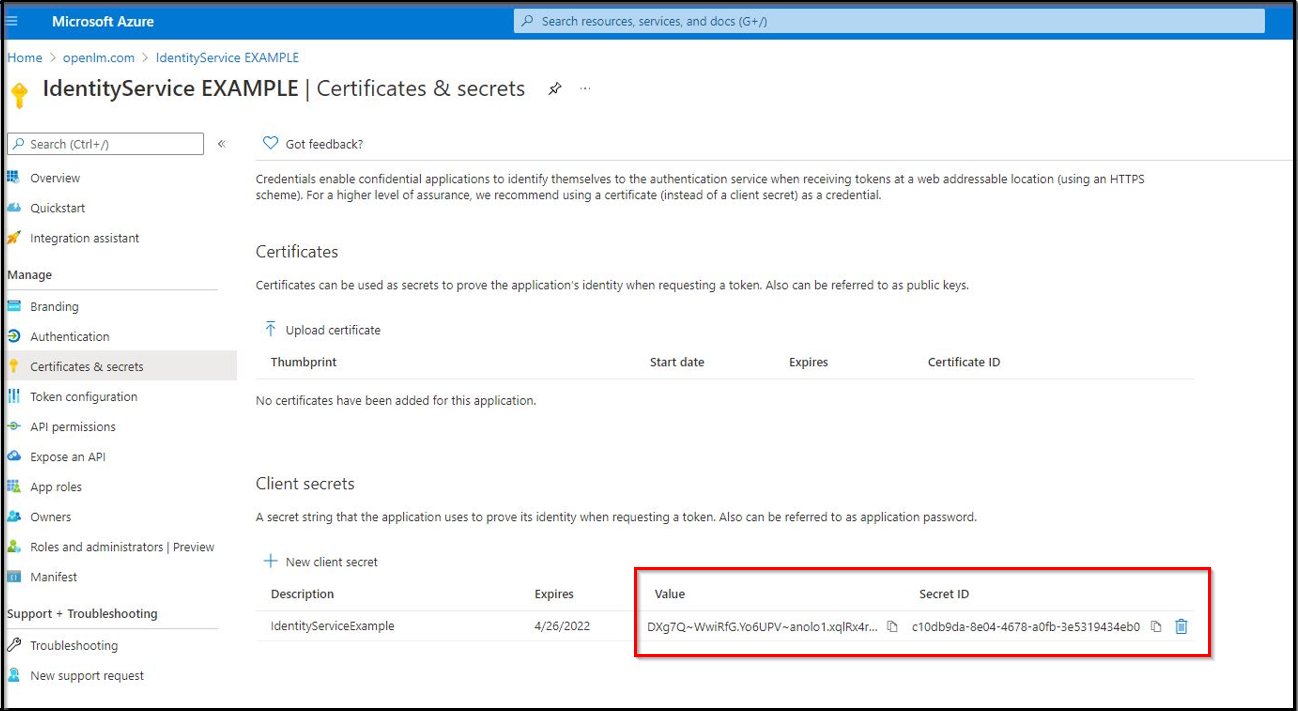
- Note: The value will be displayed hidden as shown in the image below and impossible to retrieve after closing the page:
OpenLM On-premise users – Adding Azure Active Directory in OpenLM Identity Service as an external Identity provider
To add the external provider (Azure) in the OpenLM Identity Service, make sure the OpenLM SLM and Identity Service are SSL secured
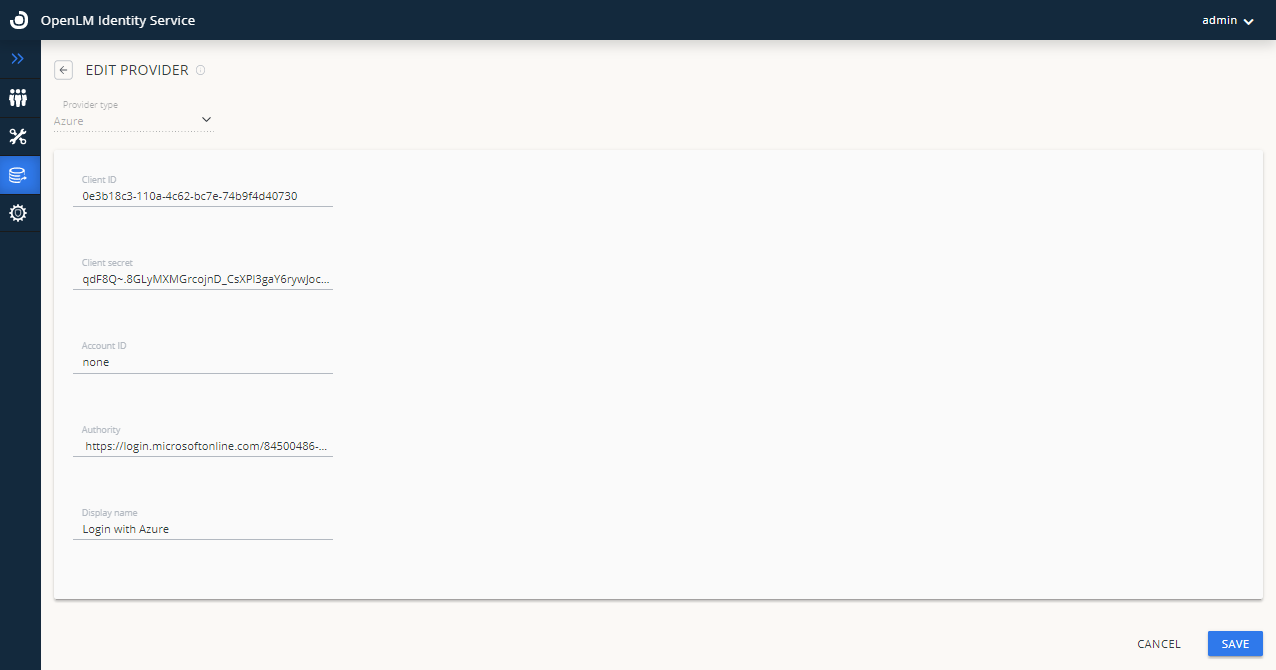
- Navigate to your Identity Service account → Click on the External Providers icon to add the external provider.
- Select the provider type Azure from the drop-down options.
- Enter the Client ID in the Client ID field. Client ID is “Application (client) ID” (from AAD settings, as in step 5 of the section “IAzure Active Directory Configuration” above).
- Enter the Client Secret in the Client Secret field. Client Secret is “Value” (from AAD settings, as in step 8 of the section “Azure Active Directory Configuration” above).
- Enter the Account ID – none in the Account ID field.
- Enter the authority URL in the Authority field. The Authority field will be filled by the Azure Authority URL. Take the Directory (tenant) ID as mentioned in step 5 of the section “Identity Service Configuration Process with Azure Active Directory (AAD)” above and add it to the link: https://login.microsoftonline.com/{Directory (tenant) ID}.
- Enter the display name for the provider in the Display Name field. For example Login with Azure.
- Click Save.
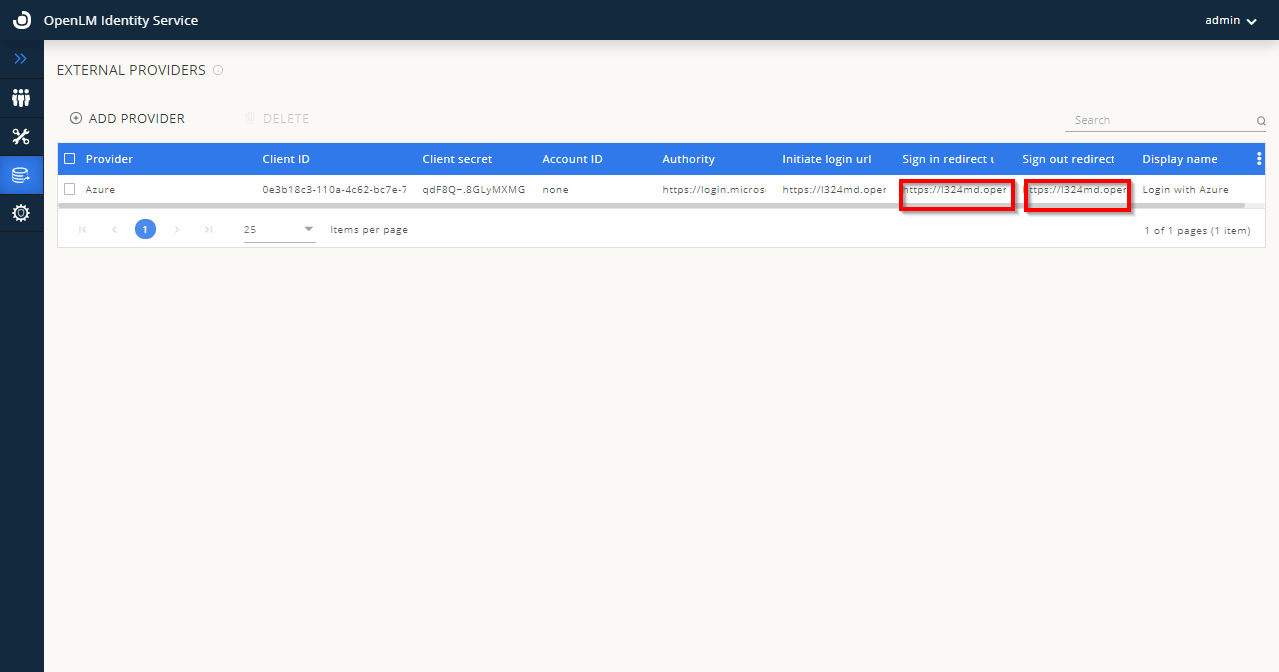
- After clicking Save, the following screen will appear. The added External Provider (Azure) is displayed in the External Providers list with the following details as shown on the screen below. Note the fields marked in red:
- Leave this window open for a while.
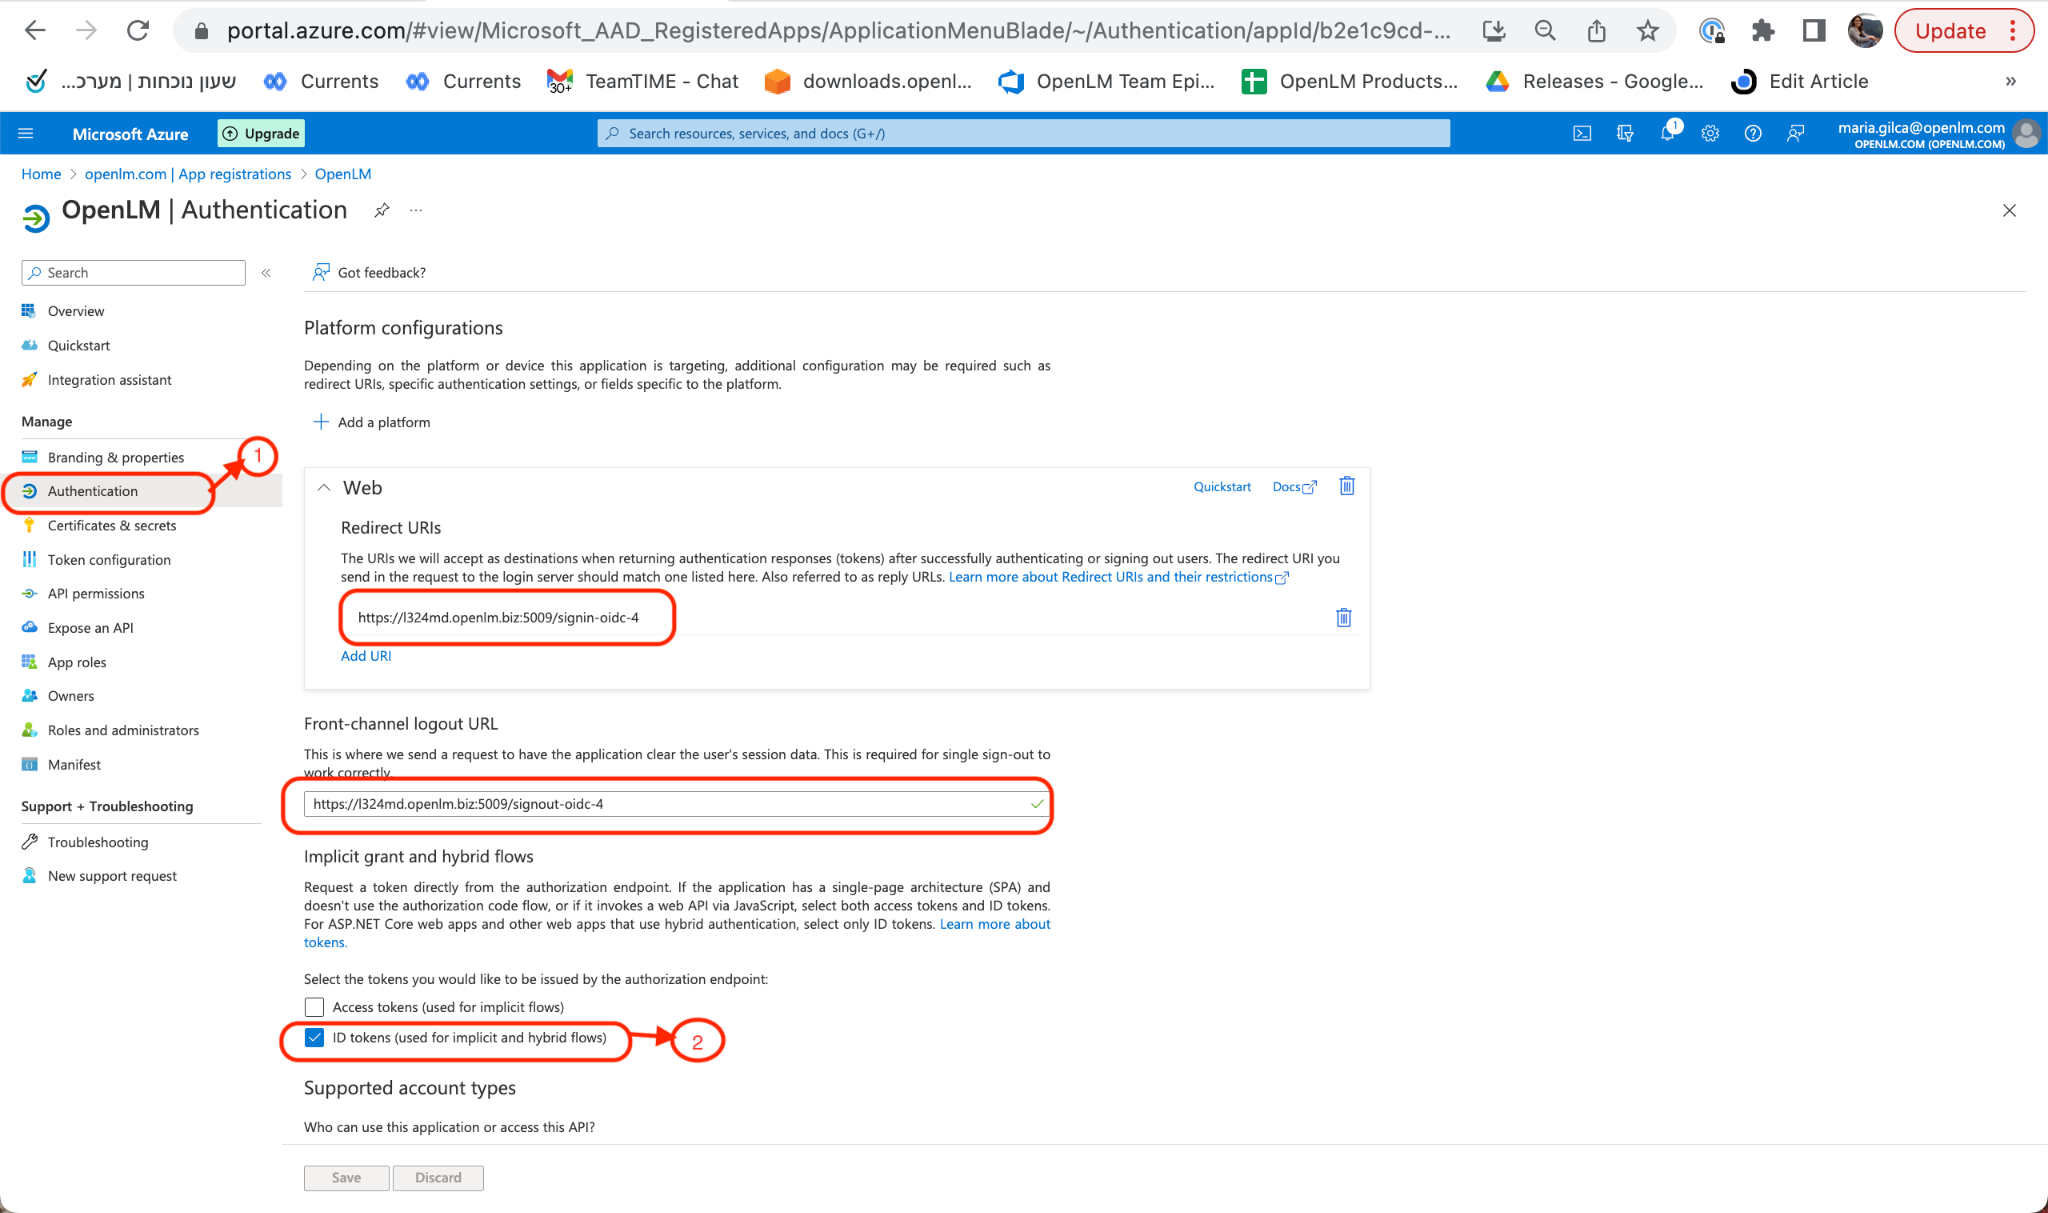
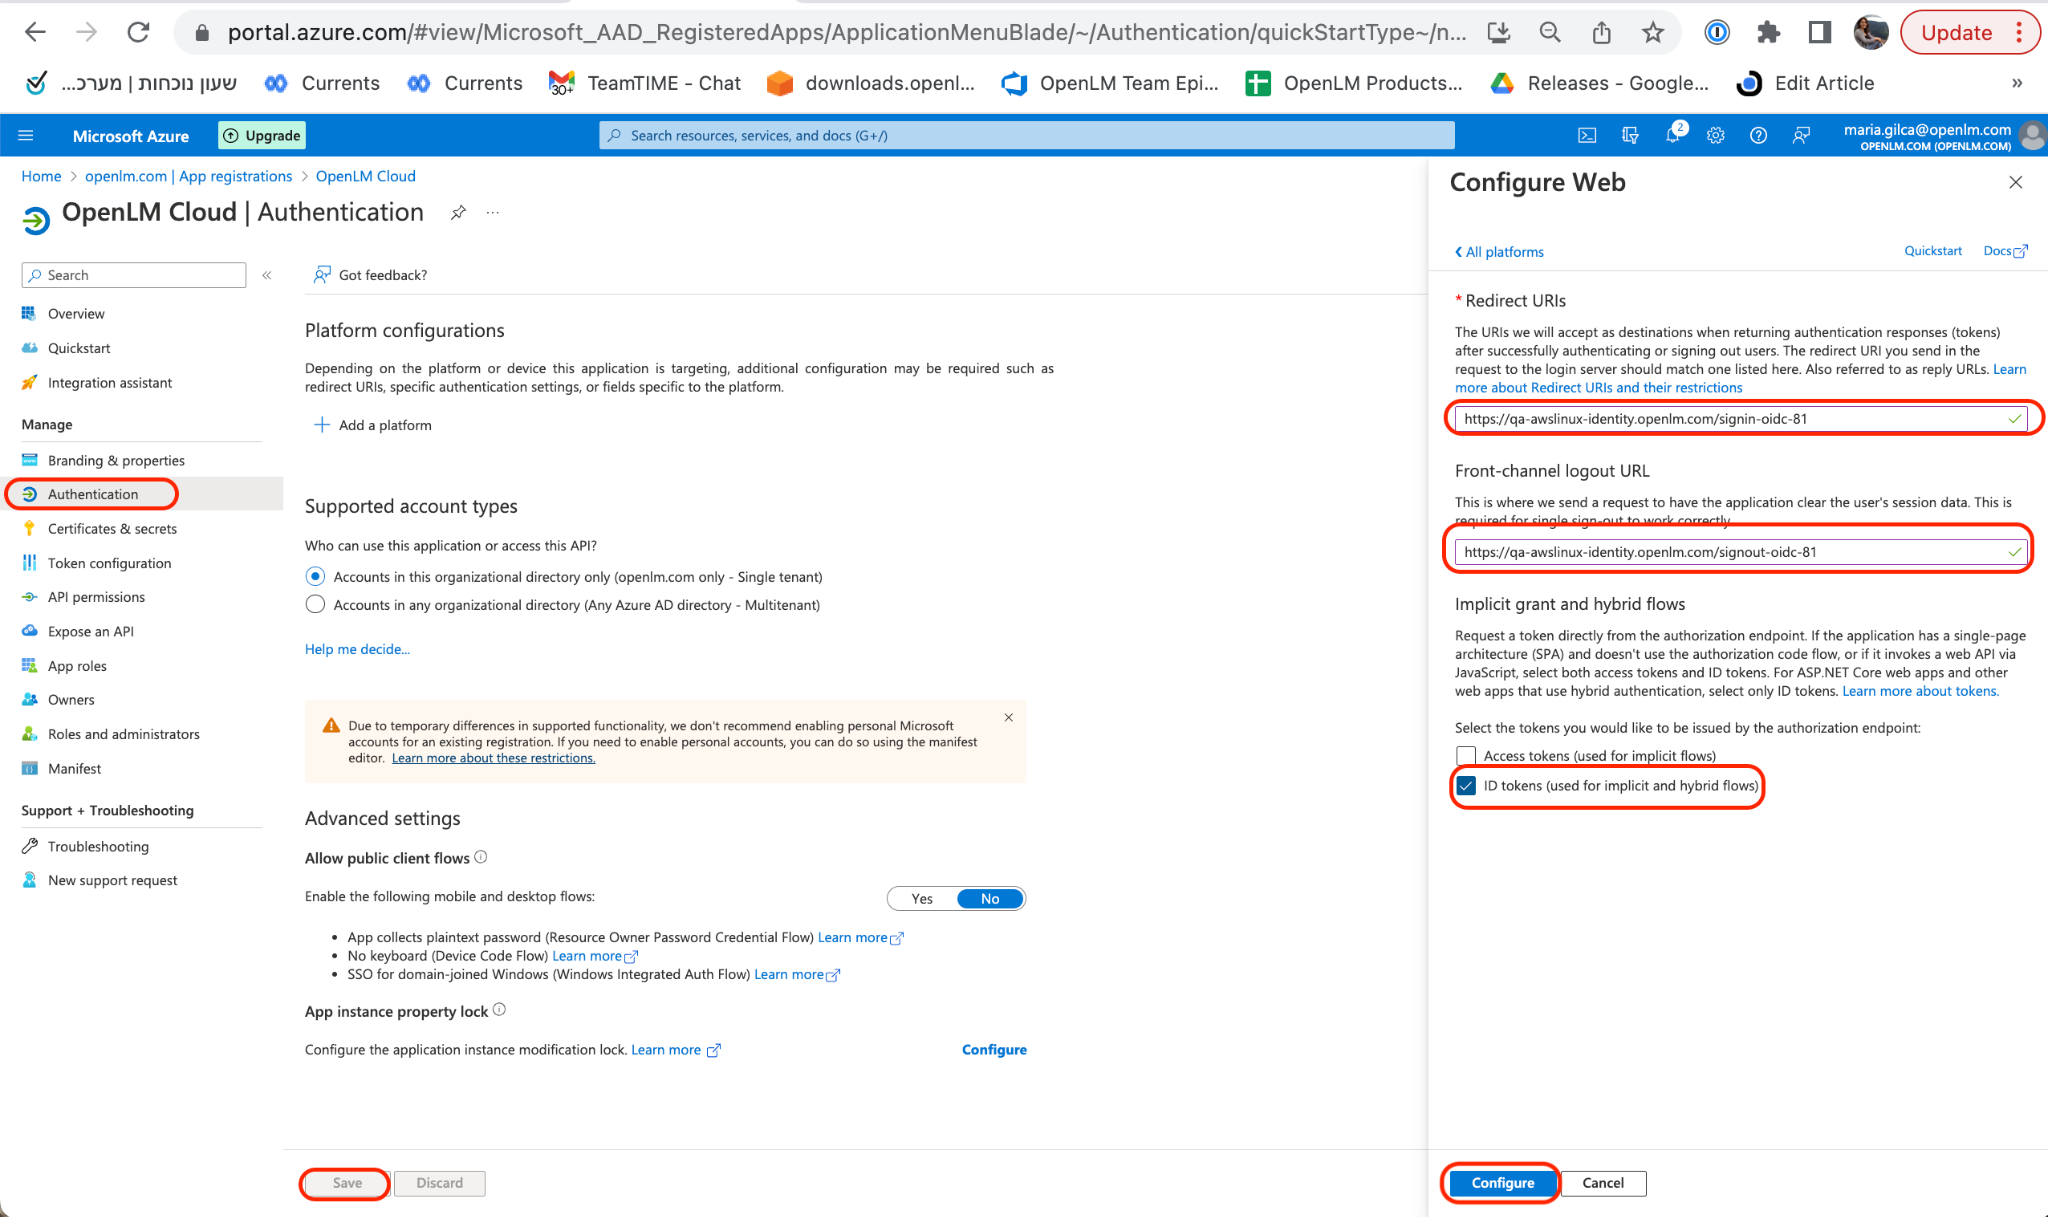
- Return to your Azure Active Directory account. Navigate to the Authentication section. Click Add Platform. Choose “Web” then provide the information for the Redirect URLs: Front-channel Logout URL and Web Redirect URL. Check the ID Tokens and choose who can use this application. Click Configure then Save.Note: The Redirect URLs are required to be taken from OpenLM Identity Service UI (as shown in the image, in step 9 above) when adding a new external provider.
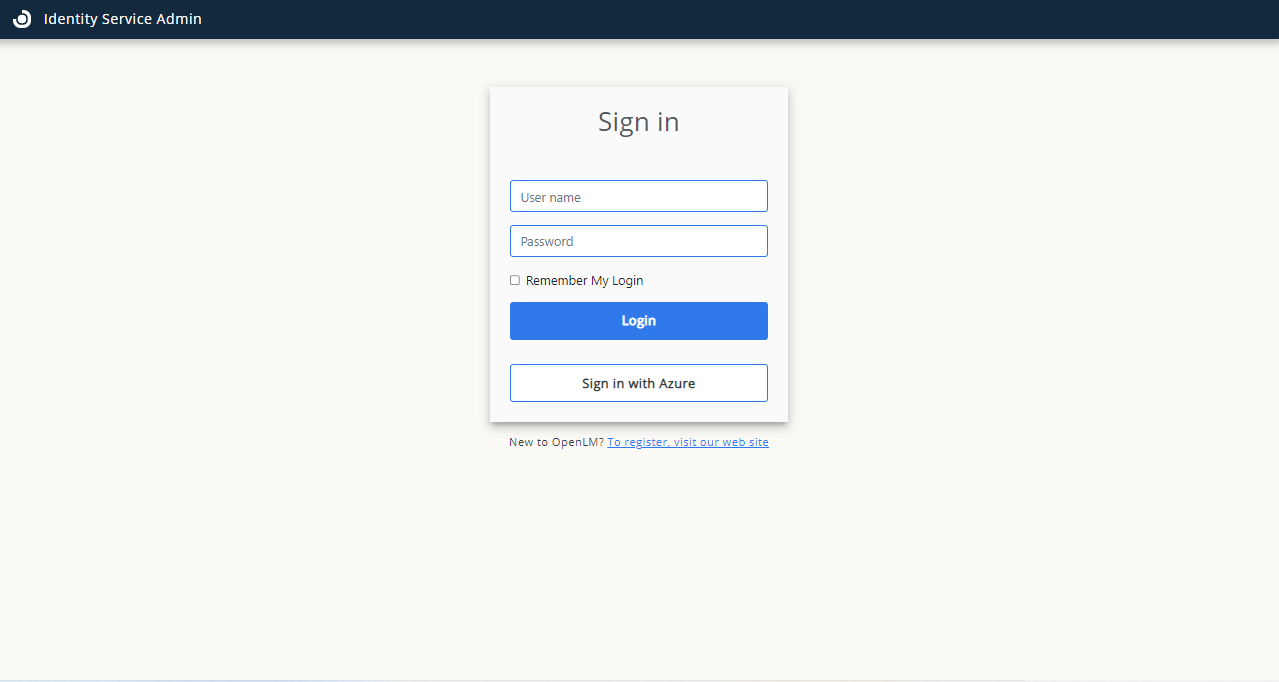
- Navigate to your Identity Service account. Log out. The Azure Login button has appeared as a login option:
OpenLM Cloud Users – Configure Azure Active Directory as an external identity provider in Cloud Portal
- Navigate to your OpenLM Cloud Portal→External Providers tab. Click Add Provider.
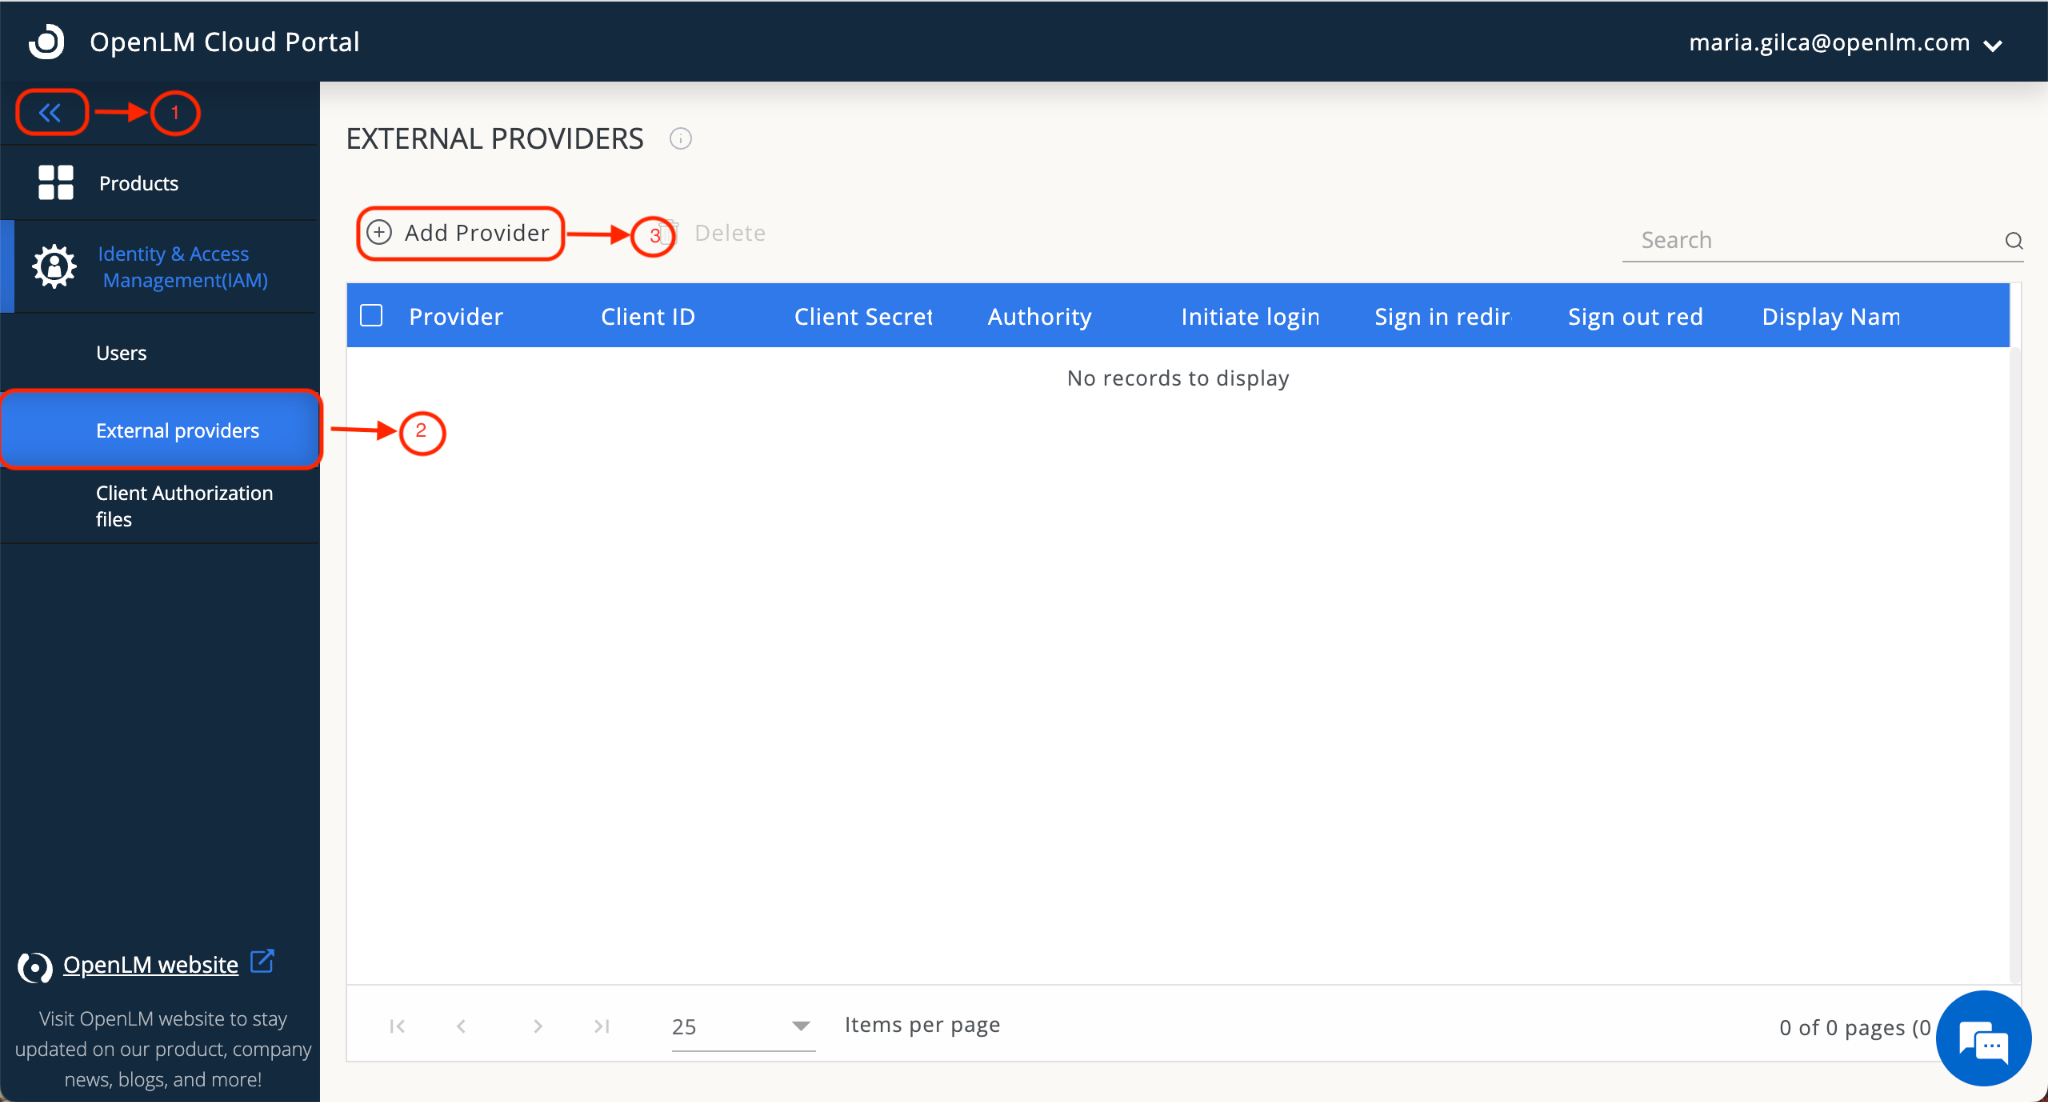
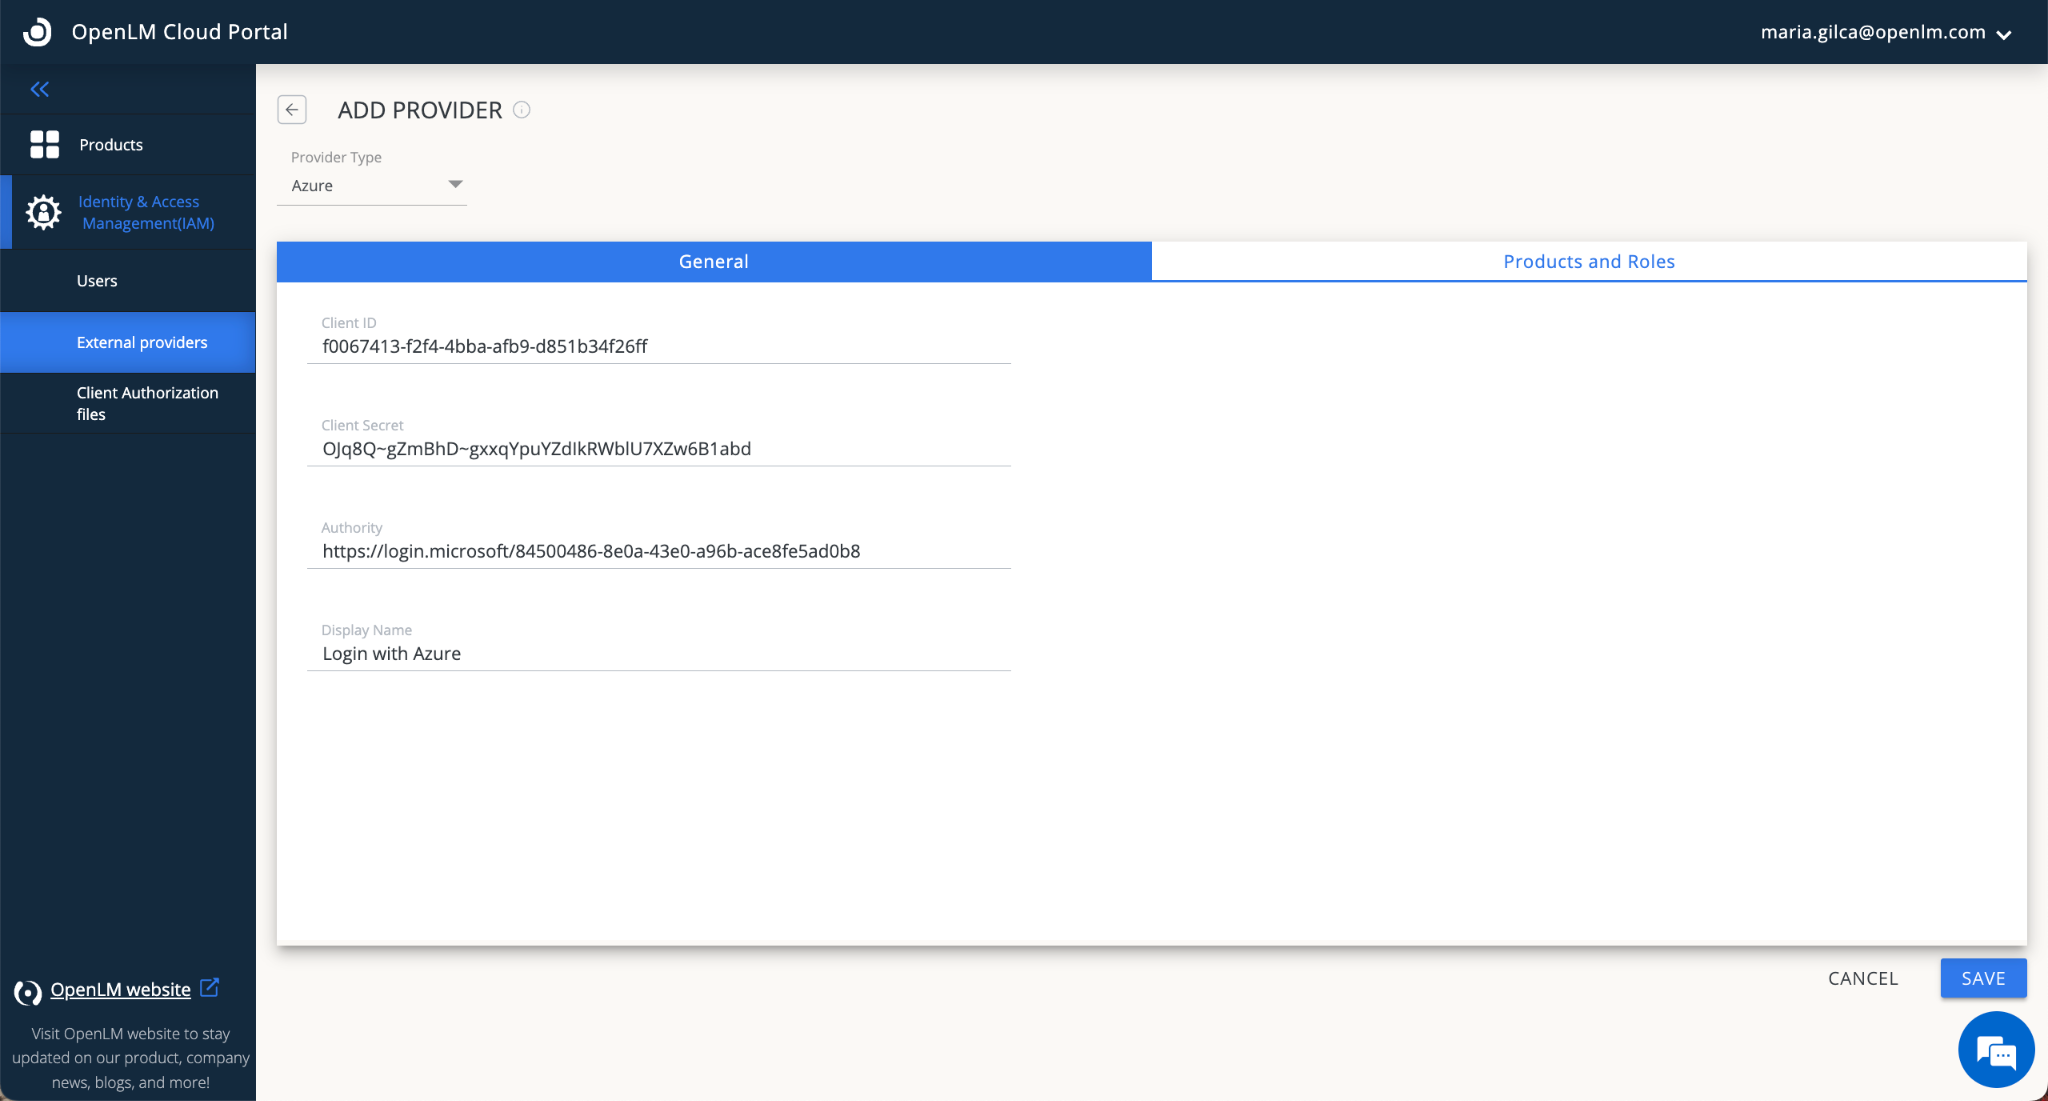
- Enter the Client ID in the Client ID field. Client ID is “Application (client) ID” (from AAD settings, as in step 5 of the section “IAzure Active Directory Configuration” above).
- Enter the Client Secret in the Client Secret field. Client Secret is “Value” (from AAD settings, as in step 8 of the section “Azure Active Directory Configuration” above).
- In the Authority field, input https://login.microsoftonline.com/{Directory (tenant) ID} (the tenant ID is Directory (tenant) ID from AAD settings, as in step 5 of the section “Azure Active Directory Configuration” above).
- Input the display name, e.g “Login with Azure”.
- Click SAVE.
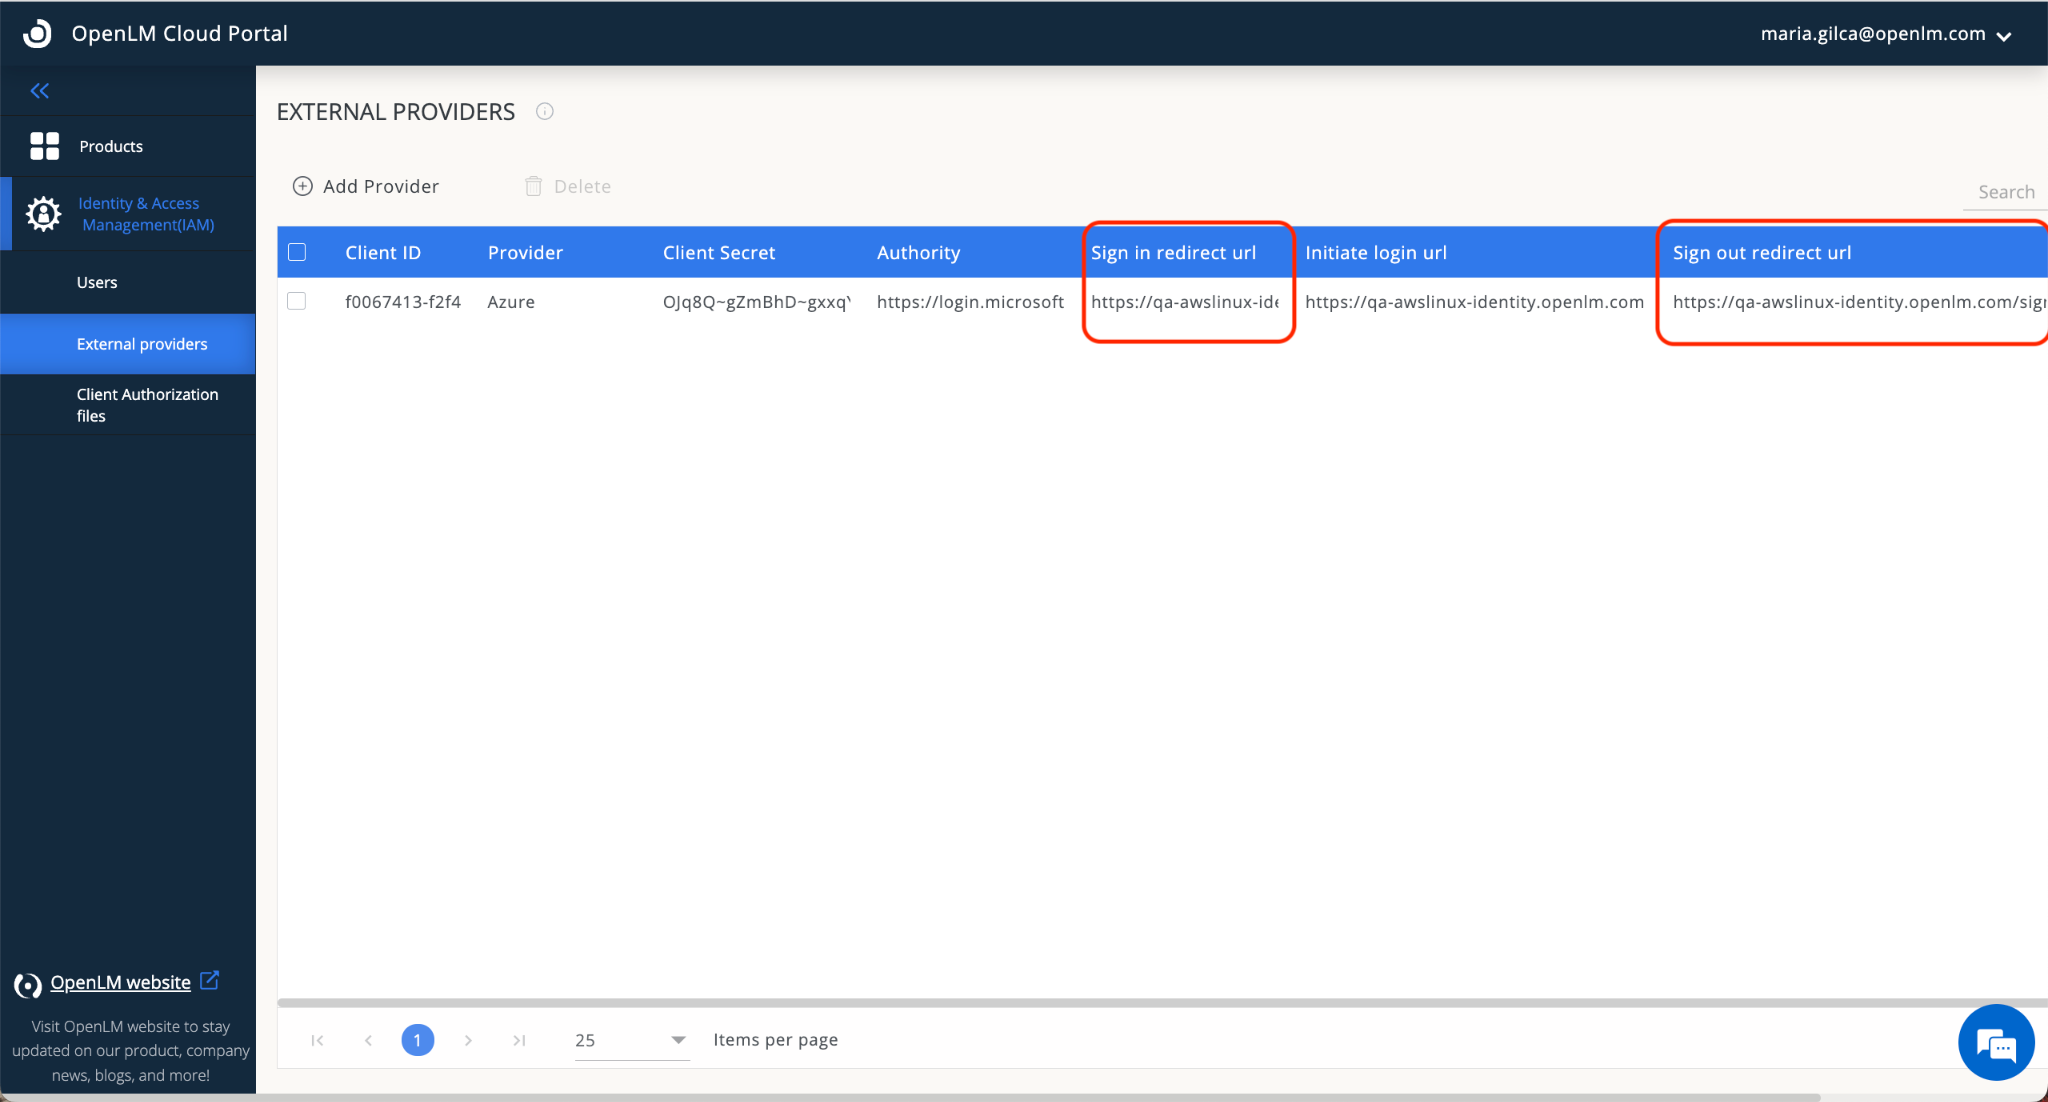
- After clicking Save, the following screen will appear. The added External Provider (Azure) is displayed in the External Providers list with the following details as shown on the screen below. Note the fields marked in red:
- Leave this window open for a while.
- Return to your Azure Active Directory account. Navigate to the Authentication section. Click Add Platform. Choose “Web” then provide the information for the Redirect URLs: Front-channel Logout URL and Web Redirect URL. Check the ID Tokens and choose who can use this application. Click Configure then Save.Note: The Redirect URLs are required to be taken from OpenLM Cloud Portal (as shown in the image, in step 7 above) when adding a new external provider.
- Go to your Cloud Portal. Click on your username (upper right corner) to see your profile information.
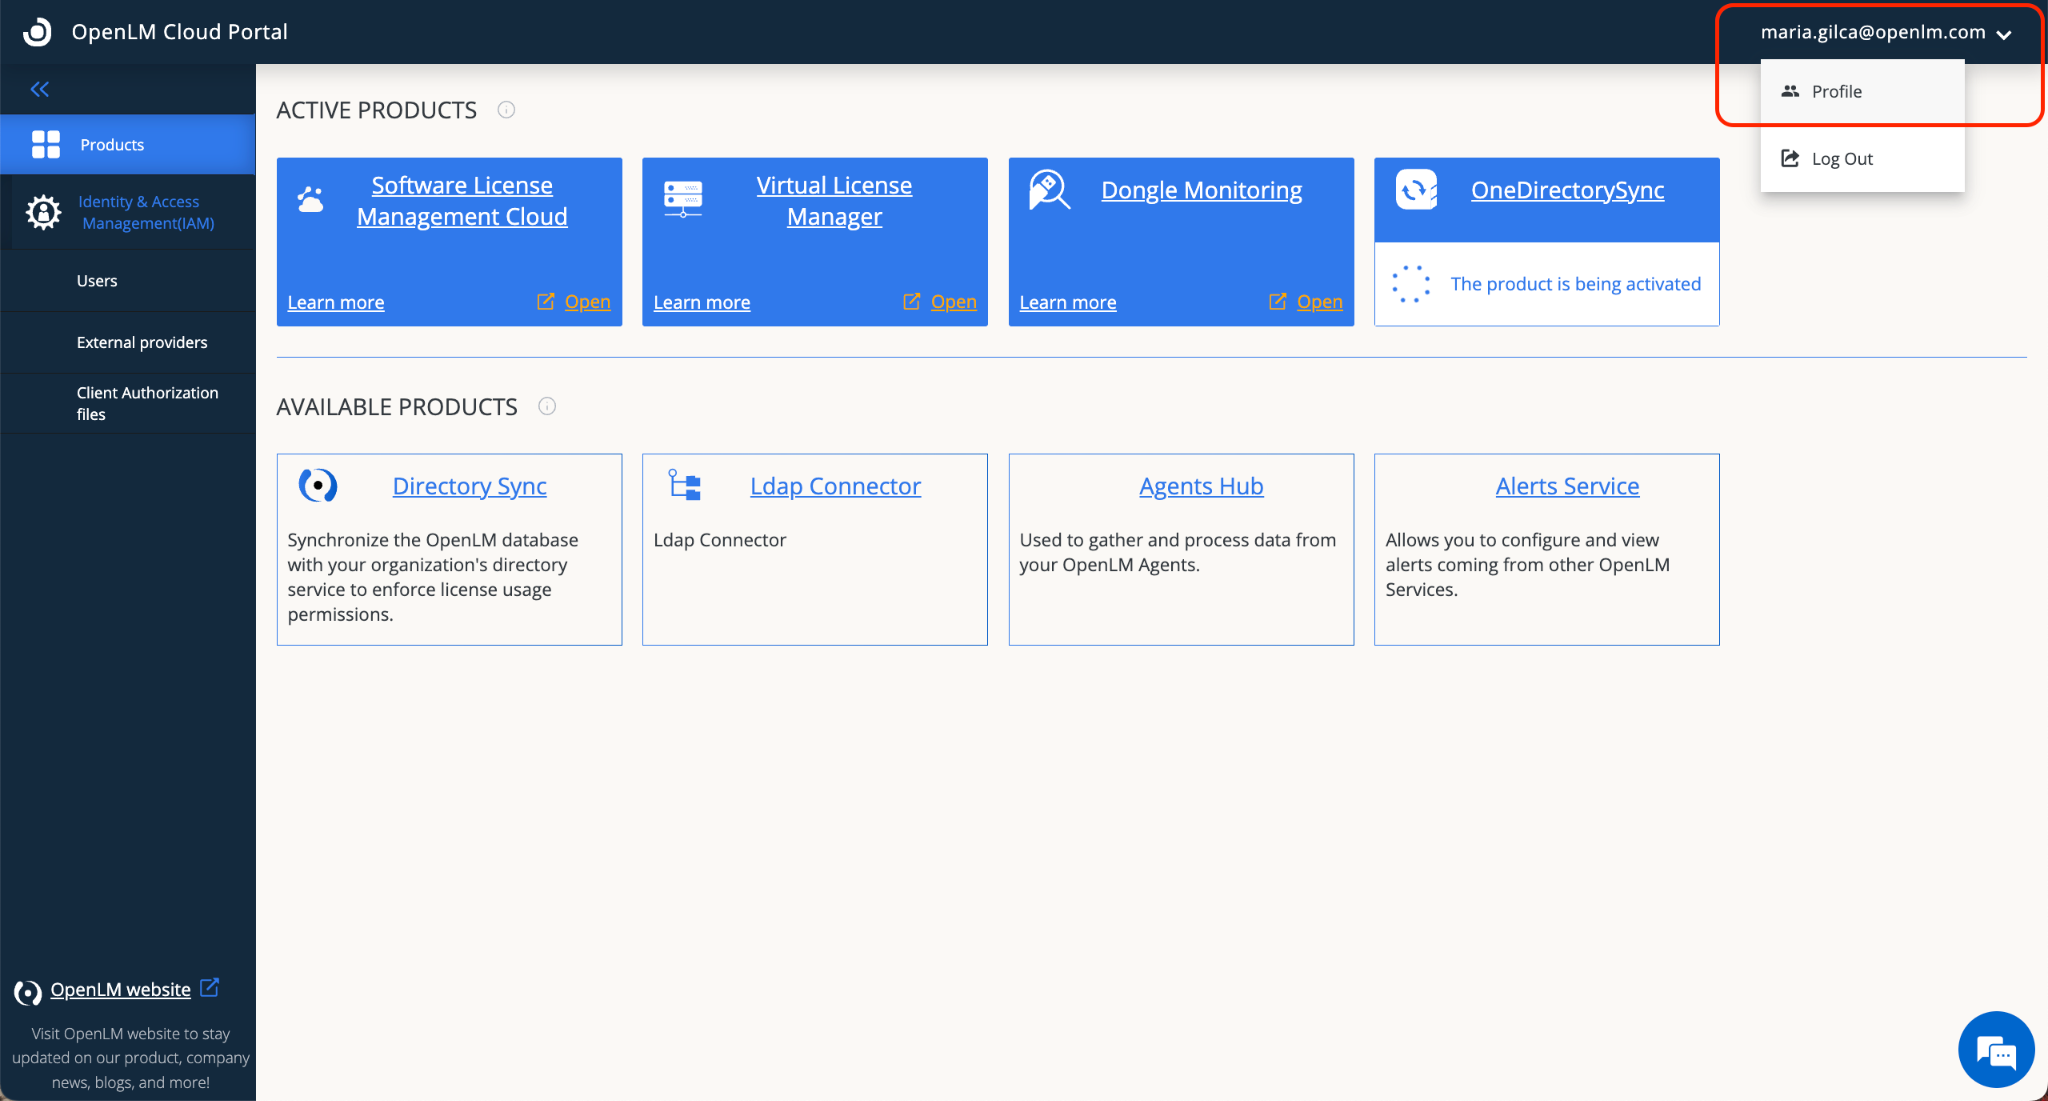
- Note and copy your OpenLM account ID.
- To access the OpenLM Cloud account using Azure Active Directory you need to create the following address, either
https://cloud.openlm.com/portal?loginAccountId=your OpenLM account ID
or
https://eu-cloud.openlm.com/portal?loginAccountId=your OpenLM account ID
Pro-tip: please clear your cache before accessing the Cloud Portal with the new configuration.

