Intergraph Smart Licensing Cloud
This integration enables OpenLM to monitor Intergraph Smart® Licensing Cloud for license usage and statistics.
Requirements
- OpenLM Server v5.0 or higher installed on a machine in your organization.
- OpenLM Broker v4.11 or higher installed on any machine with internet access to the Intergraph Smart Licensing Cloud API.
Monitoring capabilities and features
| Feature | Resolution | License totals | License usage | Denials reporting | Borrowed license reporting | Expiration date reporting |
|---|---|---|---|---|---|---|
| Support | By second | ✔ | ✔ | ❌ | ❌ | ✔ |
OpenLM Broker configuration

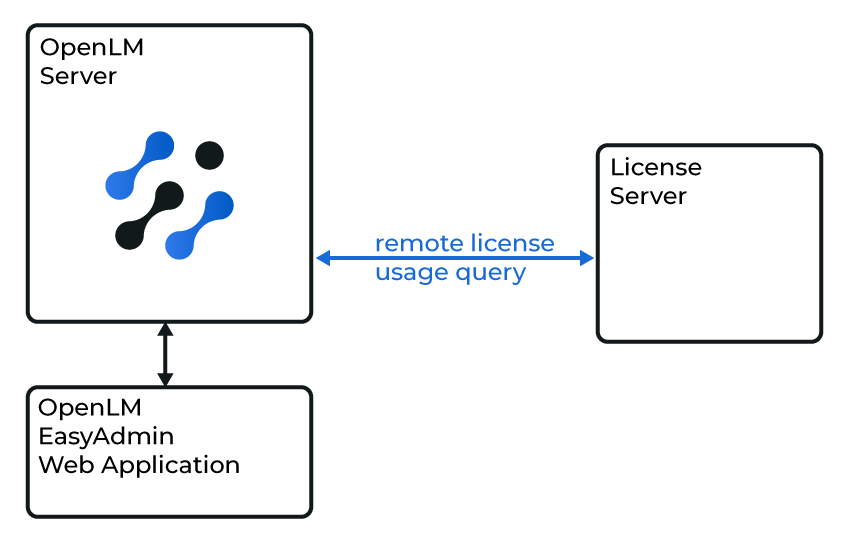
Diagram of how OpenLM interfaces with the Intergraph Smart Licensing Cloud.
OpenLM Broker communicates with the Intergraph Smart Licensing Cloud via its API. You must first create an API client in the Intergraph portal to obtain a Client ID and Client Secret.
note
OpenLM Broker must already be installed and configured to report to OpenLM Server before proceeding.
Obtain API client ID and secret
- Go to https://licensing.hexagonppm.com/.
- Log in with your credentials.
- Expand the left menu → click API Clients.
- Click the blue (+) button in the bottom-right corner to add a new client.
- Set token duration to 1 day → click OK.
- Record the generated Client ID and Secret.
Configure Broker
- Open OpenLM Broker Configuration (Windows Start → OpenLM → OpenLM Broker).
- Click Add Port.
- Enter any port number (value is irrelevant for this integration).
- Set License Manager Type to Intergraph.
- Click Apply.
- In a text editor, open the file
intergraph@XXXX.propertiesfrom the Broker folder (C:\Program Files\OpenLM\OpenLM Broker\), whereXXXXis the port number you defined. - Add the Client ID and Secret to:
oauth.client_id=your_client_id
oauth.client_secret=your_client_secret - Save the file.
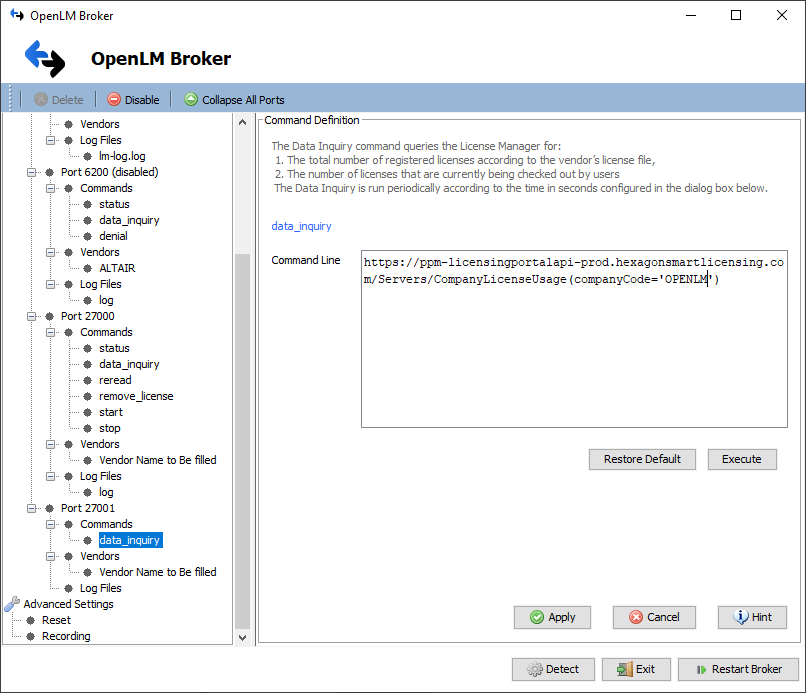
- In Broker Configuration, select the data_inquiry command under Commands.
- Replace
{$company_code}with your company code:
- Log in to the Licensing Portal.
- Click Live Usage in the sidebar.
- Select the relevant company.
- The title of the page contains your company code (e.g.,
OPENLM - All Cloud Locations). - If your company name contains spaces or special characters, follow the “Licensing Portal API Documentation” for escaping rules.
- Example command:
https://ppm-licensingportalapi-prod.hexagonsmartlicensing.com/Servers/CompanyLicenseUsage(companyCode='OPENLM')
- Click Apply → Restart Broker.
- Click Execute under data_inquiry to verify the query returns data.

OpenLM Server configuration
Automatic configuration via EasyAdmin
- Open EasyAdmin (Windows Start → OpenLM → OpenLM EasyAdmin User Interface).
- In the License Servers window, click the red row for the newly added Intergraph server.
- Click Approve.
The configuration is now active and visible in both EasyAdmin and the OpenLM Server configuration tool.
How to verify configuration
- Open EasyAdmin (or navigate to
http://<OpenLM Server host>:7019/EasyAdmin2/). - Go to Start → Widgets → License Servers.
- Confirm that the Intergraph Smart Licensing Cloud server appears with a green status indicator.
note
It may take up to 3 minutes for a new connection to appear as active.